allen roth 1789MR-22-201 22-in W x 30-in H Slate Blue Rectangular Framed Bathroom Vanity Mirror Instruction Manual
- June 8, 2024
- Allen+Roth
Table of Contents
- 1789MR-22-201 22-in W x 30-in H Slate Blue Rectangular Framed Bathroom
- PACKAGE CONTENTS
- SAFETY INSTRUCTIONS
- PREPARATION
- BEFORE YOU INSTALL, MAKE A CHOICE!!
- INSTALLATION INSTRUCTIONS
- CARE AND MAINTENANCE
- WARRANTY
- REPLACEMENT PARTS LIST
- Read User Manual Online (PDF format)
- Download This Manual (PDF format)
 welcoming
Instruction Manual
1789MR-22-201 22-in W x 30-in H Slate Blue Rectangular Framed Bathroom
Vanity Mirror
| MODEL NUMBER | DESCRIPTION |
|---|---|
| 1789MR-22-201 | AR 22-IN BROOKVIEW WHITE MIRROR |
| 1789MR-22-310 | AR 22-IN BROOKVIEW SLATE BLUE MIRROR |
| 1789MR-22-322 | AR 22-IN BROOKVIEW PINE MIRROR |
| 1789MR-22-323 | AR 22-IN BROOKVIEW ROYAL NAVY MIRROR |
| 1789MR-22-325 | AR 22-IN BROOKVIEW TRUE GRAY MIRROR |
22-IN MIRROR
ITEM #4136288; 5055519; 4136287; 4136290; 4136289
MODEL #1789MR-22-201; 1789MR-22-310; 1789MR-22-322; 1789MR-22-323;
1789MR-22-325
PACKAGE CONTENTS

| PART | DESCRIPTION | QUANTITY |
|---|---|---|
| A | Mirror | 1 |
| B | Mounting Hanger (preassembled to Mirror (A)) | 4 |
HARDWARE CONTENTS (NOT SHOWN ACTUAL SIZE)
SAFETY INSTRUCTIONS
Please read and understand this entire manual before attempting to assemble, operate or install the product.
CAUTION
- Before installation, carefully use scissors or utility knife to cut and unwrap all parts. Make sure you DO NOT discard the hardware.
- Follow these instructions closely, take your time, and use care while assembling this mirror.
KEEP THESE INSTRUCTIONS FOR FUTURE REFERENCE.
PREPARATION
Before beginning assembly of product, make sure all parts are present. Compare
parts with package contents list and hardware contents list. If any part is
missing or damaged, do not attempt to assemble the product.
Estimated Installation Time: 10 minutes.
Tools Required for Installation (not included): Phillips screwdriver, utility
knife or scissors.
Helpful Tools (not included): Measuring tape, level
BEFORE YOU INSTALL, MAKE A CHOICE!!
OPTION 1: Vertical Mounting.
OPTION 2: Horizontal Mounting.
INSTALLATION INSTRUCTIONS
-
Measure the distance between the holes in the mounting hangers (B) on the back of the mirror (A).

-
Measure and mark location for mounting hardware on the wall using the measurement from Step 1. Make sure the marks are level and located at the desired height.
Note: Make sure to allow height clearance along the bottom of the mirror for your faucet if necessary.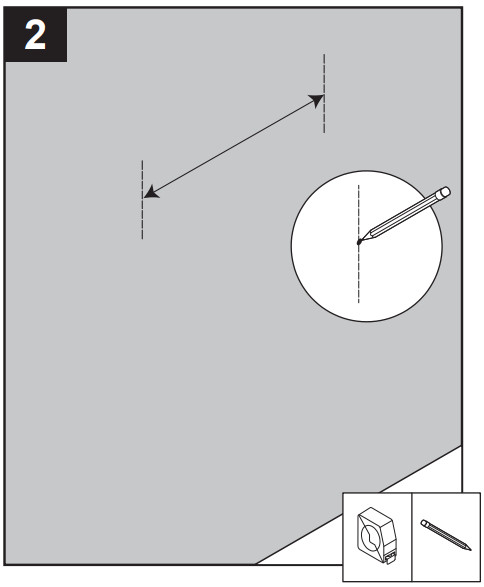
-
If the wall is drywall, there is no need to drill pilot holes for wall anchors (AA). Screw anchors (AA) flush into the wall. Then, insert screws (BB) into anchors (AA), leaving approximately 1/4 in. protruding out from the wall. If the wall is not drywall, please choose appropriate mounting hardware (not included) for your installation site, and follow the installation instructions to secure the mounting hardware to the wall.


-
With the assistance of another adult, lift mirror (A) to the wall and hang mounting hangers (B) on screws (BB).

CARE AND MAINTENANCE
- Dust the frame regularly with a soft, non-lint producing cloth or household dusting product.
- You can clean the mirror frame with a gentle, non-abrasive household cleaner.
- Make sure to dry the wood immediately with a soft cloth or towel.
- The glass can be cleaned using standard household glass cleaning agents.
- Tips for using touch-up pen (CC): For scratches, stroke in direction of scratch; for worn areas, stroke in direction of wood grain. Rub off excess colorant promptly with a soft cloth.
WARRANTY
The manufacturer warrants this item against defects in materials and
workmanship for a period of one (1) year from the date of original retail
purchase. This warranty applies only to the original purchaser. This warranty
does not apply to any damage on the product by accident, misuse, or modified,
improper installation or by affixing accessories not produced by the
manufacturer. The manufacturer is not accountable whatsoever for product
installation during the warranty period.
There is no further expressed warranty. The manufacturer shall not be legally
responsible for incidental, consequential or special damages arising at or in
connection with product use or performance except as may otherwise be accorded
by law. The manufacturer disclaims any and all implied warranties.
REPLACEMENT PARTS LIST
For replacement parts, call our customer service department at 866-439-9800, 8 a.m. – 8 p.m., EST, Monday – Sunday.

| PART | DESCRIPTION | PART# |
|---|---|---|
| B | Mounting Hanger | PU16-1.75×1-MH |
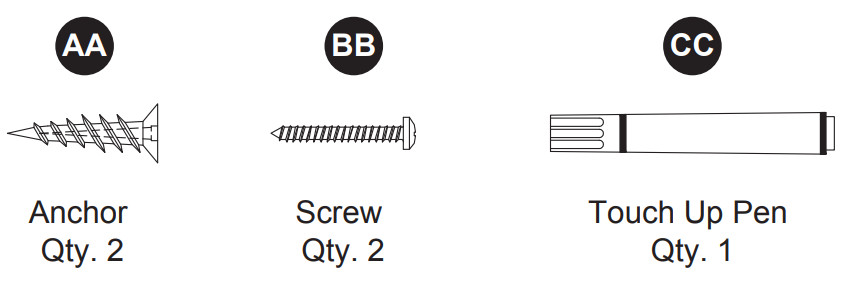
| AA | Anchor | |
| BB | Screw | |
| CC | Touch-up Pen (1789MR-22-201) | OF 0010 |
| Touch-up Pen (1789MR-22-310) | M-1128 | |
| Touch-up Pen (1789MR-22-322) | M-0066 | |
| Touch-up Pen (1789MR-22-323) | OX-0180Y | |
| Touch-up Pen (1789MR-22-325) | OF-0120R |
ATTACH YOUR RECEIPT HERE
Serial Number__
Purchase Date__
Questions, problems, missing parts? Before returning to your retailer, call
our customer service
department at 866-439-9800, 8 a.m. – 8
p.m., EST, Monday – Sunday.
Read User Manual Online (PDF format)
Read User Manual Online (PDF format) >>