allen roth KPD8901AX-01 Blidge Brushed Gold Traditional Alabaster Glass Instruction Manual
- June 2, 2024
- Allen+Roth
Table of Contents
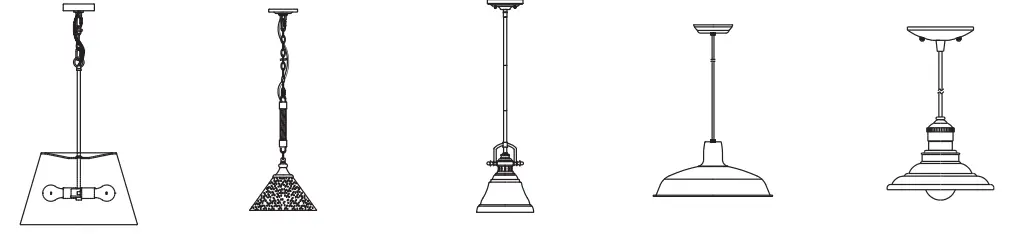
allen roth KPD8901AX-01 Blidge Brushed Gold Traditional Alabaster Glass
ALLEN + ROTH and logo design are trademarks or registered trademarks of LF,
LLC. All rights reserved.
MODEL/MODELO #KPD8901AX-01 GD/ KPD8901AX-01 BN
Thank you for purchasing this allen + roth product. We’ve created these easy-
to-follow instructions to ensure you spend your time enjoying the product
instead of putting it together. But, if you need more information than what is
provided here, please visit Lowes.com, search the item number and refer to the
Guides & Documents tab on the product’s page.
If you have any questions or problems, please call our customer service
department at 866-439-9800, 8 a.m. – 8
p.m., EST, Monday – Sunday. You could also contact us at
partsplus@lowes.com.
PREPARATION
Before beginning assembly of product, make sure all parts are present. Compare
parts with package contents list and hardware contents list. If any part is
missing or damaged, do not attempt to assemble the product.
Estimated Assembly Time: 20-30 minutes.
TOOLS REQUIRED
(NOT INCLUDED)/ HERRAMIENTAS NECESARIAS (no se incluyen):

FEELING CONFIDENT?
START YOUR NEXT PROJECT
- Visit lowes.com for more information.
TROUBLESHOOTING
| PROBLEM | POSSIBLE CAUSE | CORRECTIVE ACTION |
|---|---|---|
| Bulb will not light |
- Bulb is burned out
- Faulty wire connection
|
- Replace light bulb.
- Check wiring
CARE AND MAINTENANCE
- Shut off main power before cleaning light with damp cloth or window cleaner. Do not use abrasive cleansers
WARRANT
- The manufacturer warrants all of its lighting fixtures against defects in materials and workmanship for one (1) year limited from the date of purchase.
SAFETY INFORMATION
Please read and understand this entire manual before attempting to assemble, operate or install the product.
WARNING
- Some metal parts in the fixture may have sharp edges. To prevent cuts and scrapes, wear gloves when handling the parts
- Account for small parts and destroy packing material, as these may be hazardous to children
- Assistance may be required to support fixture during installation.
CAUTION
- Connect fixture to supply wires rated for at least 167˚F.
- Workable for dimming circuits when using appropriate light bulbs with dimmable function.
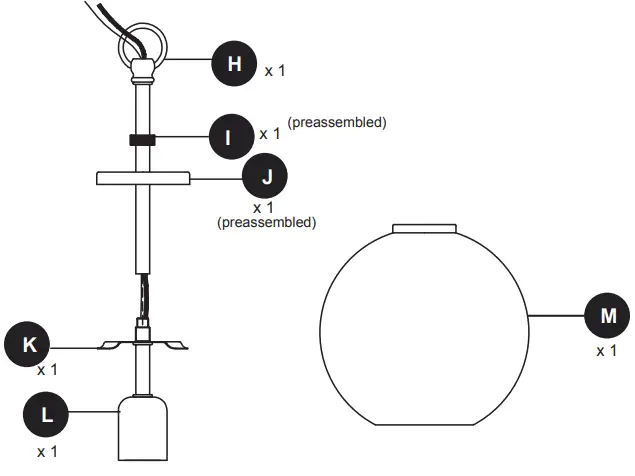
PACKAGE CONTENTS
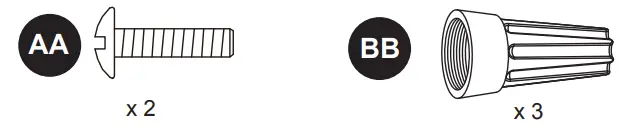
HARDWARE CONTENTS
INSTALLATION OVERVIEW
| Turn off the power and remove
existing fixture.
---|---
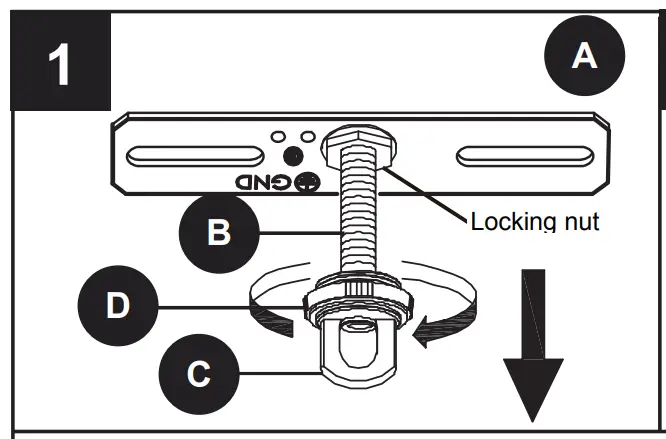
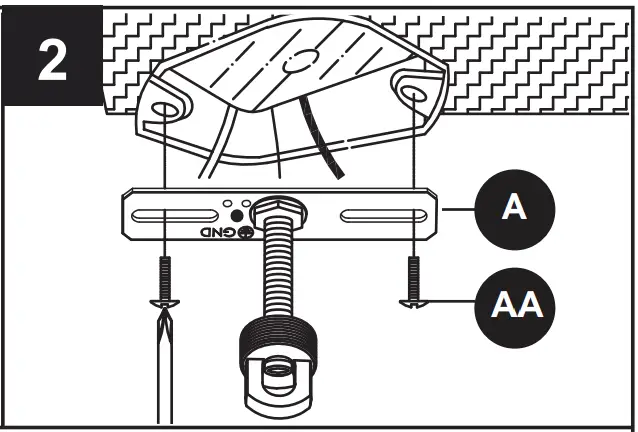
| Unscrew nut D from screw collar loop C. Attach A to outlet box using AA.
Temporarily place E through B to determine amount of adjustment necessary for
B.
Use pliers (not included) to tighten locking nut on B until locking nut
touches A
---|---
| Temporarily place E through B to determine amount of adjustment necessary
for B
---|---

| Unscrew the K/D rings F from chain G. Adjust chain G to
desired length. Spread the chain link using standard pliers
(not included) and screw driver (not included) and twist chain link in
opposite direction and remove the extra chain lengths.
---|---
| Weave electrical wires and ground wire up chain G, through nut D, through
canopy E, through the screw collar loop C, through threaded tube B, and into
outlet box
---|---
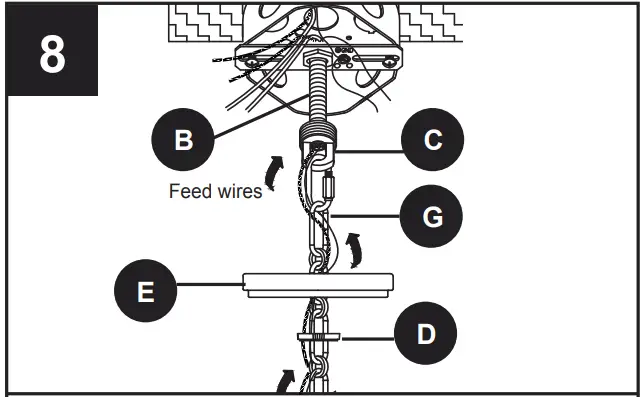
| Feed wires. Twist stripped ends of the white, ribbed or tinned wire without
writing from the fixture evenly against the white wire from the outlet box.
Connect the black, smooth or un-tinned wire with writing from the fixture to
the black wire from the outlet box in the same manner. Snip ends. Attach
copper wire to ground wire
---|---
| Attach BB to connections with electrical tape (not included).
---|---
| Lift E up over C, securing in place with previously removed D
---|---
| Install light bulb(not included). Use 60-watt max. standard-base
incandescent bulb or CFL/LED equivalents.
---|---
Read User Manual Online (PDF format)
Read User Manual Online (PDF format) >>