StrikeMaster 24V Lithium Ion Battery Charger User Guide
- June 6, 2024
- StrikeMaster
Table of Contents
![]()
StrikeMaster 24V Lithium Ion Battery Charger

TOLL-FREE HELPLINE: 1-877-572-7278
| LIGNE DE SECOURS: 905-571-3001
(Monday – Friday / 8am – 4:30pm CST)
READ ALL SAFETY RULES AND INSTRUCTIONS CAREFULLY BEFORE OPERATING
PRODUCT SPECIFICATIONS
COMPONENTS
- StrikeMaster Lithium 24v Battery Charging Base
- Input: 120V AC 50/60Hz 1.0A
- Output: 24V DC 2.0A
- Weight: 1.48 lbs., (0.67 kg)
STRIKEMASTER® LITHIUM 24v BATTERY CHARGING BASE QUICK START

-
Remove Lithium 24v Battery Charging Base from carton (Image 1).
-
Unpack the 24v Battery Charging Base from carton and plug it in. Slide Battery onto Battery Charging Base using the channels on both sides as a guide. Press down until you hear it click in place. Leave Battery on Battery Charging Base until fully charged (Image 2).
NOTE: Battery is not fully charged when first removed from box. -
When Battery Charging Base indicator shows solid green, your Battery is fully charged (Image 3). Your StrikeMaster Lithium 24v Battery is ready for use.
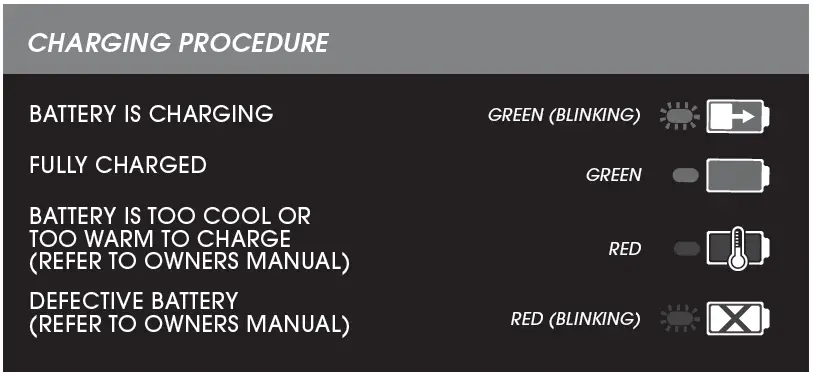
Your StrikeMaster Lithium 24v Battery Charging Base has built in “Smart Charging Technology”. The chart below shows you the correct charging procedure/occurrences that could be experienced while charging. -
Your Battery must be charged in a location where the temperature is more than 35°F/2°C, but less than 100°F/38°C.
CHARGING PROCEDURE
IMPORTANT SAFETY INSTRUCTIONS
- SAVE THESE INSTRUCTIONS – DANGER: TO REDUCE RISK OF FIRE OR ELECTRICAL SHOCK CAREFULLY OBEY THESE INSTRUCTIONS.
- Confirm the voltage available at each country location before using the charger.
- The LTV-CB(CA) is meant for use with 110 to 120 VAC only.
- DO NOT allow liquid inside the charger.
- DO NOT try to use the charger for any other purpose than what is presented in this manual.
- Unplug the charger before cleaning and when there is no battery pack in the charger.
- Do not try to connect two chargers together.
- Do not use the charger in the circumstances that the output Polarity does not match the load polarity.
- For indoor use only.
- The charger may under no circumstances be opened. If the charger is damaged, then the charger may no longer be used.
- LTV-CB is only to be used with LTV-B.
WARNING
To avoid risk of fire, electrical shock, or electrocution:
- Do not use a damp cloth or detergent on the battery or battery charger.
- Always remove the battery pack before cleaning, inspecting, or performing any maintenance on the tool.
SPECIAL RULES FOR CHARGER
This device complies with Part 15 of the FCC Rules. Operation is subject to the following two conditions:
- This device may not cause harmful interference.
- This device must accept any interference received, including interference that may cause undesired operation.
CAUTION
Changes or modifications not expressly approved by the party responsible for
compliance could void the user’s authority to operate the equipment.
NOTE
This equipment has been tested and found to comply with the limits for a Class
II digital device, pursuant to Part 15 of the FCC Rules.
These limits are designed to provide reasonable protec-tion against harmful
interference in a residential instal-lation. This equipment generates, uses
and can radiate radio frequency energy, and if not installed and used in
accordance with the instructions, may cause harmful interference to radio or
television reception, The reception can be determined by turning the equipment
off and on, the user is encouraged to try to correct the interference by one
or more of the following measures:
- Reorient or relocate the receiving antenna.
- Increase the separation between the equipment and the receiver.
- Connect the equipment into an outlet on a circuit different from that to which the receiver is connected.
- Consult the dealer or an experienced radio/TV technician for help.
SYMBOLS ON THE PRODUCT
You can use below symbols on the machine. Please study them and learn their
definitions. Correct interpretation of these symbols let you operate the tool
better and safer.
| Symbol | Explanation |
|---|---|
| Class II |
| For indoor use only
| Before charging, read the instructions
| Fuse
| Precautions that involve your safety.
RECYCLE
The following symbol words and meanings are intended to explain the levels of
risk associated with this product.
CALIFORNIA PROPOSITION 65
WARNING
This product contains a chemical known to the state of California to cause
cancer, birth defects or other reproductive harm. Some dust created by power
sanding, sawing, grinding, drilling, and other con-struction activities
contains chemicals known to cause cancer, birth defects or other reproductive
harm. Some examples of these chemicals are:
- Lead from lead-based paints;
- Crystalline silica from bricks and cement and other masonry products;
- Arsenic and chromium from chemically treated lumber.
Your risk of exposure to these chemicals varies depending on how often you do this type of work. To reduce your exposure to these chemicals, work in a well- ventilated area, and work with approved safety equipment, such as dust masks that are specially designed to filter out microscopic particles.
EXAMINE THE LTV-CB CHARGING BASE
If the battery pack does not charge correctly:
- Examine the current of the power outlet with different machines. Make sure that the outlet works.
- Examine that the charger contacts are not short-circuited.
If the charger is not under usual room temperature, move the charger and battery pack to a location where the temperature is between 35˚F(2˚C) and -100˚F(38˚C).
WARNING
If you put the battery pack into the charger in cold or hot environment, the
charger LED light is red. Remove battery pack and allow temperature to arrive
at recommended charging range.
MOUNT THE LTV-CB CHARGING BASE
- Locate on wall where to mount the charger.
- Use 2 wood screws to attach the charger on the wood studs or anchors and screws to mount to drywall.
- Drill two paralleled holes 2 3/8” (60 mm) on center.
- Use wall anchors and screws to attach the charger to the drywall. Hardware not included.
OPERATION OF LVT-CB CHARGING BASE
CHARGE PROCEDURE
- Connect the plug of charger to an AC power outlet.
- Insert battery pack onto charger.

This is a diagnostic charger. The Charger LED Light (3) illuminates in a specified order to show the current battery status. They are as follows:

NOTE
If you do not use the battery pack and charger for a long time, please remove
the battery from the charger and unplug from power source.
MAINTENANCE
CLEANING THE MACHINE
NOTE
Keep the air vent free of blockage, dust, and debris. Do not spray, wash or
submerge in water.
- Clear the unwanted material out of the air vent with a vacuum.
- Clean housing and the plastic components with a dry, soft cloth.
STOW THE MACHINE
Remove the battery pack before you store the charger and disconnect the
charger from power source .
TROUBLESHOOTING
| PROBLEM | POSSIBLE CAUSE | SOLUTION |
|---|---|---|
| Charger doesn’t work. Charger shows defective mode. (LED flashes Red) | Battery |
pack or charger is defective or there is a bad connection between the battery
pack and charger.| Try to remove and reinsert the battery pack in the charger.
Try charging a different battery pack.
Unplug the charger and wait until the red LED goes out, then reconnect the
plug to the power supply.
Replace defective battery pack.
Charger doesn’t work. Charger shows evaluation mode (LED indicates Red solid
ON).| Battery pack is either too hot, or too cold.| ****
Allow the battery pack to reach normal temperature. Charging will begin when the battery pack returns to 35˚F(2˚C) and -100˚F(38˚C).

2-YEAR LIMITED WARRANTY
CHARGING BASE WARRANTY
StrikeMaster® hereby warranties this product, to the original purchaser with
proof of purchase, for a period of two (2) years against defects in materials,
parts or workmanship. Batteries must be charged in accordance with the owner’s
manuals directions and regulations in order to be valid. StrikeMaster, at its
own discretion will repair or replace any and all parts found to be defective,
through normal use, free of charge to the customer. This warranty is valid
only for units which have been used for personal use that have not been hired
or rented for industrial/ commercial use, and that have been maintained in
accordance with the instructions in the owner’s manual supplied with the
product from new.
ITEMS NOT COVERED BY WARRANTY
- Any part that has become inoperative due to misuse, commercial use, abuse, neglect, accident, improper maintenance, or alteration; or
- The unit, if it has not been operated and/or maintained in accordance with the owner’s manual; or
- Normal wear;
- Routine maintenance;
- Normal deterioration of the exterior finish due to use or exposure.
TRANSPORTATION CHARGES
Transportation charges for the movement of any power equipment unit or
attachment are the responsibility of the purchaser. It is the purchaser’s
responsibility to pay transportation charges for any part submitted for
replacement under this warranty unless such return is requested in writing by
StrikeMaster.
REGISTER YOUR PRODUCT ONLINE TO ACTIVATE YOUR WARRANTY www.strikemaster.com/warranty
10395 Yellow Circle Drive • Minnetonka, MN 55343
TOLL-FREE HELPLINE: 1-877-572-7278
(Monday – Friday / 8am – 4:30pm CST)
www.strikemaster.com
LIGNE DE SECOURS: 905-571-3001
(Lundi-Vendredi / 8am – 4:30pm CST)
www.strikemaster.com
©2020 StrikeMaster, Inc. August 2020
Read User Manual Online (PDF format)
Read User Manual Online (PDF format) >>