Kirisun T350 PoC Radio User Guide
- June 5, 2024
- Kirisun
Table of Contents
T350 PoC Radio
Quick Guide
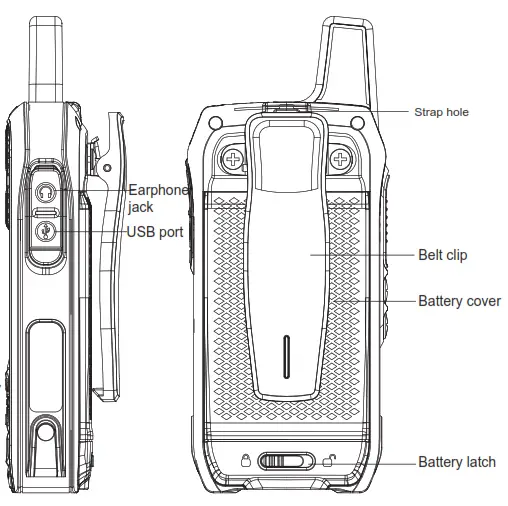
Appearance
 | 
---|---
Attachments
| No. | Name |
|---|---|
| 1 | Radio |
| 2 | Battery |
| 3 | USB cable |
| 4 | Power adapter |
| 5 | Quick Guide |
| 6 | Safety Information |
| 7 | Strap |
| 8 | Desktop charger (optional) |
Charging the Battery
Method 1: Charging through Micro USB Cable
- Connect the power adapter to an AC power socket as required.
- Power off the radio. Connect one end of the micro USB cable to the power adapter, and the other end to the USB port on the radio.
The red indicator light is on.
Method 2: Desktop charger
- Plug the power adapter into a qualified AC power socket.
- Connect the USB cable of the power adapter to the USB port at the back of the desktop charger. Green indicator light is on.
- Insert the battery only or together with the radio into the desktop charger.
- Make sure the battery contacts the charging points properly and red indicator light is on.
- When the indicator light turns from red to green, charging is finished.

Installing the Battery
- Press the upper part of the belt clip gently so that it springs up. (Figure ①)
- Unlock the battery latch by pushing it to the right, pull the buckle of the battery cover using your fingers, and then remove the battery cover. (Figure ②)
- Install the battery into the holder in the indicated direction. Make sure it is placed properly. (Figure ③)
- Press the lower part of the battery gently to put it in position, put back the battery cover, and lock the battery latch by pushing it to the left. (Figure ④)

Installing SIM Card
- Remove the battery and find the SIM card holder in the upper part of the battery holder. Push the cover of the SIM card holder rightwards and then open the cover.
- Insert a Nano-SIM card into the guide slot of the cover, and make sure the card is in position.
- Press the cover of the SIM card holder back onto the holder, and push the cover leftwards to lock it.
Note: Please use a standard Nano-SIM card.
LED Indicator
| Indicator State | Device State |
|---|---|
| Red light on | – SIM cards not installed or installed improperly. (Voice |
prompts “No SIM card”.)
Failed to unlock PIN code of SIM card.
Green light on| – In individual/group/all call
– Downloading/playing back voice record.
Blue light on| In individual-call standby state.
Red light flashing fast| Network registration failed due to inactivated or
overdue SIM card.
Green light flashing slow| Network registration succeeded. Enter standby
state.
Blue light flashing fast| – Registering to a network.
– Device not configured on the server. (Voice prompt “Not configured”.)
– Device expired.
No light| In a power-off state.
Programmable Keys
To suit your operation habits, programmable keys (P1, P2 and P3) are provided. You may enable various functions on these keys using the CPS. The functions are listed as below.
| No. | Function | Description |
|---|---|---|
| 1 | The alarm on/off | Send/quit an emergency alarm. |
| 2 | Remaining battery capacity announcement | Announce remaining battery |
capacity.
3| User announcement| Announce the user name of the radio.
4| Group announcement| Announce the current group in which the radio is in.
5| Playback| Play back the latest 30 voice records.
6| Bluetooth on/off| Enable/disable the Bluetooth function.
7| Wi-Fi on/off| Enable/disable Wi-Fi function.
8| Individual Call| Make a quick individual call.
9| All Call| Make an all-call.
10| Broadcast| Make a broadcast call.
Icons
Icon
| Description
---|---
| 2G/3G/4G received signal strength
**2G,3G,4G**
| 2G/3G/4G transmission
| Wi-Fi signal strength
| Searching GPS signal
| GPS signal acquired
| In group call
| In individual call
| In all call
| Remaining battery capacity
| Short message
| Bluetooth enabled
| Connected to Bluetooth device
| In emergency alarm
| Alarm message
| Stun
| Kill
Basic Operation
-
Powering On/Off
To power on the radio, hold down the 【Power 】 key for 3 seconds before release. The screen backlight and green indicator light will be on, and “Starting” will be displayed on the screen. To power off the radio, hold down the 【Power 】 key for 3 seconds before release. -
Adjusting the Volume
To increase the volume, press the 【Volume + 】 key on the left face of
the radio; to decrease it, press the 【Volume – 】 key. -
Individual Call
①Initiating Individual Call:
– In the standby status, press the 【OK 】 key, select 【Contacts 】, and choose a contact.
– Press the 【OK 】 key, select Initiate Individual Call. You will hear a voice prompt “Enter individual-call mode”.
– Press the 【PTT 】 key.
②Ending Individual Call: An individual call can be ended in either of the following ways.
– During an individual call, press the 【OK 】 key, select 【Contacts 】, and select End Individual Call.
– After entering the individual-call mode, if you do not press the 【PTT 】 key within 30 seconds, the radio will quit this mode, and you will hear a voice prompt “Individual call timed out”. -
Group Call
①Initiating Group Call:
Under individual/group/broadcast call mode, you can call the members of a group by pressing the 【PTT 】 key. If there is no member online, you will hear a voice prompt “No member online”, and transmission will be terminated.
Note: A group is set through the network management system.
②Switching Groups:
In the standby interface, press the 【OK 】 key, select 【Group List 】, select a group, and press the 【OK 】 key again. -
All Call
After programming an all-call key through the CPS, you may enter all-call mode by pressing the key and then initiate an all-call by pressing the 【PTT 】 key. A called radio should answer within 3 seconds, otherwise, it will quit this mode.
An all-call overrides all undergoing calls of all types, for example, an individual and a group call. -
Broadcast Call
After programming a broadcast-call key through the CPS, you may enter broadcast-call mode by pressing the key, and then initiate a broadcast call by pressing the
【PTT 】 key. A broadcast call can be received but not answered. A broadcast call overrides all undergoing calls of all types, for example, an individual and a group call. -
Receiving a Call
By switching to a group set through the NMS, the radio can receive an individual call, a group call or an all call from the group and output voice. -
Late Entry
This function enables the radio to join an undergoing group call after a delay. -
Priority Call
Different call priorities can be set on the radio. A radio with a higher call priority initiates a call prior to a radio with a lower call priority.
Note: The default call time of all types of calls is 60 seconds, which is modifiable through the NMS. A call is terminated automatically after this time is up, so as to release the floor. -
Playback
After voice recording and playback are enabled on the NMS, you can download and playback the latest 30 voice records by pressing a pre-programmed 【playback 】key. -
Low-Power Alert
When the remaining battery of the radio is below 10%, you will hear the voice alert “Low power” at a certain interval.
Please replace or charge the battery after powering off the radio. -
Positioning
To enable or disable GPS positioning, go to the standby interface, press the 【OK 】 key, select 【Setting 】and then 【GPS 】, and slide the switch. The GPS module inside the radio locates the radio and reports position information to the NMS. The real-time location and movement track of the radio can be displayed on a GIS map on
the NMS or a dispatcher. -
Wi-Fi
To enable or disable Wi-Fi, go to the standby interface, press the 【OK 】key, select 【Setting 】and then 【Wi-Fi 】, and slide the switch.By enabling Wi-Fi, you can search Wi-Fi networks nearby in real-time. The radio can only be connected to a Wi-Fi hotspot, which should be preset through the CPS. To view or select from preset hotspots, go to Saved Network. -
Bluetooth
To enable or disable Bluetooth, go to the standby interface, press the 【OK 】key, select 【Setting 】and then 【Bluetooth 】, and slide the switch. After enabling Bluetooth, you can connect the radio to a Bluetooth earphone by the scan. -
Short Message
To view sent short messages, go to the standby interface, press the 【OK 】key, and select 【Message 】, 【Short Message 】, and then 【Inbox 】. -
Mobile Networks
GSM, WCDMA, TDD-LTE and FDD-LTE networks are supported. -
Advanced Functions
Revive, stun, kill, monitor and voice playback can be achieved through the dispatcher. -
Emergency Alarm
The radio supports two types of emergency alarms.
– Manual Alarm: After programming an emergency alarm key through the CPS, you can press the key to send or quit an emergency alarm.
– Man-Down Alarm: When the radio is placed horizontally, an alarm will be triggered. (This function can be enabled on the NMS.)
Each type of emergency alarm has two modes.
– Silent Alarm: In this mode, the radio sends an alarm silently, but receives
an alarm with a voice prompt “Alarm from ”.
-Alarm and Call: If the silent alarm is disabled, the radio sends an alarm and rings a siren, but receives an alarm with a voice prompt
“Alarm from” and rings a siren.
To view the alarms sent and received, go to the standby interface, press the
【OK 】 key, and select 【Message 】, 【SOS Message 】.
Troubleshooting
No.
| Problem|
Solution
---|---|---
1
|
Power-on failed
| Reason: The battery is used up.
Solution: Charge or replace the battery.
Reason: The volume switch is faulty.
Solution: Get it repaired at the specified service station.
2
|
Small voice
| Reason: Speak too far from the microphone.
Solution: The suggested distance is 3~10 cm from the mouth.
Reason: Wrong volume setting.
Solution: Increase the volume.
3
|
Communication failed
| Reason: SIM card expired.
Solution: Renewal or replace the card.
Reason: Incorrect group setting.
Solution: Choose the correct group and try again.
Reason: PoC platform service expired.
Solution: Renew the PoC platform service again.
This document is only for reference, and actual product prevails.
Kirisun reserves the right to the final interpretation of this document.
FCC Statement
15.19 Labeling requirements.
This device complies with part 15 of the FCC Rules. Operation is subject to
the following two conditions: (1) This device may not cause harmful
interference, and (2) this device must accept any interference received,
including interference that may cause undesired operation.
15.21 Information to user.
Any changes or modifications not expressly approved by the party responsible
for compliance could void the user’s authority to operate the equipment.
15.105 Information to the user.
This equipment has been tested and found to comply with the limits for a Class
B digital device, pursuant to Part 15 of the FCC Rules. These limits are
designed to provide reasonable protection against harmful interference in a
residential installation. This equipment generates uses and can radiate radio
frequency energy and, if not installed and used in accordance with the
instructions, may cause harmful interference to radio communications. However,
there is no guarantee that interference will not occur in a particular
installation. If this equipment does cause harmful interference to radio or
television reception, which can be determined by turning the equipment off and
on, the user is encouraged to try to correct the interference by one or more
of the following measures:
- Reorient or relocate the receiving antenna.
- Increase the separation between the equipment and receiver.
- Connect the equipment into an outlet on a circuit different from that to which the receiver is connected.
- Consult the dealer or an experienced radio/TV technician for help.
Specific Absorption Rate (SAR) information:
This product meets the government’s requirements for exposure to radio waves.
The guidelines are based on standards that were developed by independent
scientific organizations through periodic and thorough evaluations of
scientific studies. The standards include a substantial safety margin designed
to assure the safety of all persons regardless of age or health.
FCC RF Exposure Information and Statement The SAR limit of the USA (FCC) is
1.6 W/kg averaged over one gram of tissue. This device was tested for typical
body-worn operations when the device was used at 25mm from the front face and
10mm from the product, 0mm from the belt, for maintaining compliance with FCC
RF exposure requirements. The use of belt clips, holsters, and similar
accessories should not contain metallic components in its assembly. The use of
accessories that do not satisfy these requirements may not comply with FCC RF
exposure requirements and should be avoided.
IC Statement
This device complies with Industry Canada’s license-exempt RSS. Operation is subject to the following two conditions:
- This device may not cause interference;
- This device must accept any interference, including interference that may cause undesired operation of the device.
Specific Absorption Rate (SAR) information:
This product meets the government’s requirements for exposure to radio waves.
The guidelines are based on standards that were developed by independent
scientific organizations through periodic and thorough evaluations of
scientific studies.
The standards include a substantial safety margin designed to assure the
safety of all persons regardless of age or health.
IC RF Exposure Information and Statement The SAR limit of USA (IC) is 1.6 W/kg
averaged over one gram of tissue. This device was tested for typical body-worn
operations with the back of the handset kept 10mm for body-worn. To maintain
compliance with IC RF exposure requirements, use accessories that maintain a
25mm from the front face and 10mm from the product, 0mm from the belt. The use
of belt clips, holsters and similar accessories should not contain metallic
components in its assembly. The use of accessories that do not satisfy these
requirements may not comply with IC RF exposure requirements and should be
avoided.
RED Statement
- Risk of explosion if the battery is replaced by an incorrect type. Dispose of used batteries according to the instructions.
- The product shall only be connected to a USB interface of version USB2.0 or higher.
- The adapter shall be installed near the equipment and shall be easily accessible.
- The operating temperature of the EUT can’t exceed 40 ℃ and shouldn’t be lower than -20 ℃.
- The plug is considered as a disconnect device of the adapter. ****
- The device complies with RF specifications when the device is used at 25mm from the front face and 5mm from the product, 0mm from the belt.
- Use care with the earphone may be possible excessive sound pressure from earphones and headphones can cause hearing loss.
Hereby, Kirisun Communication Co., Ltd. declares that this Mobile phone product is in compliance with essential requirements and other relevant provisions of Directive 2014/53/EU. This product is allowed to be used in all EU member states.
 http://www.kirisun.com
Kirisun Communication Co.,Ltd.
References
Read User Manual Online (PDF format)
Read User Manual Online (PDF format) >>