CAENels Device Manager User Guide
- May 15, 2024
- CAENels
Table of Contents
CAENels Device Manager

Disclaimer
No part of this Quick Start Guide may be reproduced in any form or by any
means, electronic, mechanical, recording, or otherwise, without the prior
written permission of CAEN ELS s.r.l.
It is strongly recommended to read thoroughly this Quick Start Guide before
performing any kind of operation related to firmware upgrade on CAEN ELS
devices.
CAEN ELS S.r.l. reserves the right to change partially or entirely the
contents of this Manual at any time and without giving any notice.
Document Revisions
| Revision | Date | Comment |
|---|---|---|
| 1.0 | August 10th, 2023 | First Release |
| 1.1 | January 9th, 2024 | Text revision |
| 1.2 | February 5th, 2024 | Text revision, images updated. Added |
Advanced Network Configuration menu. Compatible with Device Manager 2.2.0
Introduction
This document is the Quick Start Guide for the CAEN ELS Device Manager software. The Device Manager is capable of:
- discover CAEN ELS devices connected on the network;
- change the device network settings;
- update the device firmware.
Supported CAEN ELS devices are reported in Table 1.
Table 1: List of currently supported devices.
Device Family| Supported Device Groups| Firmware File
extension
---|---|---
Power Supply System| EASY-DRIVER FAST-Bi-1K5 FAST-PS
FAST-PS-M FAST-PS-1K5 NGPS
QDS
REGUL8OR| .hex
.updt
.updt
.updt
.updt
.updt
.flash
.updt
Precision Current Measurements| CT-BOX|
Beamline Electronic Instrumentation| TetrAMM
PreDAC
EnBOX| .flash
.flash
.flash
The Device Manager can be used to upgrade the firmware of all the supported device groups, except for the CT-BOX.
The Device Manager can be downloaded from the CAEN ELS website (www.caenels.com), from the Software/Firmware page of each supported device, as reported in Figure 1.
Figure 1: Device Manager download location.
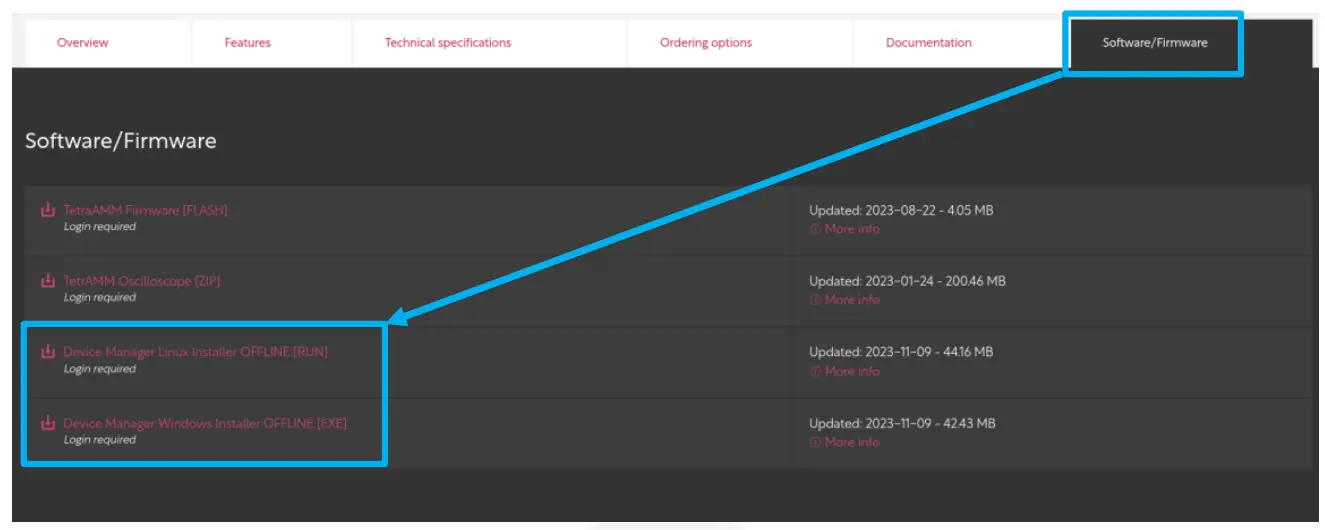
The Device Manager is provided as a Linux or Windows Offline installers.
Main Window
The Main Window (Figure 2) of the Device Manager is organized as follows:
- Scan bar: this bar allows to discover CAEN ELS devices on the network (Scan button), select the information visualized on the secondary frame (Info, Firmware and Config buttons), and filter the discovered CAEN ELS devices (Filter button ).
- Primary frame: shows the list of the detected CAEN ELS devices with their basic information. Group column is important when upgrading multiple devices (more information in section 3.1).
- Secondary frame: shows additional information depending on the selected button from the scan bar. If Info is selected (left picture in Figure 3) general information about the device are shown. If Firmware is selected (central picture in Figure 3) a new firmware can be uploaded to one or more devices. If Config is selected (right picture in Figure 3) device network settings can be configured.
Figure 2: Main window at startup.

Figure 3: Info page (left picture), Firmware page (central picture) and Config page (right picture).

Utilities
Firmware Upgrade
To update a device with a specific firmware, select Firmware from the Scan bar.
Figure 4: Firmware page.

Firstly, select the device or devices by checking the corresponding frame boxes in the first column of the primary frame.
Only devices belonging to the same Group can be selected for multiple update.
Select the firmware file by using the icon. When the firmware file is selected, the upgrade procedure can be started by means of the icon. The firmware loading progress can be followed by the progress bar. When the firmware update is completed a pop-up window as reported in Figure 5.
All CAEN ELS devices are automatically rebooted after the upgrade except for QDS, TetrAMM, PreDAC and EnBOX which have to be rebooted manually by performing a power-cycle.
Figure 5: Firmware upgrade completed pop-up.

The firmware upgrade Terminal Log (green box in Figure 4) and the Enable Manual IP checkbox (blue box in Figure 4) are reserved for debug purpose only.
Network Settings
When selected, the Config Page (see Figure 6) shows additional network configurations about the selected device. By selecting a device, it will be possible to modify its network configurations. After having edited the desired parameters, press the saving key.
Figure 6: Network settings.

A pop-up message (see Figure 7) will inform the user that the new settings have been applied. After few seconds verify that the new settings have been applied by performing a new Scan.
Figure 7: Network configuration pop-up.

Tools
From the Tools item in the upper bar, the user has access to:
- Select Network Interfaces;
- Settings;
- Advanced Network Configuration.
Select Network Interfaces
It is possible to choose which network interfaces to send a broadcast message to detect the CAEN ELS devices by selecting Network Interface from the Tools item from the upper bar.
Figure 8: Network interfaces.

Settings
From the Settings menu, it is possible to change the Broadcast Time (waiting time for the research of new devices in the network) and set the theme for the Device Manager among Light and Dark.
Figure 9: Settings menu

Advanced Network Configuration
From the Advanced Network Configuration menu (Figure 10), it is possible to change the network settings simultaneously to all the detected devices. From this menu it is possible to change IP Address, Subnet Mask and Gateway. The new network setting are applied by pressing the Apply button.
Figure 10: Advanced Network Configuration menu.

Customer Support
c/o AREA Science Park
S.S. 14 km 163,5 – 34149 Basovizza (TS)
Italy
Mail : info@caenels.com
Web : www.caenels.com

References
- CAEN ELS - Precision Power Supplies and Electronic Instruments
- CAEN ELS - Precision Power Supplies and Electronic Instruments
Read User Manual Online (PDF format)
Read User Manual Online (PDF format) >>