Htcuto X1 Wireless Dog Fence User Manual
- June 17, 2024
- Htcuto
Table of Contents
Htcuto X1 Wireless Dog Fence

Specifications
- Power Button: Short press to turn on/off the collar
- Flashlight Button: Press to activate the flashlight
- Shock Level/Electronic Fence Level Increase Button: Press to increase the shock level or electronic fence level
- Beep/Pairing Confirmation Button: Short press to emit a beep sound or confirm pairing
- Vibration Level Increase Button: Press to increase the vibration level
- Shock Level/Electronic Fence Level Decrease Button: Press to decrease the shock level or electronic fence level
Remote
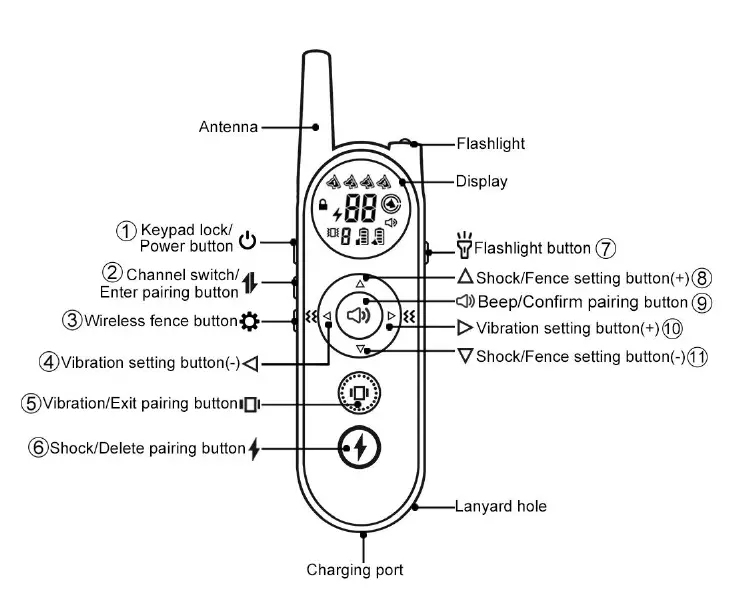
- Keypad lock/Power button( ).Short press to lock the button, and then short press to unlock. Long press the button for 2 secs to turn on/off.
- Channel switch/Enter pairing button( ),Short press to select the dog channel. Long press for 3 seconds to enter pairing mode.
- Wireless Fence button( ): Short press to enter/exit the electronic fence. Note: This is an Exclusive function for X3, not available on X1/X2.
- Vibration Level Decrease button:( )
- Vibration/Exit Pairing Mode button( ) :Short press to vibrate once, long press to vibrate 8 times and stop. During pairing mode,press this button to exit pairing.
- Shock/Delete Pairing button( ): Short press to deliver a 1-second shock, long press to deliver an 8-second shock and stop. Release and press again to activate the shock. During pairing mode, select the receiver to delete pairing and press this button to delete.
- Flashlight button( )
- Shock Level/Electronic Fence Level Increase button (▲).
- Beep/Pairing Confirmation button( ): Short press to emit a beep sound. During pairing mode, select the dog channel and press this button to confirm pairing.
- Vibration Level Increase button.( )
- Shock Level/Electronic Fence Level Decrease button.( )
Quick User Manual
-
 Charging
 -
Use the included USB cable to fully charge the collar and remote control at 5V.
-
When the remote control is fully charged, the battery display is full.
-
When the collar is fully charged, the red light turns green. It fully charges in about two hours.
-
The battery level is shown on the remote control screen.The battery capacity of the collar cannot display on the remote screen after multiple collars are connected at the same time, when switching to a single dog, eg collar 3, the battery of the corresponding collar 3 will be displayed.
-
 Collar On/Off
 -
Short press the power button( ) for 1 second, the collar will beep and vibrate to turn on
-
After it powers on, the green light flashes once for 2 secs, automatically enter the sleep state if it is not used for 6 minutes, and the green light flashes once for 6 secs.
-
Press and hold for 2 seconds to power off.
-
Remote control On/Off
-
Long press the button( )for 2 seconds to turn on/off. There will be a beep and the screen will light up.
-
Long press the button( ) for 2 seconds, a beep will be heard and the display will turn off.
-
Keyboard lock
-
Short press to lock the button( ), and then short press to unlock.
-
Recommended to lock the buttons when not in use to prevent misuse.
-
Pairing(One-to-one has been paired in the factory, you can use it directly)
-
In the remote controller’s power-on state, long-press the Channel Switch button ( ) for 3 seconds until the icon starts flashing, and the remote controller enters pairing mode.
-
Then, short press this button ( ) to select the receiver you want to pair with (the flashing icon indicates it’s in pairing mode). Proceed to set up the receiver.
-
To put the receiver in pairing mode while it’s powered off, long-press the Power button for 3 seconds until you see the indicator light flashing red and green. Release the button, and the receiver will enter pairing mode. Note: The receiver’s pairing mode is active for 30 seconds; if the time is exceeded, you need to power off and retry.
-
Press the Sound Command button on the remote controller ( ) to confirm pairing. It will emit a beep sound to indicate successful pairing.
-
Cancel pairing
-
Long-press the Channel Switch button( ) on the remote controller for 3 seconds until the icon starts flashing. Then short press the switch button ( )to select the receiver you want to cancel pairing with.
-
Short press the Shock button( ) to Delete Pairing, and then Press the Vibration button( ) to exit the pairing mode
-
Pairing with multiple collars
Repeat the above operations, you can continue to pair other collars. -
One channel has one collar, and multiple collars cannot be connected to the same channel.
-
After all four channels are paired, you can press the channel switch button( )to select 1 to 4 channels to control a single collars, or control all collars at the same time.
-
Vibration and shock levels can be individually adjusted when controlling a single collar.All functions are available.
-
Special Note: When controlling multiple collars at the same time, the vibration level is the same, and the electric shock function is turned off(X1/X2 model).The electric shock function at level 1(X3 Model).
-
Beep tone command
-
Short press ( )button on the remote controller, and the receiver will emit a beep sound.
-
Long press ( )button, and the receiver will continuously emit sounds.
-
Vibration intensity adjustment
-
Press the Vibration Level Decrease button( ) , and the vibration level will decrease from level 9 to level 0.
-
Press the Vibration Level Increase button ( ), and the vibration level will increase from level 0 to level 9.
-
Level 0 means no vibration, and level 9 is the strongest vibration.
-
Vibration command
-
Short press the vibration button( )and the collar will vibrate once.
-
Long press the vibration button( ),the collar will vibrate continuously and will stop after 8 seconds.
-
When controlling multiple collars at the same time, the vibration level is the current set value.
-
Shock intensity adjustment
-
Press the Shock Level Increase button ( )on the remote controller, and the shock level will increase from level 0 to level 30.
-
Press the Shock Level Decrease button( ) on the remote controller, and the shock level will decrease from level 30 to level 0.
-
Level 0 means no shock, and level 30 is the strongest shock
-
It is recommended to start training the dog at level 1 and observe the dog’s reaction before gradually increasing the intensity.
-
Shock command
-
Short press the electric shock button( )and there will be an electric shock for one second.
-
Long press the electric shock button( )and the electric shock will stop after 8 seconds.
-
Release the shock button and press the shock button again to activate the shock.
-
Electronic fence function(X3 model only).
It allows you to set a distance limit for your dog to roam freely and provides an automatic warning if your dog exceeds this limit. Here is a guide on how to use this function: -
To enter the electronic fence mode: press the Function Select button ( ).The electronic fence icon will be displayed( ).
-
To exit the electronic fence mode: press the Function Select button ( ) again. The electronic fence icon will disappear ( ).
Tips:When not using the electronic fence function, it is recommended to exit the electronic fence function to save power.
Adjust the distance levels
To adjust the electronic fence distance: while in the electronic fence mode,
press the ( ) button. The electronic fence level will increase from level 1 to
level 14. Press the ( ) button to decrease the electronic fence level from
level 14 to level 1.
Distance levels
The following table shows the distance in meters and feet for each level of
the electronic fence.
| Levels | Distance(meters) | Distance(feet) |
|---|---|---|
| 1 | 8 | 25 |
| 2 | 15 | 50 |
| 3 | 30 | 100 |
| 4 | 45 | 150 |
| 5 | 60 | 200 |
| 6 | 75 | 250 |
| 7 | 90 | 300 |
| 8 | 105 | 350 |
| 9 | 120 | 400 |
| 10 | 135 | 450 |
| 11 | 150 | 500 |
| 12 | 240 | 800 |
| 13 | 300 | 1000 |
| 14 | 1050 | 3500 |
The distance levels provided are based on measurements taken in open areas and are intended for reference purposes only. Due to variations in the surrounding environment, the actual effective distance may vary.
Preset Operations (Remote Controller can also be operated in Fence Mode):Before entering the fence mode, you must set the levels as follows:
- For 1 dog: Both vibration and shock levels can be set
- For 2-4 dogs: Only vibration level needs to be set, and the shock level cannot be adjusted (it remains at level 1 by default).
- After setting the vibration level, you must press the Vibration button on the remote controller once to save the settings before entering the electronic fence mode. In the electronic fence mode, you cannot set the vibration and shock levels.
While in the electronic fence mode, you can use all the training functions of the remote controller, including sound, vibration, and shock. These functions will affect all collars within the electronic fence. When controlling multiple dogs, the automatic shock warning for going beyond the range is disabled by default, and the manual shock level is set to 1 by default.
Level Status in Electronic Fence Mode/Training Mode
Controlled
Quantity
| 1 Dog| 2 Dogs| 3 Dogs| 4 Dogs
Vibration level| Pre-set Level| Pre-set Level(Every dog is at the
same level)
| Pre-set Level
(Every dog is at the same level)
| Pre-set Level(Every dog is at the
same level)
shock level| Pre-set Level| Default level 1 (cannot be
changed)
| Default level 1 (cannot be
changed)
| Default level 1 (cannot be
changed)
.Automatic warning function:
When the collar exceeds the distance limit, there will be a warning. The
remote control will emit beep sounds until the dog returns to the distance
limit.And the collar will automatically emit three beep, each with a one-
second interval. If the dog still does not return to the distance limit after
this, the collar will emit five beeps and vibration warnings, each with a
five-second interval, then the collar will stop warning. The shock function is
turned off by default during the automatic warning. The default vibration
level is 5, which can be preset.
Notes:
- When the dog exceeds the distance limit, the collar will be eight warnings in total (3 beep sounds and 5 beep sounds with vibration), followed by another round of warnings if the dog exceeds the distance limit again.
The automatic warning function does not include shock function to ensure the safety of the dog. If you need to use the shock function, you can operate it manually using the remote control. If the automatic warning function is ineffective for controlling multiple dogs, you can exit the 14 electronic fence mode and choose the specific collar to issue a sound/vibration/shock warning. If controlling only one dog, you can directly operate the training functions on the remote control for warning.
Tips
- Always exit the electronic fence mode when not in use to save battery life.
- It is recommended to use the vibration function first before using theshock function during training.
- When using the electronic fence function, make sure the collar is properly fitted to your dog for optimal performance.
.FAQ
-
Question 1: Can multiple collars be connected simultaneously?
Answer 1: Yes, multiple collars can be connected. However, when operating the device, you can only choose to connect one or all collars. You cannot select only two or three collars. Collars that do not need to be connected must be cancel pairing. For example, if you select to connect four collars but only need to connect two, such as collar 2 and collar 4, you need to cancel pairing the others on the remote instead of selecting only collar 2 and collar 4 on the remote and leaving collar 1 and collar 3 turned on. If you do not cancel pairing collar 1 and collar 3 from the remote and only turn them off, the remote will issue an out-of-range warning, and the icons of collar 1 and collar 3 on the remote will flash because the signal of the turned-off collars cannot be detected. -
Question 2: Will other functions work normally when the electronic fence is on?
Answer 2: When the electronic fence is on and a single collar is connected, the remote icon will not display the shock icon, but will display the level of the electronic fence. However, the shock function is normal, and the shock level depends on the level set before entering the electronic fence. When in this state, you cannot see the shock level when selecting the shock function, but you can see the vibration level. This is because, after selecting the electronic fence, the screen only displays the electronic fence level and not the shock level. When multiple collars are connected, the vibration level is consistent with the level set before entering the electronic fence, and the shock level defaults to level -
Question 3: When the out-of-range sound and vibration are warning simultaneously, will manually operating the vibration and sound on the remote conflict with each other? Which one takes priority?
-
Answer 3: When out of range, the collar will emit sound first, and the remote will also beep. After 5 seconds,the collar will vibrate and beep at the same time. However, if you simultaneously press the vibration function on the remote at this time, the vibration function on the remote takes priority over the out-of-range warning function. If you stop pressing the remote, the out-of-range vibration and warning sound will continue to be emitted.
-
Question 4: When out of range, will the warning stop immediately after returning to the range or will there be a delay, and how long is the delay?
Answer 4: There is usually a delay of about 3-5 seconds. -
Question 5: When controlling multiple collars in electronic fence mode, will the signals between collars affect each other?
Answer 5: No, they will not affect each other. -
Question 6: Can the level of vibration warning triggered automatically when exceeding the electronic fence distance be adjusted?
Answer 6: Yes, it can be adjusted, but it needs to be set before entering the electronic fence. After entering the electronic fence, the levels of all other functions except the electronic fence level cannot be adjusted.
 Turn on the
flashlight
Turn on the
flashlight
- Regardless of power on/off, short press the flashlight button( )and the light will turn on.
- Short press again and the flashlight will switch between 3 modes: long on/on/off.
Shock intensity test
- Screw the contact points onto the collar.
- Tighten the contact points with test light, and then put on the conductive cap. Also the contact point of test light is aligned with the Contact points.
- Level 1: Neon faint, Level 30: Highlight.
ADJUST THE COLLAR LENGTH

Wearing the Collar

Training Tips
- Choose a suitable contact points and Silicone cap, and put it on the dog’s neck.
- If the hair is too thick, separate it by hand so that the Silicone cap touches the skin, making sure both electrodes touch the skin at the same time.
- The tightness of the collar tied to the dog’s neck is suitable for inserting a finger tie the collar on dog enough to fit a finger.
- .Shock training is not recommended for dogs under 6 months of age, aged, in poor health, pregnant, aggressive, or aggressive towards humans.
- In order to make your pet less shocked by electric shock, it is recommended to use sound training first, then vibration, and finally use electric shock training. Then you can train your pet step by step.
The level of electric shock should start from level 1.
Important Safety Information
- Disassembly of the collar is strictly prohibited under any circumstances, as it may destroy the waterproof function and thus void the product warranty.
- .If you want to test the electric shock function of the product, please use the delivered neon bulb for testing, do not test with your hands to avoid accidental injury.
- Note that interference from the environment may cause the product to not work properly, such as high-voltage facilities, communication towers, thunderstorms and strong winds, large buildings, strong electromagnetic interference, etc.
Troubleshooting
- When pressing buttons such as vibration or electric shock, and there is no response, you should first check:
- Check if the remote control and collar are turned on.
- Check whether the battery power of the remote control and collar is sufficient.
- Check if the charger is 5V, or try another charging cable.
- If the battery has not been used for a long time and the battery voltage is lower than the charging start voltage, it should be charged for a different period of time.
- Verify that the collar is providing stimulation to your pet by placing a test light on the collar.
- 2.If the shock is weak, or has no effect on pets at all, you should check first.
- Make sure that the contact points of the collar are snug against the pet’s skin.
- Try increasing the shock level.
- .If the remote control and collar do not respond or cannot receive signals, you should check first:
- Check whether the remote control and the collar are successfully matched first.
- If it cannot be paired, the collar and remote control should be fully charged first. The collar must be in the off state, and then long press the power button for 3 seconds to enter the red and green light flashing state before pairing (valid time is 30 seconds).
- Check if the button of the remote control is pressed.
- Check whether there is a electromagnetic field interference, strong signal etc. You can cancel the pairing first, and then re-pairing can automatically select a new channel to avoid interference.
- The collar automatically emits sound, vibration, or electric shock signal, you can check first: check whether the remote control buttons are stuck.
Operating environment and maintenance
- Do not operate the device in temperatures of 104°F and above.
- Do not use the remote control when it is snowing, it may cause water ingress and damage the remote control.
- Do not use this product in places with strong electromagnetic interference, which will seriously damage the performance of the product.
- Avoid dropping the device on a hard surface or applying excessive pressure to it.
- Do not use it in a corrosive environment, so as not to cause discoloration, deformation and other damage to the appearance of the product.
- When not using this product, wipe the surface of the product clean, turn off the power, put it in the box, and put it in a cool and dry place.
- The collar cannot be immersed in water for a long time.
- If the remote control falls into the water, please take it out quickly and turn off the power, and then it can be used normally after drying the water.
FCC Warning
This device complies with part 15 of the FCC Rules.
Operation is subject to the following two conditions
- This device may not cause harmful interference, and
- this device must accept any interference received, including interference that may cause undesired operation. Note: This equipment has been tested and found to comply with the limits for a Class B digital device, pursuant to part 15 of the FCCRules.
These limits are designed to provide reasonable protection against harmful
interference in a residential installation. This equipment generates, uses and
can radiate radio frequency energy and, if not installed and used in
accordance with the instructions,
may cause harmful interference to radio communications. However, there is no
guarantee that interference will not occur in a particular installation. If
this equipment does cause harmful interference to radio or television
reception, which can be determined by turning the equipment off and on, the
user is encouraged to try to correct the interference by one or more of the
following measures:
- Reorient or relocate the receiving antenna.
- Increase the separation between the equipment and collar.
- Connect the equipment into an outlet on a circuit different from that to which the collar is connected.
- Consult the dealer or an experienced radio/TV technician for help.
Note: The Grantee is not responsible for any changes or modifications not expressly approved by the party responsible for compliance. such modifications could void the user’s authority to operate the equipment. The device has been evaluated to meet general RF exposure requirement. The device can be used in portable exposure condition without restriction.
Specification
Specification(1 Collar/2 Collars)
Model| X1/X2/X3
Packing size(1 collar)| 6.74.491.73 inches
Package weight(1 collar)| 0.63 Pounds
Packing size(2 collars)| 6.896.691.77 inches
Package weight(2 collars)| 0.85 Pounds
Remote control weight(single)| 0.15 Pounds
Collar weight(single)| 0.18 Pounds
Adjustable of collar| Maximum circumference 23.6inches
Suitable for dogs weight| 10-130 Pounds
Collar IP rating| IPX7
Remote control waterproof rating| Not waterproof
Collar battery capacity| 350MA
Remote control battery capacity| 800MA
Collar charging time| 2 hours
Remote control charging time| 2 hours
Collar standby time| 185 days
Remote control standby time| 185 days
Collar charging interface| Type-C connection
Collar and remote control reception range (X1)| Obstacles 1/4 Mile, open 3/4
Mile
Collar and remote control reception range (X2 X3)| Obstacles 1/3 Mile, open
1.1 5Mile
Signal receiving method| Two-way reception
Training mode| Tone/Vibration/Shot
Vibration level| 0-9
Shock level| 0-30
Power consumption of the collar/remote control| 9μA
Collar standby power consumption| 60μA
Remote control standby power consumption| 48μA
In the Box(1 collar)

- Remote control 1PCS
- Collar unit 1PCS
- Collar strap 1PCS
- USB cable 1PCS
- Contact Points 2PCS
- Silicone cap 6PCS
- Test Light 1PCS
- Lanyard 1PCS
- User Manual 1PCS
In the Box(2 collars)

- Remote control 1PCS
- Collar unit 2PCS
- Collar strap 2PCS
- USB cable 1PCS
- Contact Points 4PCS
- Silicone cap 10PCS
- Test Light 1PCS
- Lanyard 1PCS
- User Manual 1PCS
Read User Manual Online (PDF format)
Read User Manual Online (PDF format) >>