AndroidPCtv N9N Mini PC User Guide
- September 21, 2024
- AndroidPCtv
Table of Contents
AndroidPCtv N9N Mini PC

Service Guarantee Description
Thank you for buying this product. You can enjoy one year of free spare parts
and manual guarantee service provided by our company.
If the company needs to provide services due to the following circumstances,
we will charge maintenance fees as appropriate:
- Improper operation was not carried out according to the product manual or instructions.
- Man-made damage, computer virus, dampness improper software installation or self-disassembly, etc.
- Irresistible force such as fire, flood, wind, and earthquake Wear and tear caused by accessories consumables, and natural use.
- If we need to reinstall the software or adjust the computer Settings, a fee will be charged as appropriate.
- The company’s warranty identification mark is damaged or dirty, resulting in unrecognizability.
- Do not block the front and rear vents, which may affect product performance and life.
- Do not use non-original adapters, which may affect product performance and life.
- Please backup your data and files before sending the product to repair it. The integrity of the data may be affected during the repair process.
- We guarantee the maintenance service so you buy peace of mind and use it with ease.
Product Interface

Product specification sheet
| CPU | Intel® Alderlake-N N100 |
|---|---|
| OS | Windows11 |
| Memory | 1*LPDDR5 (8G Max) |
| M.2 SSD | 1*M.2 2280 256G SSD(Default SATA) |
| HDD | 2.5 inch 500G HDD |
| Display | HDMI x 1 / DP x 1 |
| Wireless | On Board 2.4GHz/5GHz Wifi Module |
| IO | USB2.0×3/ USB3.0×1/ TF Card Port |
| LAN | 2 X RJ45 1000M LAN |
| Audio | 1 x 2-Audio Connectors (Audio& Mic) |
| DC | DC 12V/3A |
Remark
- The low-power RF motor is a certified qualified product. Without permission, the company, businesses, or individuals are not allowed to change the frequency increase the power or change the characteristics and functions of the original design;
- The use of low-frequency RF motor shall not affect flight safety or interfere with legal communication;
- If any interference is found, it should be stopped immediately and improved until there is no interference;
- Legal communication refers to wireless communication in work as prescribed by law;
- Low-frequency of motors shall be able to withstand the interference of legal communication or industrial, scientific, and medical radio-wave motor equipment;
- The product contains miniature batteries used by CMOS on the host board. Please do not replace them by yourself;
- If consumers replace the battery with the incorrect model by themselves it may be dangerous. Please dispose of the replaced battery properly.
Part and interface definitions
Warning: The product function configuration is subject to the actual product!
- Power Button
- CIr-Cmos Button
- USB2.0
- 2 in 1 Audio
- USB3.0
- HDMI Out
- DP Out
- RJ45
- DCIN(12V)
- TYPE-C(optional)
- TF Card ( optional )
- VESA Mount screw hole
- Safety lock hole

Directions for use
- Select the “Video input source” of the HDMI/DP interface and display device(such as TV, LCD/LED, Projector) to the HDMI input channel connected.
- DC power supply: connect the power cord of accessories to the device and plug the other end directly into the plug.
- Wireless keyboard and mouse can be used with Bluetooth keyboard and mouse and USB interface.
- Press the power button to start the system.

How to enter the Retro bat game system?
A 500GB HDD hard disk is pre-installed for you when the product leaves the factory. Please do not delete the files inside. Deleting or moving files will cause the game system to malfunction.
When you start your computer for the first time and complete the system
configuration, the game disk will appear in Disk Management.

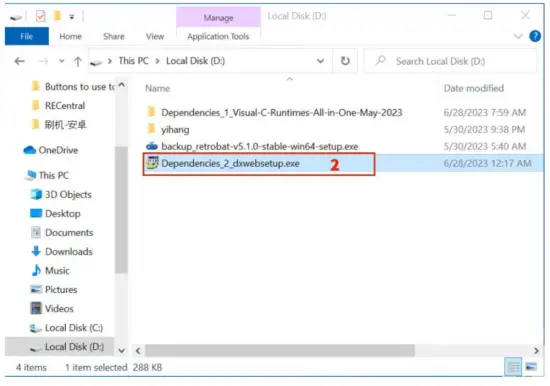
Step1 : Install the program that the game system depends on, double-
click the program and follow the steps to install it.

Step2: Enter the game disk, find the Retrobat.exe software application in the directory, double-click to enter the game system, or you can also send the shortcut to the desktop.
The game system will be displayed in full screen, you can still switch back to
the Windows system through the computer system hotkey or the game system menu.

Tips: In some cases, the computer system may not be able to run the Retro bat Game System due to the lack of programs that the game system depends on. When you can’t run the game system, you will be prompted about missing plugins. Just follow the instructions and follow the prompts to install plugin XX. (the probability of happening is very small)
How to use the Retro bat Game System?
Common hotkey settings
| Left/right cross keys and joystick | Switch emulator platform |
|---|---|
| B key (right side function key) | Return or cancel |
| A key (lower function key) | Enter or confirm |
| START Key | Set up |
| SELECT Key | Soft restart or soft shutdown setting |
| L2/R2 | Game menu page flip |
| Select + Start(press twice) | Quite Game (Quite game’s hotkeys are available |
throughout the system, but most of the other hotkeys only work when using the
retro arch core.)
Select + A| Enter Retro arch
Select + B| Pause
Select + X| Save date
Select + Y| Load date
Select + R2| Mute
More Information:
Please scan the QR code below
This is a huge system. If you encounter any problems, please contact us and we
will provide feedback and make regular corrections based on your problems.
KINHANK E-mail:kinhank003@gmail.com

FCC WARNING
This device complies with part 15 of the FCC Rules. Operation is subject to the following two conditions: (1) this device may not cause harmful interference, and (2) this device must accept any interference received, including interference that may cause undesired operation.
Any changes or modifications not expressly approved by the party responsible for compliance could void the user’s authority to operate the equipment.
NOTE: This equipment has been tested and found to comply with the limits for a Class B digital device, pursuant to Part 15 of the FCC Rules. These limits are designed to provide reasonable protection against harmful interference in a residential installation. This equipment generates, uses and can radiate radio frequency energy and, if not installed and used in accordance with the instructions, may cause harmful interference to radio communications.
However, there is no guarantee that interference will not occur in a particular installation. If this equipment does cause harmful interference to radio or television reception, which can be determined by turning the equipment off and on, the user is encouraged to try to correct the interference by one or more of the following measures:
- Reorient or relocate the receiving antenna.
- Increase the separation between the equipment and receiver.
- Connect the equipment into an outlet on a circuit different from that to which the receiver is connected.
- Consult the dealer or an experienced radio/TV technician for help.
To maintain compliance with FCC’s RF Exposure guidelines, This equipment should be installed and operated with minimum 20cm distance between the radiator and your body: Use only the supplied antenna.
Read User Manual Online (PDF format)
Read User Manual Online (PDF format) >>