ASMOKE AS350 Series Portable Pellet Smoker Grill User Guide
- August 4, 2024
- ASMOKE
Table of Contents
ASMOKE AS350 Series Portable Pellet Smoker Grill

Specifications:
- Model: ASMOKE AS350 Series
- Temperature Control: PID
- Power Source: Battery
- Grill Type: Pellet Grill
Product Usage Instructions
Starting the Machine:
If the machine does not start properly and displays an ERP error, please
ensure that the knob is in the OFF position when turning on the power. If the
error persists, contact support for
assistance.
Preventing Flame While Using:
To prevent flames while using the grill:
- Avoid accumulation of pellets in the combustion tank to prevent fires.
- When grilling food with grease, smoke it at medium-low temperature or use a griddle grill to avoid grease dripping.
Managing Temperature Fluctuations:
If you experience significant temperature fluctuations:
- Clean the unit after each cook to ensure proper temperature regulation.
- If fluctuations persist, contact customer service for further instructions and suggestions.
Ignition Issues:
If the machine shows an Err=2 error and fails to ignite:
- Check if the igniter is heating properly and if there are any pellets stuck in the fire pot.
- If it’s an issue with the igniter, contact customer service for assistance.
Uneven Heating:
If your grill is heating unevenly:
The design principle of the pellet grill may result in relatively high
temperatures on the four sides. When using a griddle, remove the stainless-
steel arc-shaped fire plate.
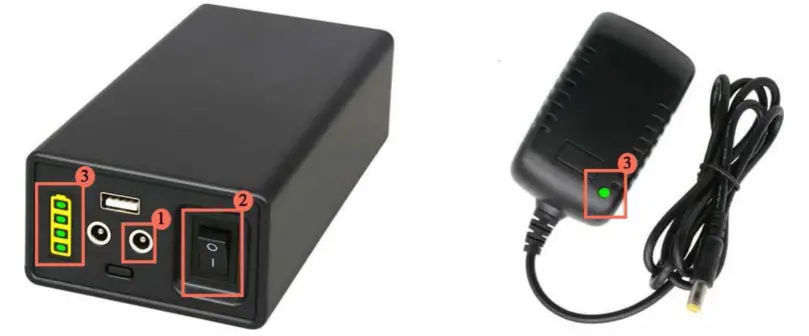
Charging the Battery:
To charge the battery:
- Connect the plug into the IN Port marked 1 and turn on the battery switch.
- The battery indicator will flash during charging and light up with 4 bars when fully charged.
- Do not connect the plug directly to the grill for charging.
FAQs:
-
Q1: The Machine does not start properly, displays ERP error.
A1: Contact support if the machine does not start properly with an ERP error after following operations. -
Q2: How to prevent flame while use?
A2: Avoid pellet accumulation in the combustion tank and smoke food with grease at medium-low temperature or use a griddle grill to prevent flames. -
Q3: Why does temperature fluctuate greatly?
A3: Clean the unit after each cook and contact customer service if temperature fluctuations persist. -
Q4: Unable to ignite normally (showing Err=2 error).
A4: Check igniter functionality and pellet blockage in the fire pot. Contact customer service if necessary. -
Q5: Why is my grill heating unevenly?
A5: Remove the stainless-steel arc-shaped fire plate when using a griddle for even heating. -
Q6: How to charge the battery?
A6: Connect the plug to the IN Port marked 1, turn on the battery switch, and do not connect the plug directly to the grill for charging.
THANK YOU FOR CHOOSING US!
ASMOKE AS350& AS350DC FAQs
Q1: The Machine does not start properly, displays “ERP” error.
A1. There are 3 reasons may cause this error:
- If this is your first time using the AS350DC, please fully charge the Power Station before using it, because insufficient battery will cause an ERP error.
- Please add enough pellets to Hopper before ignition.
- After the power is turned on, the control panel screen will flash three times in succession to scan the control panel’s own program and check its own hardware; if the knob is turned on while the control panel flashes three times, an ERP error code will appear; or the knob’s position is not in the OFF position after power is turned on. bit, ERP error codes will also appear. At this time, please turn the knob back to the off position and restart.
If the machine cannot work properly when the mentioned operations had applied, please contact us via support@asmokegrill.com for help.
Q2. How to prevent flame while use?
A2. Here are two tips to help you avoid a fire:
- Please avoid accumulation of pellets in the combustion tank. Accumulating too many pellets in the combustion tank may cause a fire.
- When grilling food with a lot of grease, it is recommended to smoke it at medium-low temperature or use griddle grill directly to avoid dripping of grease.
Q3. Why does temperature fluctuate greatly?
A3. As AMOKE uses a PID temperature control system, the unit will
automatically test different pellet feeding speeds and adjust its algorithm
according to the data stored.
Usually in instances of temperature fluctuation, it may due to the fact that
the unit has had enough cooks on it to properly regulate temp. We recommend to
clean the unit after each cook. If this is a recurring problem after multiple
uses, please contact the customer service team directly. We will provide more
instructions and suggestions!
Q4. Unable to ignite normally (showing Err=2 error)
A4. The Err=2 error indicates that ignition is unsuccessful. There are two
reasons may lead to this error. One is that the igniter is damaged, and the
other is that the pellets are stuck in the spiral fighting assembly. Please
check whether the igniter is heating properly, and whether the motor is
working normally. And are there any pellets in the fire pot? If it is a
problem with igniter, please contact the customer service team.
Q5. Why is my grill heating unevenly?
A5. The relatively high temperature on the four sides is in line with the
design principle of the pellet grill; when using the griddle, you need to take
out the stainless-steel arc-shaped fire plate.
Q6. How to charge the battery?
A6. First of all, connect the plug into the IN Port which marked “I” in the
picture, then turn on the switch of the battery. The battery indicator will
flash during charging, and will light up 4 bars when fully charged.
Please DO NOT connect the plug directly to the grill.
For Other Error Codes, Please Refer to the Appendix.
Appendix – Error Code Guidelines
| Error Code | **Reason** | **Solution** | **Image** |
|---|---|---|---|
| **ERP** | After the power is turned on, the control panel screen will |
flash three times in succession to scan the control panel’s own program and
check its own hardware. If the knob is turned on while the control panel
flashes three times, an ERP error code will appear; or the knob’s position is
not in the OFF position after power is turned on.| Please turn the knob back
to the off position and restart|
**ER1| If the temperature probe is not connected, the control board
will display the ER1 error code.| Open the maintenance door on the left side
of the grill. Check if the connection between the temperature probe and the
control board is loose or disconnected.| **
**ER2| The working time of the igniter is 9 minutes. When the
temperature in the grill rise to the starting temperature + 104˚F or 90% of
the set temperature, the igniter will automatically stop working. If the
temperature fails to rise to 192˚F, the igniter will enter the next A 9-minute
working cycle; the total working time is 20 minutes. If the temperature inside
the grill cannot rise within 20 minutes and does not reach the starting
temperature + 104˚F or 90% of the set temperature, the grill will
automatically stop working and an ER2 error will occur.| Check whether the
hopper is lacking pellets or if there’s a jam. If lacking pellets, refill the
hopper. 2. If there’s a jam, clean the hopper and ensure the pellets flows
smoothly| **
**ER3| During the use of the grill, after the pellets in the feeding
box are used up and the temperature drops to 150 degrees, the control board
starts the igniter to re-ignite. If the temperature is still lower than 130
degrees after ignition, an ER3 error code will appear;| Check whether the
hopper is lacking pellets or if there’s a jam. If lacking pellets, refill the
hopper. 2. If there’s a jam, clean the hopper and ensure the pellets flows
smoothly| **
---|---|---|---
**ER4**| After the grill is started, the igniter enters the working
state. If the igniter is not connected or the igniter is damaged, an ER4 error
code will appear;|
- You need to unscrew the screws between the control board and the maintenance door to check whether the connection between the igniter and the control board is normal and whether the connection is loose or not.
- If the connection wire is not loose, the igniter is damaged and needs to be replaced.
|
**ER5**| After the grill starts, if the fan is not connected, the
control board will display ER5.|
- Unscrew the two screws on the control board, pull the control board out a little, and check whether the connection between the fan board and the control board is loose, and whether the three terminals are connected to the control board normally.
- After completing the steps, the control board still reports that the ER5 fan cannot be started. It is possible that the fan is broken and needs to be replaced.
| **
ER6| The motor is not connected normally| You need to unscrew the screws
of the maintenance door to check whether the connection between the motor
cable and the control board is normal and whether the connection is loose or
disconnected. 2. Check whether the connection between the motor cable and
the motor is loose or disconnected.| **
**NOP| If the meat probe is not connected, NOP will appear on the
control panel.| Check whether the meat probe is connected and whether the meat
probe is inserted all the way.|
****LO| When an LO error code appears on the control panel, it means
that the DC power supply is low in power and cannot supply enough power.| The
DC power supply is required for charging.|
****HI| When the DC power supply is used improperly and the input
voltage is higher than 17.5V, an HI error code will appear on the control
board.| Replace the connected power supply and ensure that the voltage of the
connected power supply is lower than 17.5V.|
ERH| When the oven temperature exceeds 500 ˚F, an ERH error code will
appear;| It is necessary to open the upper cover to cool down the temperature
inside the furnace to below 500 ˚F.| **
Read User Manual Online (PDF format)
Read User Manual Online (PDF format) >>