autocom Secure Gateway User Portal User Guide
- June 21, 2024
- autocom
Table of Contents

autocom Secure Gateway User Portal
Product Information
Specifications
- Product Name: Autocom Secure Gateway
- Compatibility: Autocom CARS software
- Identification Methods: QR Code, Mobile Phone, Document Scanning, Face Recognition
- Activation Process: Company Registration, Vehicle Brand Activation
Product Usage Instructions
Company Registration
- Open Autocom CARS software on your PC.
- Go to Settings and choose Secure Gateway Registration or click on the login page link.
- Fill in your personal information matching your identification document.
- Receive a confirmation code via email and use it within 3 days to continue the registration process.
- Complete identification using your mobile phone for a smoother process.
- Add your company details to finalize the registration.
Vehicle Brand Activation
- Go to Company in the menu of Autocom CARS software.
- Add your serial number under VCI (found on the back of your diagnostic tool) and save.
- Contact your distributor if you need to add more diagnostic tools.
- Go to Brands in the menu, choose a brand, and click Enable to link and enable it.
Frequently Asked Questions (FAQ)
-
Q: What should I do if I have been invited to an existing company?
A: If you have been invited to an existing company, check your email for instructions sent to you for registration. -
Q: What is the importance of activating Secure Gateway access immediately after registration?
A: It is crucial to activate immediately after registration, especially for FCA Group vehicles, to avoid delays in approval processing time.
User guide for the Secure Gateway user portal.
First steps
In order to get access to the locked vehicles and start working with Autocom
Secure Gateway you first need to register your company. After that you need to
activate the vehicle brands to work with. Both registration and activation
takes place in your software for Autocom CARS.
How to
- Open your software Autocom CARS on your PC.
- Go to “Settings” in the menu.
- Choose “Secure Gateway Registration” or click here to access the login page.
A registration page is now opened. If this is your first time here, you need
to register an account and create a company. That takes about 5-10 minutes.
If you already have an account you can login via the button “Login”.

The process looks a bit different if someone has invited you to an existing company. In that case an email with instructions has been sent to you.
Step 1 – registration
To register, you need to fill in your personal information. It is important
that the details match your identification document (passport or drivers
license), as you will need to identify yourself with one of those later on.

Only the fields marked with stars (*) are required.

An email with a confirmation code will be sent to your. The code shall be used in the registration page in order to continue the process. The code is valid for 3 days.

When it is time for identification, you have 4 options to choose from:
- Scan the QR code to identify yourself.
- Send an email with a link for identification.
- Send a text message with a link for identification.
- Continue the identification on your computer.
We recommend that you use your mobile phone for the identification. The camera
quality is generally much better than the PC and the process will thereby be
smoother.
In this case, we use the QR code.
Once the QR code has been scanned, the page will change while waiting for you
to finish the identification.

Identify via mobile phone
This is the mobile phone process in short.

- You will be greeted by a welcoming text and a link to the identification service.
- Start your identification by pressing the button.
- There are multiple ways to identify. Choose whichever works best for you.
Scan your preferred document and confirm that all details are correct. You also need to scan your face after this step to confirm.
Once done you will get a confirmation like this.
Continue registration on the computer
When you are done the page on the computer will update and you’ll have to
accept the terms. Read and scroll to the bottom to accept.

The final step of the registration is to add your company.

Once your company is created, you will be redirected to the login page where you can login.

Step 2 – Activation of brands
After the registration you need to continue by activating the Secure Gateway
access.
We recommend that you do the activation immediately after the registration.
The reason is that you do not want to do this once you have a vehicle waiting
for service in front of you.
NOTE! This is especially important for vehicles within the FCA Group since their processing time for the approval might vary.
How to activate
- Go to “Company” in the menu.
- Under “VCI” you add your serial number. You find it on the back of your diagnostic tool.
- Save.
 If you want to add more diagnostic tools you need to contact your distributor.
 - Go to “Brands” in the menu.

- Chose brand by clicking on the blue arrow in the right side and click “Enable”. Note that more than one brand can be linked and thereby enabled at the same time.
It can take a few minutes for the activation to connect to your diagnostic tool. The diagnostic tool will show yellow light during the process and turn green once ready.
Once it turns green, the activation is ready.
More possibilities
You can do more in the Secure Gateway portal than just registrate and
activate. You can also see all your registrated information, edit and update
your account as well as invite employees.
You can read more about this below.
Dashboard

Once logged in, you have several options depending on access levels. There are three main roles:
Responsible – only one person with responsibility for the whole company.
Have all permissions. Assigned to the one who created the account from the
beginning. It is possible to change to another person (who needs to accept).
Requires identification.
Administrator – a user with more permissions than a normal employee. Can
for example edit company data, and invite users. Need to be invited from the
responsible user. Does not require identification.
Employee – the standard role once you get invited. Does not require
identification.
The view in this guide is from the responsible users perspective.
Profile
You can access your profile on the menu bar on the left.

Here you can change basic information, like your password or profile details.
Companies

Access the companies page on the left side bar. The main page shows two cards Overview of your company/companies.
Register a new company.

Adding a new company is as easy as adding your first one. You only need to provide all the details.
Companies overview
Once you have two or more companies, the overview will change a bit in order
to give you an overview of all your companies.

You can click on the name to go to the company page and see the number of employess. You can also have a shortcut to invite more employees.
Manage company
By pressing the name of a company, you’ll access the company page.
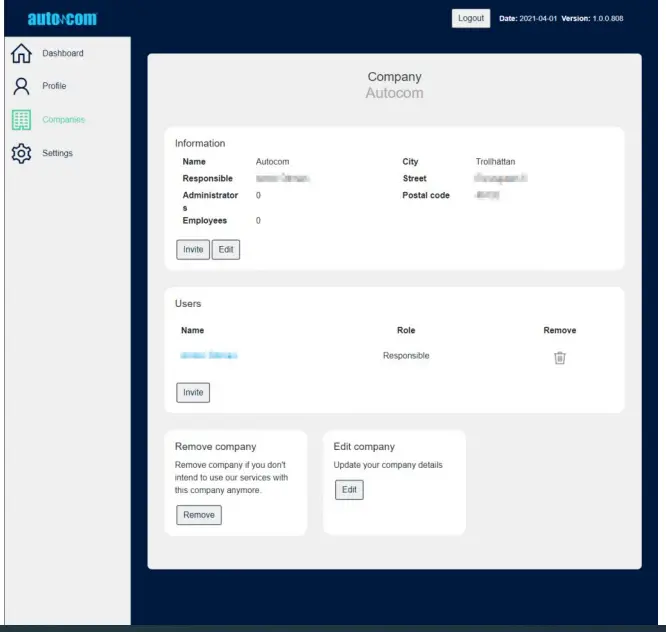
These are the actions that a responsible user can do:
- Invite new employees.
- Edit your company details.
- Go to a specific employee.
- Remove employee.
- Remove company.
Invite employee

You can invite as many employees as you want. Just add their emails by
pressing the ‘Add‘ button. Once you are done, press ‘Send Invitations‘.
The ones invited will get an email with a link. They need to follow the basic
registration process. However, they do not need to identify themselves unless
they are meant to become the new responsible user.
Edit company

You can adjust your company information by pressing ‘Company’. Do not forget to save your adjustments.
Employee
It is possible to go to an employee page by pressing the employee name.
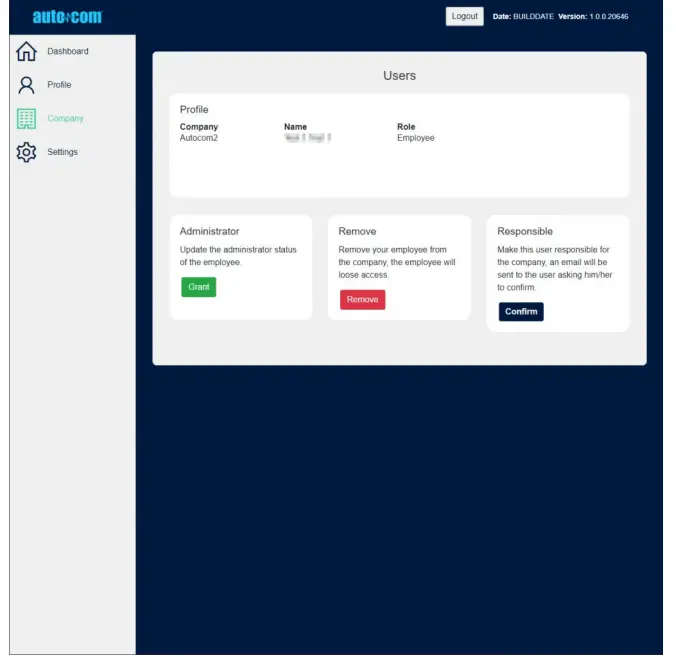
- Her is what you can do in the employee page:
- Changing from employee to administrator and vice versa
- Removing the employee
- Making the employee a responsible user for the company
- If you want to make another employee responsible, that user will get an email with instructions. The person need to accept becoming the responsible user, as well as identify her/himself if that has not been made yet.
Settings
By pressing ‘Settings‘ on the left side menu, you can access some of the most
important settings of your account.
- Changing password
- Remove account (only for users with access level ‘responsible’)
- Update email
- Change language

Read User Manual Online (PDF format)
Read User Manual Online (PDF format) >>