EEye V029__010A08A Dry Eye Treatment IPL system User Manual
- June 12, 2024
- EEye
Table of Contents
- V029__010A08A Dry Eye Treatment IPL system
- ACCESSORIES E▶Eye
- PRECAUTIONS FOR USE
- GLOS SARY
- INFORMATION PROVIDED BY E▶Eye ‘S TOUCHSCREEN
- TREATMENT OF MEIBOMIAN BLEPHARITIS USING E▶Eye
- REPLACING E▶Eye Optic CARTRIDGE
- SOFTWARE OPTIONS
- PROHIBITED OPTIONS
- USE OF ACCESSORIES
- MAINTE NANCE
- ASSISTANCE
- MARKING
- TECHNICAL CHARACTERISTICS
- STANDARDS
- GUARANTEE CONDITIONS
- References
- Read User Manual Online (PDF format)
- Download This Manual (PDF format)
![]() User Manual
User Manual

V029__010A08A Dry Eye Treatment IPL system
Dear Practitioner,
As the recent purchaser of an ![]() , I would like to thank you for your
confidence in our product.
, I would like to thank you for your
confidence in our product.
Habits are changing, and ![]() is a practical example of this fact.
Your patients can now enjoy the benefits of a new treatment for meibomian
blepharitis (dry-eye syndrome) using state-of-the-art pulsed light technology,
with complete safety and in a compact format.
is a practical example of this fact.
Your patients can now enjoy the benefits of a new treatment for meibomian
blepharitis (dry-eye syndrome) using state-of-the-art pulsed light technology,
with complete safety and in a compact format.
You have my personal assurance that the greatest care has been taken in the
manufacture of each ![]() ; as you will see for yourself,
; as you will see for yourself, ![]() is an
exceptional product.
is an
exceptional product.
I hope that your device will give you complete satisfaction, and that you will
choose to share your experience on the website www.esw-vision.com.
With sincerest regards,
Yves Vincent Brottier
Creator of 
ACCESSORIES E▶Eye
❙ INSTRUCTION FOR USE IS DOWNLOADABLE AT:
https://www.esw-vision.com/downloads
![]() base unit and applicator.
base unit and applicator.
optic – Consumable cartridge (delivered with your ![]() kit).
kit).
Part Number: V029010A08A
Connect plus Part number: N029010A08A
Activation cards ![]()
(one type of activation card is delivered with cartridge).
clean
Optical spray.
Part Number: V000__018A___Any cleaning spray over 95% isopropyl alcohol may be
used.
The purpose of stickers (known as patch) is to simplify the user to protect patients. Any stickers with the same purpose can be used.
patches
Self-adhesive patches (per sheet).
Part Number: V000__020A___
stop
Guide plate.
Part Number: V000__016A___
Power cord.
Part Number: V029XX013A00A
(XX according to the country).
gel
Flashing intended gel – 85 ml (delivered with Kit)
Part Number: V000__005A___
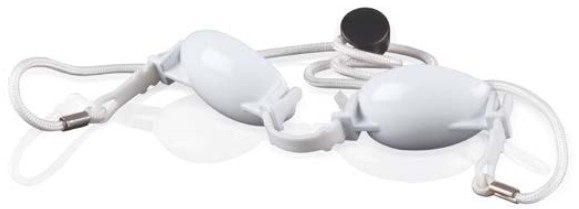
Pairs of eye mask protective shells (in special packaging).
Part Number: V000__014A___
consents to be completed by patients.
mask – Protective glasses.
Part Number: V000__012A___
Any glasses compliant to EN166 with a glass of type 3: 8 to 18 % transmission
may be used.

User manual.
Electrical outlet
Part number:
V041__000A08A
extractor
Extraction tool for the mobile head.
Part Number: V000__031A___
NOTE: E-Swin SAS holds exclusive rights for the marketing of ![]() and its
accessories: optic, clean, patches, stop, gel, mask, eye mask etc.
and its
accessories: optic, clean, patches, stop, gel, mask, eye mask etc.
IMPORTANT: YOU MUST KEEP ALL THE ITEMS OF ORIGINAL PACKAGING (BOXES,
PACKING BLOCKS, ETC.).
The manufacturer’s guarantee for parts and labour will only be valid if your
device is returned in its complete original packaging. All items of original
packaging in which your ![]() was delivered should therefore be
carefully stored.
was delivered should therefore be
carefully stored.
❙ INDICATIONS
![]() produces Intense pulsed light (IPL) in order to improve the dry eye syndrome
caused by a deficiency in the oily layer of the cornea. The indication for IPL
treatment is all adults, from phototypes I to V, suffering from Meibomian
gland dysfunction (MGD).
produces Intense pulsed light (IPL) in order to improve the dry eye syndrome
caused by a deficiency in the oily layer of the cornea. The indication for IPL
treatment is all adults, from phototypes I to V, suffering from Meibomian
gland dysfunction (MGD).
Use of the device is associated with following benefits for the patient
including (after 45 days of IPL treatment):
- Improvement of the meibomian gland function with a reduction of the lid margin of 73% (from 1.5/3 before treatment to 0.4/3) after 5 months and 24 days post-treatment.
- Stabilisation of the tear film with an increase for TBUT of 80% (from 4.02 before treatment to 7.95 seconds) after 1 month and 25 days post treatment.
- Less ocular surface inflammation with a CFS score reduction of 91% (from 1.1/12 before treatment to 0.1/12) after 7 months and 12 days post-treatment.
- Reduction of symptoms with a decrease of 63% (from 14.7/28 before treatment to 5.5/28) for SPEED questionnaire after 7 months and 12 days post-treatment.

PRECAUTIONS FOR USE
❙ FOR YOUR SAFETY
Before using your ![]() , the following information should be
read carefully:
, the following information should be
read carefully:
-
Service voltage: 100 – 240 V a.c.
-
Rated frequency: 50-60 Hz.
-
Maximum power consumption: 540 VA.
-
Check that this voltage is consistent with the voltage rating of your installation. Any connection error may cause irreparable damage which is not covered by the guarantee.
-
Check that the power socket to which your
 is connected is not damaged, is in perfect working order, and will not impair the correct use of your (the power socket must be easily accessible).
 -
This device is reserved exclusively for the use of ophthalmological specialists.
-
Never disconnect
by pulling on the power cord in normal use. -
In case of emergency,
may be separated from mains by disconnecting the power cord on either side. -
Never use
with wet hands. -
must not be used in any location in which the device might be exposed to water spray (on either the applicator or the base unit).
-
Never immerse the
base unit, its applicator or the Optic cartridge in water. -
must not be used if it is damaged, in case of the display of a functional anomaly on the touch screen, or if the device has been dropped (concealed damage may jeopardize your safety and the safety of your patient).
-
This device can only be repaired using special tools. In case of any problems after delivery, contact us by filling out the contact form on www.esw-vision.com/contact.
Any serious incident occurring in relation to the should be
reported to esw-vision (https://www.esw-vision.com/contact) and the
competent authority of the Member State in which the user and/or patient is
established. -
optic cartridges, and all accessories in general, must be ordered exclusively by visiting www.esw-vision.com/contact and choosing the applicable contact for your country. We cannot accept any liability associated with the use of consumable cartridges and accessories supplied by another manufacturer.
-
During operation, the device must be positioned on a flat supporting surface, in a location where there is no risk of the device being dropped.
-
E-Swin SAS cannot accept any liability for damage resulting from the incorrect use of the device, or from the use of the device other than as described in the present user manual.
-
Attention – Using controls or setting or performance of procedures others than those specified in this user manual may result in exposure to dangerous optical radiation.
-
Each of your patients must be supplied with a pair of eye mask protective shells. The protective shells eye mask must be worn throught the operation of the device by the patient.
-
One pair of glasses mask is supplied with the device: these glasses should be worn throughout the operation of the device by the professional user of
. -
Once
is in service, it must not be brought into contact with the hair, the area covered by the eye mask protective shells, clothing or any other object, in order to avoid any risk of injury, obstruction or deterioration. -
The tip of the applicator must not be in contact with the eye mask shells at the time of administration of the flash.
-
The device must never be used in the proximity of an aerosol, in the proximity of a heat source, or in the proximity of the other electronic devices.
-
The device must not be stacked on other electronic devices.
-
Your
is supplied with a mains lead (2 metres in length) and an applicator lead (2 metres in length). No extension cable, or any cable other than those supplied by E-Swin, should be used – the device may otherwise be rendered non-compliant for electromagnetic purposes. -
Wireless communication devices must be kept at a distance (approximately 3 metres), as these may impair the correct operation of the device.
-
The device must be installed in an environment which is substantially free of electromagnetic interference (from computers, electrical treatment appliances, etc.).
-
can lead to undesirable side-effects such as blistering (lasting less than one week), cheek swelling, conjunctival cyst, floaters, hair loss at brow and forehead, light sensitivity and redness of face.
-
Earth conductor is only used as functional earth.
![]() can be used to treat the condition of meibomian blepharitis (dry-eye syndrome)
in phototypes I – V. VI phototypes must not be treated using.
can be used to treat the condition of meibomian blepharitis (dry-eye syndrome)
in phototypes I – V. VI phototypes must not be treated using.
The professional user of ![]() must ensure that only persons who
fulfil the criteria for use described in the present manual will receive
treatment using
must ensure that only persons who
fulfil the criteria for use described in the present manual will receive
treatment using ![]() .
.
❙ COMPATIBILITY CRITERIA
![]() must be contra-indicated for persons who are unsuitable for pulsed light
treatment; specifically, where one of the following criteria are fulfilled:
must be contra-indicated for persons who are unsuitable for pulsed light
treatment; specifically, where one of the following criteria are fulfilled:
- On pregnant women.
- On black skin (phototype VI).
- On sunburned skin which has healed within the last month.
- In case of a previous history of sunlight allergy.
- On skin that has been exposed to high pressure UV for less than ten days.
- On persons who have applied a self-tanning product (cream, dietary supplement) for less than two months.
- On an injured, burned, or infected skin.
- On skin lesions of unusual appearance, which will require investigation.
- On high-risk areas (blemishes, birthmarks, warts, unhealed wounds…).
- On persons suffering from a skin condition (eczema, inflammation, acne…).
- On moles: if they are located on the zone to be treated, they must first be protected, for example by covering them with the self-adhesive patches provided with your .
- On tattooed areas: permanent make-up, or cosmetic tattoos, of whatever colour. In this case, use the stop delimitation plate.
- On persons undergoing photo-sensitising treatment: depending upon your medical opinion, these patients may not be accepted for treatment with .
- On persons with a previous history of cutaneous pathology.
- On diabetics, hemophiliac, epileptics, persons suffering of tardive cutaneous porphyria.
- On persons wearing a pacemaker or cardiac defibrillator.
- On animals.
❙ TREATMENT PROCEDURES
-
Unperfumed micellar cleansing water is used to remove any cosmetic residues (make-up) from the skin.
-
Zone concerned:
– Flashing of the cheekbone and left temporal area according the drawing on your right.
– Repeat the same procedure under the right side. -
After flash treatment, the application of cosmetic products is possible.
-
The specific
protocol consists of 3 sessions as follows:
– Day 0
– Day 15
– Day 45
– (Day 75 optional)
❙ MEDICAL CLAIM
![]() ,
designed and manufactured by E-Swin, is a device of health regulated of class
IIb, with CE marking delivered by CE 0197 organization.
,
designed and manufactured by E-Swin, is a device of health regulated of class
IIb, with CE marking delivered by CE 0197 organization.
![]() can be used to treat the condition of meibomian blepharitis (dry-eye
syndrome).
can be used to treat the condition of meibomian blepharitis (dry-eye
syndrome).
IN NEED OF HELP?
To contact our sales department or technical department, fill out the contact
form on www.esw-vision.com/contact.
Only the gel, the self-adhesive patches, the guide plate stop, the mask
goggles and the eye mask protective shells supplied with your ![]() must be
used. The use of any other product may result in the risk of skin burns and
will invalidate the guarantee of your device.
must be
used. The use of any other product may result in the risk of skin burns and
will invalidate the guarantee of your device.
GLOS SARY
❙ BASE

❙ APPLICATOR

INFORMATION PROVIDED BY E▶Eye ‘S TOUCHSCREEN
❙ “HOME” MENU
❙ “TREATMENT OF MEIBOMIAN BLEPHARITIS” MENU
Parameters on the Treatment of meibomian blepharitis menu (ready to flash – green signal)
This Home menu (screen a) provides access to the following 3 menus:
-
TREATMENT OF MEIBOMIAN BLEPHARITIS MENU This menu is used for the selection of parameters for meibomian blepharitis and the initiation of the flash treatment session.
-
CONSUMABLES MENU
This menu displays the remaining credit balance of flashes on the activation card. -
CONFIGURATION MENU
This menu allows the setting of various parameters for the device.
Other information will be displayed continuously and automatically: -
System temperature (applicator).
-
Number of flashes remaining.
-
Date and time.
-
Return to previous menu icon. This icon allows the modification of any selection which has been entered previously.
-
User assistance menu. This provides access to instructions for use.
-
Device start-up/shutdown icon.
Screen B summarizes the parameters which have been selected progressively on the successive screens in the Treatment of meibomian blepharitis menu. -
Flux delivered (in joules per cm²).
-
Power level indicator: level of light energy required.
-
Review of all mandatory precautions to be observed before any use of the device.
-
Pause icon for the flash treatment session: pressing this icon will place
in “pause” mode. In this mode, no flash can be emitted from the applicator. To exit this mode, press the same icon again.
❙ “CONSUMABLES” MENU ❙ “CONFIGURATION”
MENU
❙ “CONFIGURATION”
MENU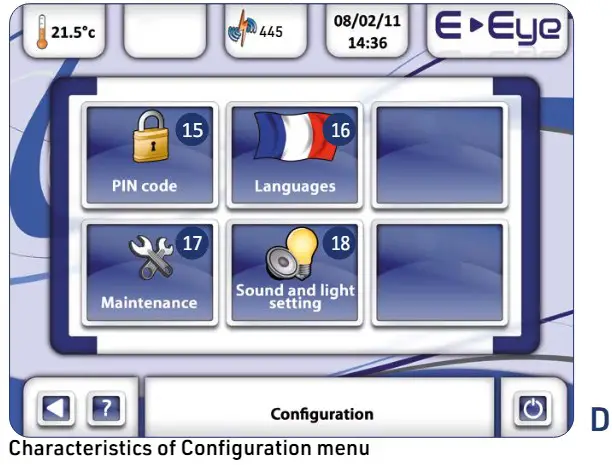 The Consumables menu
(screen C) displays the outstanding number of flashes available on the
activation card and its associated optic cartridge.
The Consumables menu
(screen C) displays the outstanding number of flashes available on the
activation card and its associated optic cartridge.
The machine operates using an activation card which is specific to each optic cartridge. A specific and unique activation card is supplied with each new optic cartridge.
The remaining number of flashes is indicated by the icon ⑤, represented here as: .
The Configuration menu (screen D) allows various settings to be entered on the sub-menus indicated; this operation corresponds to the following software options:
15. PIN code.
16. Language.
17. Maintenance.
18. Volume and brightness.
NOTE: During the charge-up waiting phase, the indicator signal will
remain red (screen B).
An audible signal indicates the insertion or withdrawal of the activation card
for the optic cartridge.
TREATMENT OF MEIBOMIAN BLEPHARITIS USING E▶Eye
❙ BEFORE EACH APPLICATION
- Check the mains lead (to ensure that the latter is not trapped or compressed, and that no wires are exposed).
- Check the cable connecting the base unit to the applicator (for the absence of visible deterioration).
- Check the external (photo 1) and internal (photo 2) optical components of .
INSPECTION OF EXTERNAL OPTICAL COMPONENTS
Check that the glass end of the applicator (optical guide) is free of surface
defects.
If this is not the case, the mobile head must be replaced. This component can
be ordered by visiting www.esw-vision.com/contact and choosing the applicable contact for your country.
INSPECTION OF INTERNAL OPTICAL COMPONENTS
Each time before use and before connecting your ![]() to
supply, you must check the integrity of the internal optical components: the
tube, the filter (photo 2) (the flat component of red-coloured glass) and the
optical guide.
to
supply, you must check the integrity of the internal optical components: the
tube, the filter (photo 2) (the flat component of red-coloured glass) and the
optical guide.
❙ REMOVAL OF THE MOBILE HEAD
FOR THE CLEANING OF EXTERNAL AND INTERNAL OPTICAL COMPONENTS
- Hold the applicator with the ventilation slots facing you. Insert the extractor between the mobile head and the fixed lateral shell of the applicator (photo 3).
- Push the extractor into the mobile head to its full length (photo 4).
- Apply pressure simultaneously to the 2 retaining lugs of the mobile head, and remove the mobile head (photo 5).
- Remove the extractor and place the applicator carefully on a flat surface (photo 6).
- Hold the mobile head, and the filter will now be visible (photo 7). Apply the clean spray to a lint-free cloth (photo 8), and clean the filter using the cloth thus prepared (photo 9).
- Hold the mobile head, gently move the sidewalls outwards (photo 10), carefully remove the filter cartridge (photo 11) and place it on a flat surface (photo 12).
- Repeat the same cleaning operation for the internal optical lens.

The filter (the flat component of red-coloured glass) must be intact and free
of cracks, and must show a flat and regular surface.
It must be clean and free of dust. To improve the efficiency of ![]() , it is
recommended that the clean spray supplied with
, it is
recommended that the clean spray supplied with ![]() should be
used to clean the filter before each use of the device. Any filter which is
damaged as a result of incorrect maintenance will not be covered by the
guarantee (see instructions for the use of the spray clean above).
should be
used to clean the filter before each use of the device. Any filter which is
damaged as a result of incorrect maintenance will not be covered by the
guarantee (see instructions for the use of the spray clean above).
WARNING: ![]() is reserved exclusively for the use of duly authorized
ophthalmological professionals.
is reserved exclusively for the use of duly authorized
ophthalmological professionals.
You must not use your ![]() if the external and or internal optical
components are damaged.
if the external and or internal optical
components are damaged.
❙ STAGE 1
PREPARING THE PATIENT
- Patient has to be settled in an examination and treatment chair lying or sitting.
- The skin must be clean, dry and free of any cosmetic products.
- Check that no cream, moisturizing lotion, oil or any other substance has been applied to the skin beforehand.
❙ STAGE 2
USING THE ACTIVATION CARD
- Locate the activation card for your optic cartridge.
- Insert this card into the slot provided for this purpose, located on the rear of , in the base. The location of this slot is easily identifiable by its surrounding sticker.
- Leave this card in place throughout the session.
- At the end of the session remove the activation card, taking care to avoid damage, and replace it in its holder.
- Follow the procedure for turning off the device.
WHAT YOU NEED TO KNOW:
Each activation card carries the same serial number as the optic cartridge
which it accompanies. Accordingly, each activation card will only work with
one optic cartridge, and must not be used with any other cartridge.
❙ STAGE 3
START-UP AND SETTING OF PARAMETERS FOR ![]()
-
Upon the initial start-up of
, “activation codes” (5 characters, followed by a further 5 characters) may be requested. Once entered, these codes will not be requested a second time. -
Connect
using the mains lead. -
The internal test procedure of
will commence, and will last for a few seconds.
Upon the completion of this phase, screen E will be displayed automatically. The software version of the device is displayed at the bottom left of the screen and, below this, the name of the device and its version number. -
A personalized 4-digit PIN code may also be entered (see chapter on software options in the present manual).
❙ STAGE 4
SETTING PARAMETERS FOR![]() DURING THE TREATMENT SESSION
DURING THE TREATMENT SESSION
-
Select the menu «Treatment of meibomian blepharitis» (screen F)
IMPORTANT: The «Treatment of meibomian blepharitis» menu can only be accessed if your flash credit balance is not zero. -
Select the power level (screen G) “Selection of energy level” will be displayed at the bottom of the touch screen. This screen permits the setting of the required power Level (screen G). The arrows are used to increase or decrease the power of the flash delivered, which will then be displayed to the left of the power gauge, in joules per centimetre squared (J/cm²). The power level available for selection ranges from 9 to 13 joules/cm².
-
Unlocking the security features (screen H) – Your patient is wearing their eye mask , as a compulsory requirement, throughout the session.
– You are wearing the mask goggles supplied, for visual comfort during the treatment session.
– You have applied gel to the entire zone to be treated.
– You are not using under certain physiological or medical
circumstances (on pregnant women, on persons taking photo-sensitizing
medication, etc.).
under certain physiological or medical
circumstances (on pregnant women, on persons taking photo-sensitizing
medication, etc.).
– You have familiarized yourself with the user manual before proceeding with the session (specifically the hazard warnings and precautions for use).
– You have ensured that it is not possible for water to be sprayed onto the.
Once all precautions have been validated, click on the validation icon on the right.
NOTE: will not deliver any flash until you have unlocked all the
security features by clicking on each of the security icon.
IMPORTANT: The activation card for the optic cartridge must not be damaged, bent or cut. Any damaged card will not be covered by the E-SWIN guarantee. As a result, any such card will not be replaced and its associated optic cartridge will be unusable. It will then be necessary to purchase a new optic cartridge, with its activation card. The activation card must not be stored in the proximity of a source of heat or electromagnetic radiation.
NOTE:
- After 7 seconds of inactivity, screen will switch over to standby mode. Flashing is still possible. Touch the screen to reactivate.
- After around fifteen minutes of inactivity, will switch over to pause mode. Press the “play” icon 13 to reactivate.
• Validating the parameters selected (screen I).
This screen allows the options entered by the user to be reviewed; these
options are validated by clicking on the «tick» icon.
At any time, a parameter can be modified by clicking on that parameter, or by
returning to the previous menu, using the arrow at the bottom left.
❙ STAGE 5
FLASH TREATMENT
-
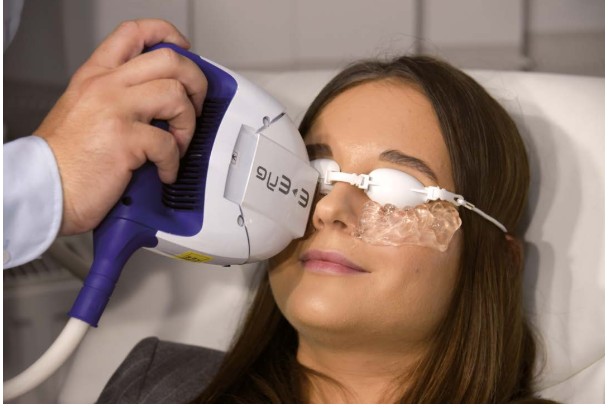
The eye mask should be correctly adjusted on the eyes of your patient, and must be worn throughout the treatment session.
-
Any beauty spots should be covered using the patches.
-
Apply the gel in a generous layer (minimum 1cm thick) on the cheekbone and the temporal areas, making sure that the gel does not get under the eye mask.
-
Locate your mask goggles and put them on. If there are other persons close to you during the operation of
, they may wear mask glasses for their comfort. -
If necessary, use the stop plate to mask a substancial area which is not to receive flash treatment (tattos).
-
Position the end of the optical guide on the gel.
-
The optical guide must be in full contact with the gel, but not with the skin.
-
Trigger a flash by pressing the button on the front of the applicator.
-
Release the button and generate a further flash, after moving the optical guide under one eye, starting from the inner canthus of the eye, up to the temporal area.
-
Repeat the same operation until 5 flashes have been applied under each eye, as per the drawing on your right.
The applicator button must not be pressed until the green indicator light is
illuminated. If the button is pressed too early (before the green indicator
light is illuminated), a flash may not be generated.
NOTE: The gel, the self-adhesive patches, the guide plate
stop, the mask goggles and the eye mask protective shells used
must be those supplied with your ![]() . The use of any other product may
result in the risk of skin burns, and will invalidate the guarantee of your
device.
. The use of any other product may
result in the risk of skin burns, and will invalidate the guarantee of your
device.
❙ STAGE 6
END OF THE SESSION
- Press the on/off button of the device (icon 9).
- The fans will continue to run for a little under 5 minutes. Do not disconnect the mains lead while the fans are still running. Amongst other factors, this will ensure that the optical components are correctly cooled.
- Unlike the fans in the applicator, which will shut down after a certain time, the fans in the base unit will continue to run until the mains lead of the device is finally disconnected.
- Remove your mask glasses and remove the eye mask from your patient.
- Remove the gel and clean off any surplus using micellar cleansing water.
- Using the clean spray, clean the glass end of the applicator (optical guide). To do this, apply the clean spray in advance to a lint-free cloth, then clean the optical guide (photo 13).
- It is also possible to service the base in which the applicator is fitted (by rinsing with water, and ensuring that the base is dry before the applicator is refitted). To this end, the base, which has a smoked black finish, must be removed by holding the two fins on either side (photos 14 & 15).
IMPORTANT: No flash treatment must be administered unless the eye mask protective shells are in place. The gel will only be applied to the area which is to receive flash treatment once the eye mask shells are in place on the patient. Under no circumstances must the gel penetrate below the eye mask shells.

REPLACING E▶Eye Optic CARTRIDGE
❙ REPLACING THE OPTIC CARTRIDGE
- For any initial use, optic cartridge be pre-installed inside the applicator.
- Each optic cartridge is associated with an activation card.
- A device may be used by several persons, each of whom will have their own optic cartridge. associated with its own activation card.
- Replacement of the optic cassette must be undertaken with the utmost care. Improper handling may result in permanent damage to the applicator, and to in general. The guarantee does not cover improper handling. We therefore recommend that you pay very careful attention to the procedure to be observed.
- You may have occasion to replace the optic cartridge before the originally scheduled number of flashes has been exhausted, e.g. in case of a change of user. where a tube has been broken, where the optic cartridge is no longer working, etc.
❙ STAGE 1
CHECKING THE NUMBER OF FLASHES AVAILABLE ON THE ACTIVATION CARD.
You can monitor your consumption of flashes in real time (see icon 7 for
the indication of the number of flashes remaining), or through the
«Consumables» menu.
When the flash credit balance reaches zero, the main menu «Treatment of
meibomian blepharitis» will immediately become inactive, and will be greyed-
out (screen J).
The activation card and its ![]() optic cartridge must be replaced when
the number of flashes reaches zero.
optic cartridge must be replaced when
the number of flashes reaches zero.
❙ STAGE 2
COOLING OF OPTICAL PARTS.
- During the procedure for the replacement of the optic cartridge, before switching off and disconnecting your device, you must wait for the fans in the applicator to shut down (this may take several minutes). This procedure will allow the cooling of the internal optical components of the applicator.
- Unlike the fans in the applicator, which will shut down after a certain time, the fans in the base unit will continue to run until the mains lead of the device is finally disconnected.
❙ STAGE 3
TURNING OFF THE DEVICE.
- Switch off the device.
- Disconnect the mains lead of the device.
❙ STAGE 4
SEPARATION OF THE MOBILE HEAD OF THE APPLICATOR USING THE extractor AND
EXTRACTION OF ![]() optic CARTRIDGE IN PLACE.
optic CARTRIDGE IN PLACE.
- Hold the applicator with logo facing you and the cable which connects the applicator to the base unit on your left. Insert the extractor between the mobile head and the fixed lateral shell of the applicator (photo 16).
- Push the extractor into the mobile head to its full length (photo 17).
- Apply pressure simultaneously to the 2 retaining lugs of the mobile head and remove the mobile head (photo 18).
- Remove the extractor and place the mobile head carefully on a flat surface (photo 19).
- Identify the guide notches of the cartridge (photo 20).
- Carefully extract the cartridge and remove it completely (photo 21).

❙ STAGE 5
INSERTION OF A NEW ![]() optic CARTRIDGE.
optic CARTRIDGE.
-
Check the direction of insertion of the new cartridge:
For orientation purposes, one side of the cartridge is marked with a red disc. This side must be aligned with the side of the applicator which carries the same red disc. In brief, the two red discs must be matched up (photo 22). NOTE: Cartridges are not symmetrical, so they must be inserted in the right sense, and certainly not in the other. -
After inserting the cartridge to the stop, you must check that it is correctly positioned: it must be parallel to the end of the fixed part of the applicator (photo 23).
If this is not the case, the cartridge has been incorrectly inserted. You should remove the cartridge and check that:
– The discs are correctly matched up (photo 22).
– The electrodes have not been twisted (photo 24). If you have twisted the electrodes, you must not insert your cartridge into the applicator, or you may cause serious damage to your device. The damaged cartridge should be returned to us, and you should order a new cartridge.
- Check that the cartridge is correctly engaged.
PRECAUTIONS: throughout the procedure for the replacement of the cartridge, the following should not be touched under any circumstances:
- The tube or its reflector (photo 25),
- The electrodes of the tube (photo 26).
If you have inadvertently touched the tube or its reflector, we would strongly advise you to return the cartridge to us for replacement. Return carriage costs and the cost of dispatching a new cartridge will not be assumed by E-Swin SAS.
❙ STAGE 6
CLEANING THE EXTERNAL AND INTERNAL OPTICAL COMPONENTS.
- Using the clean spray (photo 27), clean the glass end of the applicator (optical guide). To do this, apply the clean spray beforehand to a lint-free cloth, and clean the optical guide.
- Before repositioning the mobile part of the applicator, systematically clean the filter (in the head of the applicator) on both sides using the clean spray (photos 28). The filter is the flat element of red-coloured glass (see steps for the removal of internal optical parts).
❙ STAGE 7
CLOSING THE APPLICATOR.
Align the moving part of the applicator with the fixed part. Reposition the
mobile head so that the red disc on the fixed part coincides with the internal
red disc on the mobile head (photo 29, turquoise arrows), and re-attach the
moving part by pressing gently on the retaining lugs of the mobile head (photo
29, pink arrows).
❙ STAGE 8
INSERT A NEW ACTIVATION CARD
Remove the old activation card and insert the new card supplied with the
optic cartridge in the slot provided for this purpose (photo I).
Each activation card carries the same serial number as the optic cartridge
which it accompanies. Accordingly, each activation card will only work with
one optic cartridge, and must not be used with any other cartridge.
If your flash credit balance is exhausted while the device is in use, the
warning screen (shown in photo II) will appear.
If the activation card is not present or is damaged, the warning screen (shown
in photo III) will appear.

SOFTWARE OPTIONS
❙ SOFTWARE OPTIONS
When you switch on ![]() and the home page opens, 3 menus will
be available:
and the home page opens, 3 menus will
be available:
-
“Treatment of meibomian blepharitis” menu.
See section on “TREATMENT OF MEIBOMIAN BLEPHARITIS USING“. -
“Consumables” menu.
This menu shows the number of flashes remaining on the activation card and its optic cartridge. once the flash credit is exhausted, user only needs to replace the activation card and its associated optic cartridge. -
“Configuration” menu.
This menu will allow you to access the following 4 sub-menus:
PIN CODE (screen K)
This code may be changed to a customized number.The default PIN code is
“0000”. If you do not change this code, you will not be requested to enter the
PIN upon the start-up of thedevice. However, if you change the default PIN
code, you will be required to enter your PIN whenever ![]() is
restarted.
is
restarted.
To change the PIN code:
- Go to the “Configuration” menu.
- Select the “PIN code” sub-menu.
Using the digital keypad:
- Enter the current PIN code, and validate using the “V” key.
- Enter the new PIN code and validate using the “V” key.
- A message indicating that the codes are valid will appear. Click on “OK”.
- The “Configuration” menu will be displayed.
It is possible to return to the “Configuration” menu at any time by clicking
on icon 7.
The “C” key can be used to correct the figure in each box.
SELECT LANGUAGE (screen L)
Click on the flag which corresponds to the required language.
The “Language change confirmed” message will be displayed; click on “OK” to
confirm the change. The “Choice of language” sub-menu will be displayed once
more. The return icon 7 can be used to return to the “Configuration” menu.
SETTING OF PARAMETERS (VOLUME AND BRIGHTNESS) (screen M)
It is possible to adjust:
- The volume, using the 2 arrows associated with the loudspeaker icon.
- The brightness of the touch screen, using the 2 arrows associated with the light bulb icon.
The return icon 7 can be used to return to the “Configuration” menu.
MAINTENANCE
This access is exclusively reserved for the after-sales service.
IMPORTANT: We would strongly advise you to make a note of your PIN code.
If you have entered a PIN code which you cannot remember, it will be necessary
to return your ![]() to us before it can be used again. Only our technical service
is qualified to execute the requisite operations for the unlocking of your
to us before it can be used again. Only our technical service
is qualified to execute the requisite operations for the unlocking of your
![]() .
This service is available with the device out of guarantee, and will be
invoiced accordingly.
.
This service is available with the device out of guarantee, and will be
invoiced accordingly.
NOTE:
- After 7 seconds of inactivity, screen will switch over to standby mode. Flashing is still possible. Touch the screen to reactivate.
- After around fifteen minutes of inactivity, will switch over to pause mode. Press the “play” icon 13 to reactivate.

PROHIBITED OPTIONS
❙ LIST OF PROHIBITED ACTIONS ON YOUR![]() IS SET OUT BELOW (non-exhaustive).
IS SET OUT BELOW (non-exhaustive).
These actions are prohibited on the grounds that they might expose you to
danger or entail the risk of irreparable damage to your device.


USE OF ACCESSORIES
The optic cartridge has a pre-programmed service life which guarantees the consistent quality of light emitted, from the first flash to the very last. The cartridge is supplied together with its activation card. The optic cartridge and its card must be replaced once the number of available flashes is expired.
optic
The gel must be stored at room temperature. It is used in a very thick layer (1 cm in thickness), and is applied progressively throughout the session, in order to avoid any drying of gel on the skin.. Once used on the skin and subject to flash exposure, the gel must not, under any circumstances, be recovered and used on a different zone. Flash exposure of the gel is liable to result in the modification of its optical characteristics. At the end of the session, it is removed from the surface of the skin using a paper towel or a wet compress. The gel is removed from the optical components and the moving part of the applicator using a damp cloth, followed by the application of the clean spray.
Ingredients (quantity w/v%): carbomer (0,5-2), TriEtanol Amin (0,5-2),
MonoPropylene Glycol (0,5-2), Dimethicone Copolyol (0,1-1,0), Isopropyl
Myristate (0,1-0,8), Diazolidinyl Urea (0,1-0,8), Glycerin (1,0-5,0), Aloe Vra
barbadensis (0,2-1,0), Benzyl alcohol (et) Methylchloroisothiazoline (et)
Methylisothiazolinone (0,05– 0,15), Deionized water (Q.S 100).For external use
only.
Not to be used on broken, burned or infected skin. Keep out of reach of
children.
geL
Made in Europe
These glasses mask may be worn by all persons present during flashing
treatments, for visual comfort during treatment sessions.
After each use, they should be cleaned using the clean spray.
mask
Made in China
These protective shells eye mask must be worn by persons under treatment, and must be adjusted correctly. They protect the eyes of the patient. Disinfect the shells after each session.

The tool extractor is used for the separation of the mobile head of your applicator, in order to allow the cleaning of optical components or the replacement of the optic cartridge.
 extractor
Made in China
The spray clean is used to clean and maintain:
-
The optical parts of the mobile head of the applicator:
– External optical parts: spray directly and wipe with a dry cotton cloth.
– Internal optical parts: Never spray directly on the internal optical parts. Take a dry cotton cloth and spray on the cloth, and then clean the filter (flat red part made of glass) with this dampened cloth. Finish cleaning with a dry part of the cloth. -
The device’s touchscreen: Never spray directly on the touchscreen. Take a dry cotton cloth and spray on the cloth, and then wipe the screen with this dampened cloth.
Finish cleaning with a dry part of the cloth.
The spray clean must only be used once the device is unplugged and the optical
parts are cold.
If you intervene after using the ![]() , you must wait for the fan of the
device to come to a complete stop before unplugging the base. This enables,
among other things, the optical parts to cool down properly.
, you must wait for the fan of the
device to come to a complete stop before unplugging the base. This enables,
among other things, the optical parts to cool down properly.
clean
Made in France
These self-adhesive patches are used to mask small areas (such as beauty spots) which are not to be exposed to flash treatment. The patches must be positioned before the gel is applied. It will then be possible to administer flash treatment to the entire zone, regardless of the presence of beauty spots. patches are removed at the end of the session.
patches
Made in France
The stop plate is constructed of a flash-resistant material. It is used to mask an area where flash treatment is not to be applied (for example, tattoos). The glass end of the applicator (optical guide) may also be positioned to overlap the stop plate and the skin.
stop
Made in France
The filter set a fundamental component for the safety of flashes generated. It may be replaced if required. The cleaning of this component is essential.
filter
Made in France
All these products can be found on our website at www.esw- vision.com
MAINTE NANCE
Before undertaking any maintenance, ensure that your ![]() is
disconnected from supply. If operations are to be undertaken after using
is
disconnected from supply. If operations are to be undertaken after using
![]() ,
you must wait until the fan in the applicator has completely shut down before
disconnecting the base unit from supply.
,
you must wait until the fan in the applicator has completely shut down before
disconnecting the base unit from supply.
This will also ensure that the optical components are correctly cooled.
NOTE: Unlike the fans in the applicator, which will shut down after a
certain time, the fans in the base unit will continue to run until the device
is finally disconnected from supply.
❙ BASE
PLASTIC COMPONENTS
Do not clean the interior of the dedicated slot for the activation card. All
plastic components of the device must be cleaned using a clean cloth which has
been moistened in water (with no additional products).
TOUCHSCREEN
The screen must be cleaned using a clean cloth, impregnated with the clean
spray (never apply the clean spray directly to the touch screen).
MAINS LEAD
Check that the lead is in perfect condition (not trapped or compressed, with
no wires exposed). Clean the lead using a cloth which has been moistened in
water (with no additional products).
❙ APPLICATOR
MOBILE HEAD
Cleaning the internal optical components of the mobile head using the clean
spray before and after each use will ensure the maintenance of the effective
operation of your device. Never apply the clean spray directly to the internal
components of the applicator.
APPLICATOR BODY
All plastic components of the applicator must be cleaned using a clean cloth
which has been moistened in water (with no additional products).
❙ APPLICATOR CABLE
This cable must be kept clean at all times, and must be free of any visible
deterioration. Any excessive bending or compression of the cable must be
avoided. In case of any doubt regarding the condition of this cable, it is
absolutely essential that you should discontinue the operation of your device.
❙ VENTILATION SLOTS IN THE BASE UNIT AND APPLICATOR
The applicator and the base unit are ventilated. Grilles are incorporated into
both the applicator and the base unit, at the bottom and on the rear at the
top. You must ensure that all grilles are clean, and free of any potential
obstructions.
IMPORTANT: Ensure that no liquid enters the ventilation grilles.
❙ STORAGE
- Your device should be stored in a room with a maximum ambient temperature of 25°C, free of any excessive humidity and not exposed to vibrations.
- If the device sustains an impact, the integrity of the optical components should be checked.
- In case of any visible damage to the optical components: the filter (the flat component of red-coloured glass), the optical guide, the tube, etc., operation of the device should be discontinued immediately.
REMINDER:
Storage temperature : – 5°C to + 65°C.
Usage temperature : + 5°C to + 25°C.
To use and to store keeping a relative humidity under 93%.
ASSISTANCE
❙ E-SWIN TECHNICAL SERVICE
When in doubt about the use of your device, please contact our technical
service by filling out the contact form on www.esw-
vision.com/contact.

❙ WARNINGS
If one of the warning message below appears: you can follow the instructions
in the column ‘’What to do?‘’ or contact our After Sales service.
| Screen Display | Meaning | What to do? |
|---|---|---|
| SECU 01 | The device does not detect the cartridge. | |
| No flash detected. | Insert the new optic cartridge by carefully following the |
handling instructions.
SECU 02| No cartridge detected.
The device doesn’t work.| Insert the optic cartridge by carefully following
the handling instructions.
SECU 06| Temporary blocking.| Wait for the procedure that cools of the optical
parts of the applicator to end.
SECU 03
SECU 04
SECU 05
SECU 07
SECU 09| Your device is blocked.| Contact our technical department, by filling
out the contact form on
www.esw-vision.com/contact.
SECU 12| Your device is blocked.| Contact our technical department, by filling
out the contact form on
www.esw-vision.com/contact.
SECU 14| Loss of connection with the activation card.| Check that the
activation card is present and is running smoothly.
Just insert it in the slot provided for this purpose.
WARNING: The application of any modifications to your , of whatever type, is strictly prohibited.

MARKING
❙ MARKING
| Reference to the treatment of meibomian blepharitis (dry-eye syndrome)
using device.
---|---
………………….| Unique serial number of your ![]() .
.
E-SWIN
Rue des Côtes d´Orval
ZA of the Provost
78550 Houdan – FRANCE| Year of manufacture of your device and address of the
manufacturer.
| It is compulsory to refer to the instructions in the user manual.
| User manual.
 |
Electromedical device of Class II rating.
|
Electromedical device of Class II rating.
| Device must be used indoors.
| Keep the device dry.
| Keep away from light and heat.
| The batch number of the product is indicated beside this logo (gel).
| Functional grounding terminal.
| Logo corresponding to a degree of protection against electric shock for
parts that are applied onto the patient (Part to be applied – Type BF).
| Respect upper and lower temperature limits indicated beside this logo.
| Warning, dangerous voltage device.
| Global safety mark for electronical devices.
| Optical radiation aperture.
100 – 240 V ~ 50-60 Hz
540 VA| Operating conditions – supply voltage (alternating current), frequency
of the mains voltage, power.
IP 2X| Device protected against solid foreign body of 12,5 mm in
diameter or more (IP rating).
| Complies with MDR EU2017/745 requirements.
| Do not use this product after the deadline specified beside this logo (
gel ).
| Unique device identifier.
| This equipment is a medical device.
| Warning label according to IEC60601-2-57:2011.
TECHNICAL CHARACTERISTICS
❙ SPECIFICATIONS
| Technology | IRPL® (Intense Regulated Pulsed Light). |
|---|---|
| Wavelength | > 580 nm |
| Charging time / energy source | Continous operation |
| Dimensions (Lx W x H) | Max 345 x 320 x 440 mm |
| Weight | Max 11,5kg. |
| Shipping box dimensions (Lx W x H) | Max 740 x 460 x 610 mm |
| Shipping weight | Max 17,5kg |
| Noise level. | Max 83 dBA |
| Operating voltage | 100 – 240 VAC |
| Maximum power consumption | 540 VA |
| Frequency | 50/60 Hz |
| Temperature | Operating: +5 to +25°C |
Storage: -5 to +65°C
Relative working humidity (non-condensing)| Up to 930/0
Atmospheric pressure| 70-106 kPa
❙ RECYCLING AND PROCESSING
Instructions for the processing of end-of-life products: The WEEE “Waste
Electrical and Electronic Equipment” DIRECTIVE 2012/19/EU has been implemented
to ensure that products are recycled by the application of optimum techniques
for processing, exploitation and recycling, thereby contributing to the
protection of the environment and human health.
Your product has been designed and manufactured using high-quality products,
which are suitable for recycling and re-use.
E-Swin SAS is affiliated to an eco-organization, which undertakes the
collection and processing of end-of-life products.
TECHNICAL CHARACTERISTICS
❙ GUIDANCE AND MANUFACTURER’S DECLARATION
RADIO FREQUENCY EMISSIONS
The is equipped with a radio-frequency transmitter at 13.56 MHz in an
ASK modulation, and at a power lower than 42 dBµA/m.
Radio-frequency transmitter is used to access the activation card, whose
internal counter gives the information of the remaining number of flashes
remaining before replacement of the flash lamp cartridge
ELECTROMAGNETIC EMISSIONS
The device is intended for use in the electromagnetic environment specified
below. The user should assure that it is used in such an environment.
Emissions Test| Compliance| Electromagnetic Environment –
Guidance
---|---|---
RF emissions CISPR 11| Group 1| The device uses RF energy only for its
internal function. Therefore, its radiated emissions are very low and are not
likely to cause interference in nearby electronic equipment.
RF emissions – CISPR 11| Class B| The device is suitable for use in all
establishments, including domestic establishments and those directly connected
to the public low voltage power supply network that supplies buildings uses
for domestic purpose.
Harmonic emissions – IEC 61000-3-2| Class A
Voltage fluctuations / Flicker emissions – IEC 61000-3-3| Passed
TO AVOID ELECTROMAGNETIC SUSCEPTIBILITY ISSUES ON ![]() AND ITS
SURROUNDED DEVICES, USER SHALL FOLLOW THE FOLLOWING RULES FOR INSTALLATION
AND ITS
SURROUNDED DEVICES, USER SHALL FOLLOW THE FOLLOWING RULES FOR INSTALLATION
WARNING: Use of this equipment adjacent to or stacked with other equipment should be avoided because it could result in improper operation. If such use is necessary, this equipment and the other equipment should be observed to verify that they are ope- rating normally.
WARNING: Use of accessories, transducers and cables other than those specified or provided by the manufacturer of this equipment could result in increased electromagnetic emissions or decreased electromagnetic immunity of this equipment and result in improper operation.
WARNING: Portable RF communications equipment (including peripherals such
as antenna cables and external antennas) should be used no closer than 30 cm
(12 inches) to any part of ![]() , including cables specified by the
manufacturer. Otherwise, degradation of the performance of this equipment
could result.
, including cables specified by the
manufacturer. Otherwise, degradation of the performance of this equipment
could result.
ELECTROMAGNETIC IMMUNITY
The device is intended for use in the electromagnetic environment specified
below. The user of the device should assure that it is used in such an
environment.
Immunity test| IEC60601 Test Level| Compliance Level| Electromagnetic
Environment – Guidance
---|---|---|---
Electrostatic Discharge (ESD)
IEC 61000-4-2| ± 8 kV contact
± 15 kV air| ± 8KV contact
± 15kV air| Floors should be wood, concrete or ceramic tile. If floors are
covered with synthetic material, the relative humidity should be at least 30%.
Electrical fast transient / burst
IEC 61000-4-4| ± 2 kV 100 kHz| ± 2 kV 100 kHz| Mains power quality should be
that of a typical public low voltage power supply network.
Surge
IEC 61000-4-5| ± 1 kV differential mode
± 2 kV common mode| ± 1 kV differential mode
± 2 kV common mode| Mains power quality should be that of a typical public low
voltage power supply network.
Voltage dips, short interruptions and voltage variations on power supply input
lines IEC 61000-4-11| 0 % UT for 0.5 cycle at 45,90, 135, 180,225,270,315° 0%
Ut for 1 cycle at 0° 70% for 25/30 cycle at 0°
0% for 250/300 cycle, any angle| 0 % UT for 0.5 cycle at
0,45,90,135,180,225,270,315°
0% Ut for 1 cycle at 0°
70% for 25/30 cycle at 0°
0% for 250/300 cycle, any angle| Mains power quality should be that of a
typical public low voltage power supply network. If the user of the device
requires continued operation during power mains interruption, it is
recommended that device be powered from an uninterruptible power supply or a
battery.
Power frequency (50/60Hz) magnetic field IEC 61000-4-8| 30 A/m| 30 A/m| Power
frequency magnetic fields should be at levels characteristics of a typical
location of a typical location connected to public low voltage power supply
network.
Conducted RF
IEC 61000-4-6
Radiated RF
IEC 61000-4-3| 3Vrms
150 kHz to 80MHz
6 V for ISM band
3V/m
80 MHz to 2.7 GHz| 3Vrms
150 kHz to 80MHz
6 V in ISM bands between 150
kHz to 80MHz
3V/m
80 MHz to 2.7 GHz|
NOTE 1: UT is the ac mains voltage prior to application of the test
level.
NOTE 2: At 80 MHz and 800 MHz, the higher frequency range applies.
NOTE 3: These guidelines may not apply in all situations. Electromagnetic
propagation is affected by absorption an reflection from structures, objects
and peoples.
a. Field strengths from fixed transmitters, such as base stations for
radio (cellular/cordless) telephones and land mobile radios, amateur radio, AM
and FM radio broadcast and TV broadcast cannot be predicted theoretically with
accuracy. To assess the electromagnetic environment due to fixed RF
transmitters, an electromagnetic site survey should be considered. If the
measured field strength in the location in which the device is used exceed the
applicable RF compliance level above, the device should be observed to verify
normal operation. If abnormal performance is observed, additional measures may
be necessary, such as reorienting or relocating the device.
b. Over the frequency range 150 kHz to 80 MHz, field strength should be
less than 3 V/m.
IMMUNITY TO PROXIMITY FIELDS FROM RF WIRELESS COMMUNICATIONS EQUIPMENT
The device is intended for use in an electromagnetic environment in which
radiated RF disturbances are controlled. The customer or user of the device
can help prevent electromagnetic interference by maintaining a minimum
distance between portable and mobile RF communication equipment (transmitters)
and the device, as recommended below, according to the maximum output power of
the communications equipment.
Immunity test: IEC 61000-4-3
Test frequency (MHz)| Band a)
(MHz)| Service a)| Modulation b)| Maximum power (W)| Distance (m)| IMMUNITY
TEST LEVEL (V/m)
---|---|---|---|---|---|---
385| 380 –390| TETRA 400| Pulse modulation b)
18 Hz| 1,8| 0,3| 27
450| 430 – 470| GMRS 460, FRS 460| FM c) ± 5 kHz deviation 1 kHz sine|
2
|
0,3
|
28
710| 704 – 787| LTE Band 13, 17| Pulse modulation b)
217 Hz| 0,2| 0,3| 9
745
780
810| 800 – 960| GSM 800/900; TETRA 800; iDEN 820; CDMA 850; LTE Band 5| Pulse
modulation b) 18 Hz| 2| 0,3| 28
870
930
1 720| 1 700 – 1990| GSM 1800; CDMA 1900;
GSM 1900; DECT; LTE Band
1, 3, 4, 25; UMTS| Pulse modulation b)
217 Hz| 2| 0,3| 28
1 845
1 990
2 450| 2 400 – 2570| Bluetooth, WLAN, 802.11 b/g/n, RFID 2450, LTE Band 7|
Pulse modulation b)
217 Hz| 2| 0,3| 28
5 240| 5 100 – 5 800| WLAN 802 .11 a/n| Pulse modulation b)
217 Hz| 0,2| 0,3| 9
5 500
5 785
NOTE: If necessary to achieve the IMMUNITY TEST LEVEL, the distance
between the transmitting antenna and the ME EQUIPMENT or ME SYSTEM may be
reduced to 1 m. The 1 m test distance is permitted by IEC 61000-4-3.
a) For some services, only the uplink frequencies are included.
b) The carrier shall be modulated using a 50 % duty cycle square wave signal.
c) As an alternative to FM modulation, 50 % pulse modulation at 18 Hz may be
used because while it does not represent actual modulation, it would be worst
case.
LIGHT EMISSION
The is classified under risk group 3 related to “thermic retinal”
danger.
The inhomogeneity of lighting on the applied surface is below to 20%.
The ocular risk is negligible from a distance, between the eye and the surface
of emission, of 7,40 meters.
Output energy on the treatment area versus user’s selection:
| Energy setting | Fluence (J/cm²) |
|---|---|
| 1 | 9,0 |
| 2 | 9,8 |
| 3 | 10,6 |
| 4 | 11,4 |
| 5 | 12,2 |
| 6 | 13,0 |
STANDARDS
CERTIFICATIONS
The company E-Swin SAS, the exclusive manufacturer of ![]() device,
is certified to ISO standards 13485.
device,
is certified to ISO standards 13485.
CONFORMITY
E-SWIN hereby declares that ![]() meets the General safety and
performance requirements of the REGULATION (EU) 2017/745, Annex I, and the
conformity assessment procedures of Annex IX Chapter I Section 2 and 3 and
Chapter III.
meets the General safety and
performance requirements of the REGULATION (EU) 2017/745, Annex I, and the
conformity assessment procedures of Annex IX Chapter I Section 2 and 3 and
Chapter III.
E-SWIN holds the CE certification delivered by the notified body: TUV
Rheinland.
It is consistent with the standard: EN 60601.
PRECAUTIONS FOR USE
Never bring the base unit or the applicator into contact with water. Do not
open the base unit or the applicator, as you may risk exposure to high
voltages. Never use cartridges and accessories other than those designated and
sold by E-Swin SAS for use with ![]() .
.
ENVIRONMENTAL PROTECTION
You must abide by local regulations for the disposal of packaging and
consumables. Insofar as possible, recycling should be encouraged.
GUARANTEE CONDITIONS
Your device is guaranteed for professional use.
The term of this guarantee is associated with legislation in force in each
country.
Any error in connection, any incorrect handling, any use of the device other
than for the treatment of meibomian blepharitis (dry-eye syndrome) and, in
general, any use of the device which fails to observe the conditions described
in this manual will invalidate the guarantee.
The company E-Swin SAS will not accept liability for any accident arising from
failure to observe the instructions contained in this manual, or from
differences in the information provided by the labelling or the touch screen
of .
The manufacturer’s guarantee for parts and labour will only be valid if the
device is returned in all the items of its original packaging (boxes, packing
blocks, etc.).
All the packaging in which your ![]() was supplied should therefore be
carefully stored.
was supplied should therefore be
carefully stored.
CONTACT
 For more information visit: www
.esw-vision.com
For more information visit: www
.esw-vision.com
ZA of the Provost
Rue des Côtes d’Orval
78550 Houdan
FRANCE
01 30 46 37 61
 M029GB000G08A – 27/09/2023
References
Read User Manual Online (PDF format)
Read User Manual Online (PDF format) >>