ECO Solar App User Manual
- June 6, 2024
- ECO Solar
Table of Contents
![]()
ECO Solar App
Download the APP by searching ECO SOLAR in Google play/IOS APP store.
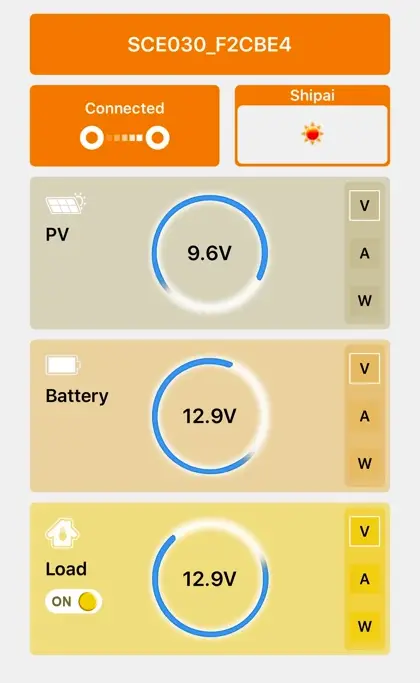
Main Interface

- Click Local to enter Local mode
- Click Cloud to enter Cloud mode
Local

- Turn on WiFi according to the prompt, and manually or automatically connect the WiFi of the device (some mobile phones need to manually connect the device, password is 12345678)
- The weather is the current location of the phone
- After connecting the device, click V/A/W of PV/Battery/Load for details
- After connecting the device, click the OFF/ON switch to control the load switch
- There are differences between Android and iOS versions (as follows)

Firmware Update

- Click Firmware Upgrade to enter the offline Upgrade interface
- In the upgrade interface, switch to the available network (mobile network or normal WiFi) and click DOWNLOAD FW to DOWNLOAD the latest upgrade package
- After downloading the UPGRADE package, connect the device WiFi and click FW UPGRADE to UPGRADE. There will be corresponding prompts if the UPGRADE fails or cannot be upgraded.
- If you don’t download the latest Update package, you can’t click the Update of IOS version and click the Update of Android version.
Device WiFi Config

Note: this feature is only available near the device
- Click the search button to search the WiFi near the phone, or manually input the corresponding WiFi name (not the WiFi of the device).
- Due to permissions, iOS only supports manual input of WiFi name, and does not support selection of WiFi
- After entering the corresponding WiFi password, approach the device according to the prompt and turn on the bluetooth switch (if the phone has already turned on the bluetooth switch, there is no hint). Click SMART LINK to bring the device online to the cloud
- If you enter the wrong WiFi name or password, click connect and the device will restart automatically. You need to wait for the device to restart and re-enter the correct WiFi name and password
- The device cannot be connected to 5G WiFi, only 2.4GWiFi can be connected
- After entering the password, it can be saved automatically. Next time, the password can be displayed automatically by entering or selecting the corresponding WiFi name
- When the device is connected to the cloud (check the WiFi icon of the device is always on), enter the correct WiFi name and password to switch the device to connect to WiFi (PS: this function is not available on some phones, please refer to special circumstances for details)
- When the device is connected to the cloud (check the WiFi icon of the device is always on), and the WiFi name or password is incorrectly entered, the device will not restart, and manual restart is required; Or re-enter the correct WiFi name and password (PS: this function is not available on some phones, please refer to special circumstances for details)
Settings/Version

- Click Device ID(Android)/Mac (iOS) to copy the Device address
- You can check the latest version of the chip and the latest version of the APP
Log Out (Only iOS)

Cloud
Register

- Click the registration button on the bottom right foot to enter the registration interface.
- According to the prompt, enter the correct email address as the login account, and enter any password as the login password to register.
Forget Password
Enter the correct login email address, verification code and modified password according to the prompt to modify the password. There are corresponding prompts for input errors
Login In

Enter the correct account password to log in successfully, input errors have corresponding prompts.
Cloud Interface

- After login, bind the Device (Device can connect WiFi to enter cloud mode through Device WiFi Config). When the Device is online, the Device functions can be remotely controlled
- After the device is online, click the OFF/ON switch to control the load switch
- Click the left and right date button to view the latest date data; You can also click the date directly to select the corresponding date to view the data
- UI differences between android and 10S (as shown below)

Bind Device

You can bind the device by directly entering or clicking the icon on the right to scan the QR code
Device WiFi Config

Set Local Mode/Set Device Local Mode

Click and a prompt box will pop up. Click OK to set the device to local mode. Click CANCEL and it will do nothing
Firmware Update/Device Upgrade

Click and a prompt box will pop up. Click OK and the device will be automatically updated to the latest version. Click CANCEL and ii will do nothing
System Settings

- Load voltage can be viewed, not selected and modified
- Select the appropriate Battery Type for the loaded Battery
- Turn on or off the switch to control whether the timer function is enabled; After opening the switch, you can select different time types and modify the time period to enable different timer functions
- When there is an error in modifying low-voltage protection data and overvoltage recovery data, the corresponding range prompt will pop up
Version (iOS)
Consistent with local mode functionality
Logout
Click and return to the cloud login interface
Special Situation
Due to unstable Bluetooth connection when the device is in cloud mode, some mobile phones cannot connect to the device via Bluetooth
- When the device is in local mode, if WIFI can not be connected by using the Device WiFi Config function, please restart the device manually so that you can re-set the device to the local mode. Then, re-use the Device WiFi Config function to bring the device to the cloud.
- The device is in the cloud mode. When WiFi connection is unavailable, restart the device and the device cannot be set to local mode. Please forcibly reset the device and reconnect to the new WiFi
Read User Manual Online (PDF format)
Read User Manual Online (PDF format) >>