SHOPPING ALL Gas Spring Monitor Desk Mount User Manual
- June 7, 2024
- SHOPPING ALL
Table of Contents
- SHOPPING ALL Gas Spring Monitor Desk Mount
- WARNING STATEMENTS
- PRODUCT LINE GRAPH
- PARTS INCLUDED
- Clamp Installation Steps
- Grommet Installation Steps
- Arm Installation
- VESA Plate Adjustment
- Monitor Installation
- Gas Spring Tension Adjustment
- Tilt & Swivel Adjustment
- Cable Management Installation
- References
- Read User Manual Online (PDF format)
- Download This Manual (PDF format)
![]()
SHOPPING ALL Gas Spring Monitor Desk Mount

WARNING STATEMENTS
Warning:
- Prior to the installation of this product, the installation instruction must be read and completely understood. Failure to do so may result in personal injury , property damage or voiding of factory warranty.
- Do not install on a structure that is prone to vibration, or movement. Reinforce the structure as required before installation.
- Recommended mounting surfaces: Wooden studs or solid-flat concrete. If the mount is to be installed on any surface other than wooden studs, use suitable hardware.
- Pay attention to the weight capacity of the mount. Exceeding the limitation can result in impairment or serious injury and property damage.
- Never operate the mount if parts are missing or damaged. Contact your local service center for warranty service.
- Do not use this product for any purpose or in any configuration not explicitly specified in this instruction. We hereby disclaim any and all liability for injury or damage arising from incorrect assembly, Incorrect mounting, or incorrect use of this product.
PRODUCT LINE GRAPH

PARTS INCLUDED


Clamp Installation Steps

For desk thickness more than 2.36″(60mm) but within 3.35″(85mm), remove clamp
screw and attachment entirely and reattach clamp screw with bottom plate
upside-down.
Grommet Installation Steps


Arm Installation

Adjust the Height Adjustment Rings at proper height and screw up tight to hold
the mount. Put Extension Arms to the pole.
Put Spring Arms onto the Extension Arms.
VESA Plate Adjustment
For packaging purpose, the VESA plate comes angled in the box.
To make the VESA plate holes face upwards, Use both hands to rotate the VESA
plate AFTER the arm is installed on the pole and BEFORE installing laptop tray
or monitor.

Smooth rotation adjustment after monitor installation.
Using both hands, rotate the VESA plate to proper angle.
Monitor Installation

OR Using Spacers
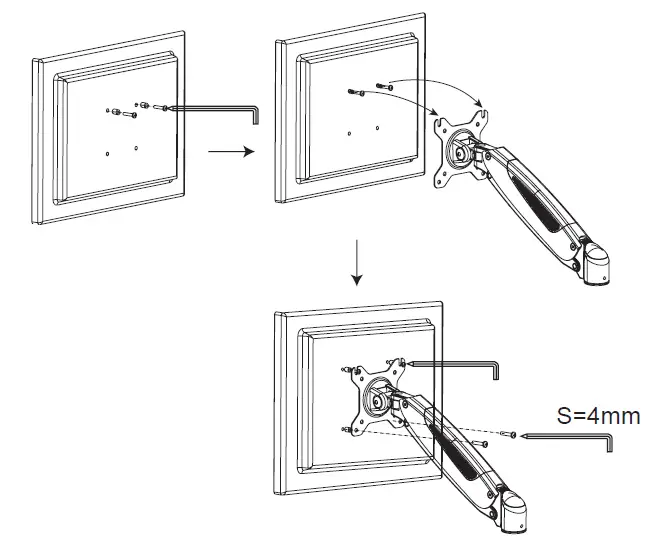
For Monitor Mounting setup, install the monitor with suitable M4 screws included in the package A using 4mm Hex Wrench.
Gas Spring Tension Adjustment

Step 1: This mount utilizes a gas spring system. The gas spring arm works
with weights. Install your laptop/monitor BEFORE making a tension
adjustment.
Step 2: To make a tension adjustment, press down the arm to a horizontal
position.
If the arm is moving downwards
Turn counter-clockwise to INCREASE tension until your laptop/monitor stays in
desired position.
If the arm is moving upwards
Turn clockwise to REDUCE tension until your laptop/monitor stays in desired
position.
Step 3: Use 5mm Hex Wrench to make tension adjustment until your monitor
stays in the desired position
Tilt & Swivel Adjustment
If your monitor is dropping down, tighten the VESA Tilt Adjustment Bolt until
your monitor stays upright.
VESA Swivel Adjustment

If the arm moves too easily, tighten the Arm Swivel screws located at the
joint of the arms to add friction. If the arms are too stiff, loosen the
screws for smoother movements.
Tighten the bolt with the Allen Key to make the tilt and swivel adjustment.
Cable Management Installation


Organize cables with cable management clips along the pole.
www.ShoppingAll.com![]()
References
Read User Manual Online (PDF format)
Read User Manual Online (PDF format) >>