SV3C 35280663 Smart IP Camera with Battery User Guide
- June 6, 2024
- SV3C
Table of Contents
SV3C 35280663 Smart IP Camera with Battery User Guide

Packing List
- Camera *1
- Wall mount *1
- Screw *3
- Power cable *1
- Quick User Guide *1
Install Adorcam APP and register account
Download Adorcam APP on your phone
Battery powered IP camera works with app: Adorcam Search “Adorcam” in App store or Google play store, or scan the above QR Code to download and install on smart phone.


NOTE: Please allow below 2 permissions when first running APR
- Allow Adorcam use mobile cellular data and wireless LAN (Function: If not allowed, it will be failed to add IP camera).
- Allow Adorcam to get system push message permissions (Function: When the camera triggers motion detection or audible alarm, the phone can receive alarm push).
See the following images to configure permission settings.


Register Account
New users need to register by e-mail, click “Sign Up”, follow the steps to complete the registration of the account, and login.
Add Camera to APP
Insert Micro SD card (No Card, No videos)
Please insert a Micro SD card to record videos, if no card, no recorded videos. Please insert Micro SD card for surveillance camera, such as Sandisk /Kingston 4-128GB, recommend 64GB SD card(SD Card not included).
NOTE:
- If SD card can not be recognized or insert the SD card at the first time, please kindly format it in app or take out SD card to format on PC in NTFS format and plug in again.
- If no Micro SD card in camera, there is no alarm recording, system will snap photos and be saved in “Events” list. If inserted Micro SD card in the camera, then no snapshot photos, only alarm recordings listed under “event”.
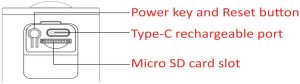
Power on the camera
Press and hold on the Power Button for 5 seconds to turn on camera ( if it can not power on, please plug in DC5V 1A/2A phone adapter to charge for 15mins first). Power adapter is not included in packing list.
NOTE: 1. Ensure the indicator light slowly flashing in RED before setup Wi-Fi. 2. Allow Adorcam to get Phone location permission, otherwise the WiFi connection won’t succeed.
Setup Wi-Fi
-
Bring the camera and phone to the router within 1 to 3 feet (30 to 100cm) and connect wifi. Note: Camera only works under 2.4ghz Wi-Fi, does not supports 5ghz Wi-Fi.
-
Run Adorcam, click “Add Device” and select “Battery Camera”,
-
Open phone GPS and search available Wi-Fi signal, select correct Wi-Fi SSID and input Wi-Fi password manually, click “Connection” to generate the QR code.

-
Follow the “Operation Guide” on App, aim the lens of the camera directly to the QR code at a distance of 5-8 inches, a tone will be heard when successfully scanned, if heard it, then tap “Hear a tone” and waiting for “Connect Network”.

-
After successfully connected the network, you can name the camera, find a good mounting spot according to the Wi-Fi signal strength, then click “Finish”, it will jump to device list. Select one camera and play it, then you can watch the real-time video.

NOTE: If failed to connect, please RESET the camera by short press the power key twice, alike double click the mouse, you will hear one tone, the LED turns to red and flashing slowly, this means waiting for Wi-Fi connection.
Device Menu
- Play
- Share
- Suspend Alarm
- Playback
- Settings
- Camera Name
- Battery Volume
- Wi-Fi Signal
- Disarm Mode: If you set “Disarmed” under “Security”, you will see this icon.
- Motion Detection Off: If you set “Motion Detection” off under setting, you will see this icon.
- Camera Time
- Messages
- Help
- About App
- Devices
- Events
- Security
- Explore
- Bit Rate
- Record
- Snapshot
- Hold & Speak
- Audio
- More
- Events
- Night Vision
- Sound Alarm
- Setting
- Close
Share Camera to Family
Operation: Upper left menu—Share
Click share icon or option, select permission and select connected cameras,
then input the family’s account to share.
There is only one master account for a camera. An APP account can only login
on one smart phone, not allowed to login the same APP account on 2 smart
phone.

NOTE:
- New account should be registered in Adorcam app and select the same region/country with your account.
- If you have sent one invitation, but the invitation had not been accepted, you cannot send 2nd invitation. Please delete invitation, and send new invitation again.
LED Status Description
- No light: Sleep/shutdown
- Red light solid on: In charging
- Red light flashes slowly (once every second): Awaiting for Wi-Fi connection
- Fast red light (multiple times a second): Wi-Fi connecting Blue light solid on: Alarm recording
- Blue light flashes slowly (once every two seconds): Camera in live view status
- Blue light flashes quickly (multiple times a second): Upgrading status
Trouble Shooting
Q: Unable to connect?
A:
- Check your WiFi name and password;
- Ensure your WiFi is 2.4G HZ, not the 5G HZ WiFi;
- Ensure your camera and phone close to router.
Q: How to Reset?
A:
- Short press power button twice and hear one tone;
- Indicator turns to flash slowly in red.
Q: How to change to a new network?
A:
- If the camera is online, you can select one new WiFi under settings, and enter the new WiFi password to change it.
- If the camera is not online, please reset the camera and connect it to the new WiFi.
Q: Why failed to Add Device?
A: Please enable Adorcam app cellular data on in mobile settings.
Q: Why no Alarm Push?
A: Please enable Adorcam app notification mobile settings.
Q: Why no Alarm Video Recorded?
A: Please insert Micro SD card.
Note:
- Battery Camera doesn’t support 7/24 constantly recording, only supports events recording when sensor human body motion detection.
- Battery Camera doesn’t support any PC software or browser.
- Battery Camera charging supports DCSV 1A/2A plug. Fully charged time: 5-6 hours.
- IP Battery Camera supports offline recording. It supports events recording when Wi-Fi disconnected, but firstly the camera should be ever connected with Wi-Fi network.
- It is unlimited to add IP camera to app, and also unlimited to share video to other persons online in max simultaneously.
Read User Manual Online (PDF format)
Read User Manual Online (PDF format) >>