NEOECO NCT-SJ81 Dual Action Airbrush Instruction Manual
- June 13, 2024
- NEOECO
Table of Contents
INSTRUCTION MANUAL
Dual-Action Airbrush
NCT-SJ81  IMPORTANT:
Read before using.
IMPORTANT:
Read before using.
WWW.neoeco-airbrush.com
Explosion Disassembly Diagram
 NOET: The drawing does not illustrate the complete structure/scope of
delivery of the instrument.
NOET: The drawing does not illustrate the complete structure/scope of
delivery of the instrument.
Parts List
1 Needle cap
2 Air cap
3 Nozzle 0.3mm
4.1 9¢c¢ silver cup
4.2 20cc plastic cup
4.3 40cc plastic cup
5 Airbrush Stem
6 Lever with dual action
7 Neelde chuck
8 Spring
9 Spring case
10 Tension adjustment
11 Needle securingnut
12 End piece
13 Ajustment knob ring
14 0.3mm needle
15 Intet valve
16 MAC valve
Spare Parts
0.2mm Air cap 1,0.2mm Nozzle 1, 0.2mm Needle » 1; 0.5mm Air cap + 1, 0.5mm Nozzle + 1, 0.5mm Needle + 1, 8pcs O ring set *1
FAQ
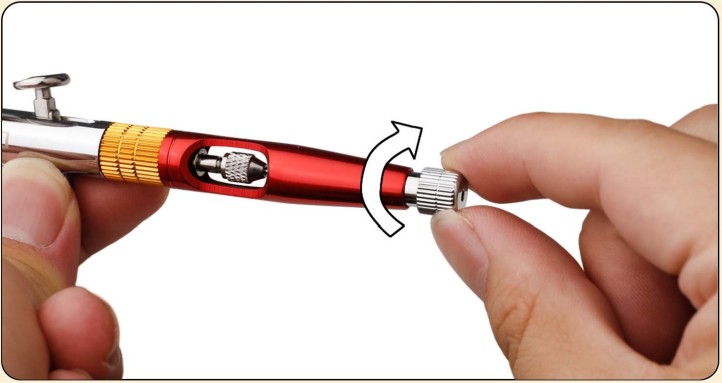
Q: How to remove the tension adjustment ring off from the airbrush?
A: Use the adjustable spanner in a counterclockwise motion to loosen and
unscrew it carefully.
 Q:
Can i use lacqoer thinner or acetone to thin paint or clean the plastic cups
and airbrush without damaging them?
Q:
Can i use lacqoer thinner or acetone to thin paint or clean the plastic cups
and airbrush without damaging them?
A: You can clean the airbrush using lacquer thinner or acetone, but avoid
putting the seats into these solvents or immersing the airbrush in them, as it
may damage the seals, When deating with plastics, quickly flush them with the
cleaner and ensure thorough washing if lacquer thinner or acetone is used, as
they are too powerful for plastics.
Q: What types of paints can i use in my airbrush?
A: Airbrushes are compatible with a wide range of paints, as long as they have
a suitable consistency for airbrushing. Here are some common types of paints
that can be used in an airbrush: Water-Based Acrylic Paints, Solvent-Based
Enamel Paints, Lacquer-Based Paints, Oil-Based Paints, Ink and Dye-Based
Paints, etc. Different paints may require specific airbrush thinner mediums of
additives to achieve the optimal consistency and prevent clogging or tip dry.
Operation & Function
Press lever down to activate air
 Presss lever backwards to activate paint
  Turn
to set the desired trigger sensitivity Turn the knob to set how far the trigger can
be pulled back
 Turn the MAC valve to adjust the air flow

First Exercise
- Create dots, lines, and dashstrokes
 https://neoeco-airbrush.com/a/qrcode-rsi/orsk5bbRLh9vFS
 - Embark on Your First Airbrush Project!
 https://neoeco-airbrush.com/a/qrcode-rsi/ygC6HwNNCivhZW
Cleaning
STP 1. Add cleaner into the fluid cup.
 STP
2. Block the needle cap to get the back flow.
STP
2. Block the needle cap to get the back flow.  STP 3. Spray out the paint, and
repeat steps 1-3 several times.
STP 3. Spray out the paint, and
repeat steps 1-3 several times.  STP 4. Terminate the compressed air supply.
Unscrew the end piece and needle secure nut.
STP 4. Terminate the compressed air supply.
Unscrew the end piece and needle secure nut.  STP 5. Pull the needle and clean
with a cloth or airbrush wipe.
STP 5. Pull the needle and clean
with a cloth or airbrush wipe.  STP 6. Detach the cup and clean it.
  STP
7. Unscrew the needle cap and clean with a cotton bud.
STP
7. Unscrew the needle cap and clean with a cotton bud. STP 8. Remove the nozzle
and push any paint residue carefully out of the interior with a
needle.
STP 8. Remove the nozzle
and push any paint residue carefully out of the interior with a
needle. STP 3. Screw the nozzle on, then fasten the needle cap into
position. Press the lever down and carefully insert the needle until it
reaches the stop. Finally, secure the needle securing nut and end piece Into
position.
STP 3. Screw the nozzle on, then fasten the needle cap into
position. Press the lever down and carefully insert the needle until it
reaches the stop. Finally, secure the needle securing nut and end piece Into
position. Cleaning airbrush tutorial
 https://neoeco-airbrush.com/a/qrcode-rsi/FRHIP1mHrKsOhA
Further Maintenance Instructions
Avold immersing the entire instrument in solvent. Instead, occasionally apply
a small amount of thinned oil to the lever mechanism. Ensure that the needle
tip and nozzle remain free of oll and grease, as these can affect the spraying
performance. Components like the needle, nozzle, and seals are subject to wear
and should be replaced when necessary. For added convenience, nozzle sets and
fluid cups are available in various sizes to facilitate easy conversion.
To achieve improved spray performance, consider polishing the needle for a
smoother finish.
For a detailed tutorial on this process, please check the page beside:<https
://neoeco-airbrush.com/a/qrcode-rsi/IA4MbeoWIQm5sX>
Accessories
Moisture Trap
Used to prevent moisture and condensation from reaching the airbrush, ensuring
a steady and consistent airflow. Can be installed between the air source and
the airbrush itself. By using a moisture trap, airbrush artists can maintain a
dry and reliable air supply, reducing the risk of paint clogs, sputtering, or
other iIssues caused by excess moisture in the air.
Quick Disconnect Coupler
used to swiftly and easily connect or disconnect an airbrush from an air
hose.
Consists of two parts: one attaches to the airbrush and another attaches to
the air hose. When you need to connect the airbrush to the hose, simply align
the two parts and push them together until they click into place. To
disconnect, push back the sleeve on the coupler, and 1t will release the
connection.
Airbrush Cups
Both 20cc and 40cc fluid cups are available for exchange, providing
versatility in your airbrushing projects. Opt for the larger cup sizes when
tackling bigger tasks or covering larger areas, as they minimize the need for
frequent refills, ensuring uninterrupted and efficient work.
Replacement Needles And Nozzles
We offer replacement needles and nozzles in two sizes: 0.2mm and 0.5mm. These
replacements ensure you have the right tools for various painting tasks. The
0.2mm option Is perfect for intricate detailing and fine lines, while the
0.5mm option is ideal for broader coverage and larger areas. Having these
replacement parts on hand allows you to maintain peak performance and achieve
the desired results with your airbrush. Air Hose
It serves as the link between the airbrush and the air source, facilitating
the flow of air essential for proper paint spraying. With a length of 6ft,
this hose features a 1/8 inch BSP connector on one end and a 1/4 inch BSP
connector on the other. Should you require both ends to be 1/8 inch BSP,
simply unscrew the 1/8 to 1/4 adapter, and you’ll have both sides with 1/8″
BSP fittings.
Cleaning Needles And Brushes
Cleaning needles are thin, needle-like tools used to remove dried or stubborn
paint particles from the nozzle and airbrush components. Cleaning brushes are
small, soft-bristled brushes designed to clean various parts of the airbrush,
such as the paint cup, airbrush body, and other hard-to-reach areas.
Gold Reamer
Used for cleaning and maintaining the delicate parts of an airbrush,
particularly the nozzle and needle. It I1s designed to gently remove dried
paint, debris, or any obstructions that may cause clogs or affect the
airbrush’’s performance.
Neelde Cap
The primary function of the needle cap is to protect the delicate needle tip
from damage or bending during use and handling. It i1s essential to keep the
airbrush needle cap clean and free from paint buildup or debris, as any
obstructions can affect the spray pattern and overall airbrush performance.
Small Wrench
Designed specifically to assist In removing and installing the nozzle of an
airbrush. It 1Is a compact and precision-engineered wrench that fits snugly
around the nozzle, providing the necessary leverage to loosen or tighten it
securely.
Replacement seals
Used to maintain airtight connections and prevent air and paint leakage In
an airbrush.Over time, seals can degrade due to usage or exposure to certain
solvents, so having replacement seals on hand 1s important for avolding
unexpected i1ssues during airbrushing sessions. Properly maintaining these
seals will help you achieve consistent and high-quality results with your
airbrush.
Troubleshooting
Not Spraing
Loose needle secure nut| |Ensure that the needle is properly inserted and
tightened.
---|---
Improper air pressure| Ensure that your air compressor Is providing
sufficient pressure.
Paint too thick| Dilute the paint to skim milk or light cream consistency.
Test the consistency on a palette or scrap surface before using it in the
airbrush.
Clogged nozzle| Disassemble the airbrush and clean each component thoroughly
with an appropriate cleaning solution or airbrush cleaner.
Budding
Loose nozzle cap or air cap| Make sure nozzle cap is finger tight and/or
tighten air cap with wrench
---|---
Improper nozzle to body connection| Remove and reinsert nozzle. Try applying
thread sealer to the nozzle threads if there are scratches where the nozzle
meets the body.
Charked or damaged nozzle.| Replace nozzle.
Incorrectly heedle depth| Remove and reinsert needle to adjust It.
Skipping
Paint dried on needle tip/ nozzle blockage| Disassemble the airbrush and clean
the nozzle & needle thoroughly using an appropriate cleaning solution or
airbrush cleaner.
---|---
Paint too thick| Thin or strain paint to skim milk consistency.
Dirty airbrush| Deep cleaning the airbrush.
Cracked or damaged nozzle| Replace nozzle
Spattering
Dried paint on heedle tip/ Nozzle blockage| Disassemble the airbrush and clean
the nozzle & needle thoroughly using an appropriate cleaning solution or
airbrush cleaner.
---|---
Paint build up In needle cap| Clean needle with cotton swab dipped in
appropriate cleaner
Air pressure too low| Gradually increase the air pressure until you achieve
the desired spray pattern.
Paint too thick| Thin or strain paint to skim milk consistency.
Dirty airbrush| Deep clean the airbrush.
Gralny or Textured spray 
Dried paint on needle tip/ Nozzle blockage| Disassemble the airbrush and clean
the nozzle & needle thoroughly using an appropriate cleaning solution or
airbrush cleaner.
---|---
Paint too thick| Thin or strain paint to skim milk consistency.
Air pressure too low| Gradually increase the air pressure until you achieve
the desired spray pattern.
Bad quality Paint| Use high-quality paints from reputable manufacturers for
better results.
Uneven surface| Sand the surface if necessary and apply a suitable primer or
base coat before airbrushing.
Spidering
| Paint is too thin or watery | Thin or strain paint to skim milk consistency. |
|---|---|
| Alr pressure too high | Adjust the pressure to a lower, more suitable level for |
your airbrushing needs.
Holding the airbrush too close or at an Incorrect angle| Maintain an
appropriate distance and angle for |the desired effect.
Paper bucking
Applying too much paint In one area| Apply light, even coats and allow each
layer to dry before adding another.
---|---
Paper too thin| Choose a heavier or thicker paper that is better suited for
airbrushing.
Too close to the surface| Maintain a suitable distance.
Repair
- Broken nozzle/ nozzle threads stuck
 Use the small reamer to uncrew the broken part out from the airbrush.
 - Bent needle repair
 STP 1. Find a nickel coin or any similar object with a sharp edge that can be used to un-snag the tip of the bent needle. Ensure that the edge Is clean and free from any debris that could potentially cause further damage.
 STP 2. Place the bent needle on the flat surface, Using the flat part of the nickel, gently roll it along the length of the needle, applying light pressure. This rolling motion helps to identify any remaining bends in the needle.
 STP 3. Apply gentle pressure and gradually roll the nickel to straighten out the bend. Continue this process until the needle is uniformly straight.
Read User Manual Online (PDF format)
Read User Manual Online (PDF format) >>