Webex Receptionist Console User Guide
- August 8, 2024
- webex
Table of Contents

Webex Receptionist Console
Product Information
Specifications:
- Feature: Dynamic Monitoring of Contacts
- Maximum Contacts: 100
- Line Status: Idle, Busy, Ringing, Call Forward, Do Not Disturb
Product Usage Instructions
Dynamic Monitoring of Contacts:
Dynamic Monitoring allows you to view the line status of selected contacts
in your company in real-time.
- In the Enterprise or Group directory, click on the contact you wish to monitor.
- The contact’s call state will be updated in real-time.
- Note: You can monitor up to 100 contacts. If the limit is reached, the first monitored contact will be unselected.
- If you save your workspace when signing out, the contacts you selected for monitoring will be saved for future sign-ins.
Static Monitoring of Contacts:
Static Monitoring is used for regularly monitoring specific contacts.
- Contact your administrator to configure favorites for static monitoring.
- Once favorites are configured, you will see the line status of these users in the Contact panel.
- The line states can be Idle, Busy, Ringing, Call Forward, or Do Not Disturb.
Personal Contacts and Speed Dial:
To add a personal contact:
- Go to the Personal tab and click Edit to open the Edit Personal Contacts window.
- Click Add to enter a new contact’s name and phone number.
- Click OK to save the contact details.
Adding a Note to a Contact:
- To add a note to a contact, click on the Notes link next to that contact.
- Enter your note and click OK to save it.
FAQ
What is the maximum number of contacts I can monitor dynamically?
You can monitor up to 100 contacts dynamically. If this limit is reached, the
first monitored contact will be unselected.
What you need to know:
Dynamic Monitoring allows you to view the line status of selected contacts in
your company on an as needed basis.
Introduction Dynamic Monitoring of Contacts Static Monitoring of Contacts
Personal Contacts and Speed Dial Adding a Note to a Contact back to top
Introduction
The Receptionist allows you to monitor when other users are on or off the phone. There are two types of monitoring-Static and Dynamic.
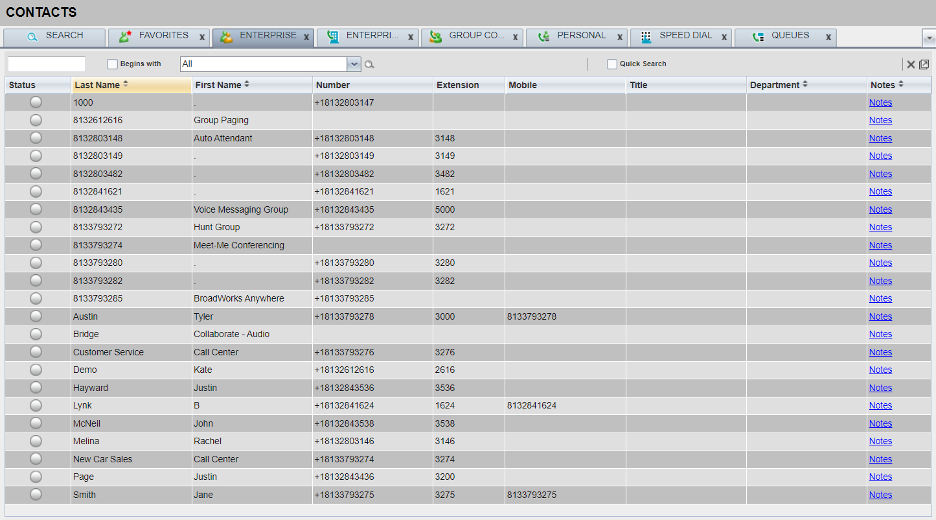
Dynamic Monitoring of Contacts
- Dynamic Monitoring allows you to view the line status of selected contacts in your company on an as-needed basis.
- For example – if you receive a call for a contact that you don’t have as a favorite and you want to see the line status of the contact before you transfer the call, you can select to monitor that contact as needed.
- To request to dynamically monitor a contact, in the Enterprise or Group directory click the contact. This updates the contact’s call state in real-time.

Click image for large view
Note: The maximum number of contacts is 100. When that limit is reached, the first contact you monitored is unselected and will stop being monitored. Also, if you check the box to save your workspace when you sign out of the Receptionist, the contacts you selected to dynamically monitor will be saved for subsequent sign-ins.
Static Monitoring of Contacts
- Static Monitoring is used if you typically monitor the same contacts each day. These contacts are assigned in your User Portal. Please contact your administrator if you want to configure contacts as favorites.
- After you configure favorites, you’ll see the line status of these users in the Contact panel. The various line states can be Idle, Busy, Ringing, Call Forward, or Do Not Disturb.
- The icon next to the contacts name is:
- Green when that contact is idle
- Red when that contact is busy and on the phone
- Yellow when a call is ringing in on that contact’s line
- A red arrow when the contact has enabled Call Forwarding Always on their line
- The Do Not Disturb icon when that contact has enabled Do Not Disturb
Personal Contacts and Speed Dial
-
To add a personal contact:
-
On the Personal tab, click Edit. The Edit Personal Contacts window opens.

Click image for large view -
Click Add. A new line appears below the existing entries, allowing you to enter a name and phone number.
-
In the Name box, enter the contact’s name or description as you want it to appear in the contacts list. In the Number box, enter the phone number of the contact.
-
To save the entry, click anywhere in the dialog box outside the entry.
-
-
To update a personal contact:
- On the Personal tab, click Edit. The Edit Personal Contacts window opens.
- Double-click the entry you want to change. Update the contact information as needed.
- To save the changes, click anywhere in the dialog box outside the entry.
-
To delete a personal contact:
- On the Personal tab, click Edit. The Edit Personal Contacts window opens.
- Select the entry you want to delete, and then click Delete.
-
To add, update, or delete speed dial contacts, follow these same steps.

Adding a Note to a Contact
To add a note to contact:
- Select the contact you want, and then click the Notes link.
- Type the note. For example – “On vacation until the 12th.”
- When you’re finished, click OK. Your note is saved.
- To view saved notes, click the Notes link by that contact.

Click image for large view

References
- bsftsupportcenter.s3.amazonaws.com/Images/receptionist-managing-contacts/Managing_Contact_1.png
- bsftsupportcenter.s3.amazonaws.com/Images/receptionist-managing-contacts/Managing_Contact_2.png
- bsftsupportcenter.s3.amazonaws.com/Images/receptionist-managing-contacts/Managing_Contact_3.png
Read User Manual Online (PDF format)
Read User Manual Online (PDF format) >>