eSMARTTEK YT-200 Wireless Intelligent Sensing Wireless Charging All In One Machine Instruction Manual
- June 5, 2024
- eSMARTTEK
Table of Contents
- eSMARTTEK YT-200 Wireless Intelligent Sensing Wireless Charging All In
- INSTRUCTION MANUAL
- **Wireless smart induction wireless charging all-in-one receiver
- **Wireless smart induction wireless charging all-in-one receiver
- **Wireless smart induction wireless charging all-in-one receiver
- **Wireless smart induction wireless charging integrated machine
- **Wireless smart induction wireless charging integrated machine
- **Wireless smart induction wireless charging all-in-one charging
- **Technical parameters of wireless intelligent induction wireless
- Operation methods and precautions
- Faults and Solutions
- Read User Manual Online (PDF format)
- Download This Manual (PDF format)
eSMARTTEK YT-200 Wireless Intelligent Sensing Wireless Charging All In
One Machine

INSTRUCTION MANUAL
- Before connecting the power supply, please read the manual completely
- Please abide by the operation procedures and safety precautions of this manual, and keep them for reference
- This product has 3C China compulsory product certification certificate and various quality inspection reports
Break the traditional concept, innovate and subvert the classic design,
wireless intelligent induction wireless charging all-in-one machine
With years of experience in the production of wireless communication system
equipment, the wireless microphone system produced by our company has become
the leader in this industry, which is widely used in KT box, stage karaoke,
school, family karaoke, conference room and other places for various speech
activities or music meetings. This product uses the operating cylinder list
and the quality is stable, which is favored by users. The company promises to
provide first-class quality and first-class service. We have a professional
technical team to help you solve any technical problems at any time.
Warning: be careful to avoid electric shock or fire. The body must be kept away from rain or humid environment.
Note: do not open the machine without permission. Any related operations can only be carried out by service personnel. A symbol indicating that the instructions and instructions must be strictly followed
- Read the operating instructions. Please read all relevant safety and operation instructions carefully before using the machine.
- Keep the operating instructions. Please keep all the safety and operation instructions of the machine for future reference.
- Pay attention to warning – please pay attention to the warning during the operation of all applications.
- Follow the instructions – please follow all instructions for operation and use.
- Additional device one is allowed to use the additional device recommended by the manufacturer of this machine to avoid accidents.
- Keep away from the water sources when using the machine in case of rain and humidity.
- Ventilation the use and storage of the machine should have good ventilation conditions, and the minimum clearance around the equipment should be more than 5cm.
- Please keep away from the heat sources, including radiators, heaters, furnaces, etc.
- Power supply 1. Please use the voltage indicated on the body.
- No naked flame source, such as a lighted candle, should be placed on the equipment.
- Do not litter the battery when it is discarded. Please put it into the designated recycling bucket.
- Do not place any liquid objects or heavy objects on the equipment, and do not let water drip or splash.
- The equipment can be used in tropical or temperate zones.


Do not use in the above environment! Nonprofessionals are not allowed to fold and install the system at will!
- Intelligent induction automatic charging machine
- Integrated design of energy-saving wireless intelligent induction charging, built-in intelligent audio processing, intelligent audio noise processing, energy-saving wireless charging module, 80 meters long-distance reception
- Using UHF PLL circuit, with sound code and noise lock mute control, not only the receiving distance is long, but also the loss of sound interruption and receiving instability is eliminated to prevent the interference of radiation noise such as jukeboxes, computers and DVD drives
- With the world’s first R automatic channel tracking lock button, as long as you press it, you can immediately make the transmitter automatically and accurately lock the working channel of the receiver, and no error or malfunction will occur
- Built-in dual-channel receiving module, which has the professional quality of sturdiness, heat resistance and isolation of harmonic radiation; preset 150 sets of non-interference frequencies, and lock the working channel without interference
- This model is a luxurious model with the easiest installation, the most convenient use, the strongest function, and the most stable characteristics. It can achieve the most satisfactory results in a variety of multidimensional professional singing environments.
- With floor mute function, with mute on/off button function, automatic mute in 3 seconds, automatic shutdown in 5 minutes
- The transmitter uses a 14650 rechargeable 3.7V 1200mah battery, innovative wireless charging, only need to put the transmitter into the charging hole to achieve wireless automatic charging, comprehensively solve the trouble of frequent battery replacement
**Wireless smart induction wireless charging all-in-one receiver
operation**
Function description of intelligent induction receiver
- Power switch: lightly press the power switch, the LCD lights up and the power is on, press the power switch again for 3 seconds, the LCD is off
- SCAN automatically searches for clean frequency points
- VOL-Volume down button/frequency down button
- SET function confirmation button
- VOL+volume up button/frequency up button
- IR Link Button
- IR pairing window
- LCD liquid crystal display: display channel, mute, received signal level, audio level, etc.
- Transmitter microphone charging jack
- Charging indicator sign
**Wireless smart induction wireless charging all-in-one receiver
operation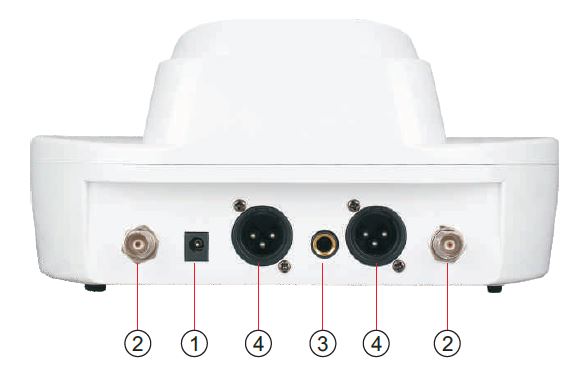 **
**
- Power on socket: dc12v500ma power input socket and the central electrode of the socket is connected with positive voltage.
- Antenna jack
- Audio mixed output: two signals are mixed together for output.
- Audio balanced output: suitable for long-distance connection to effectively reduce the noise caused by the connection line.
LCD display description of receiver
- Level 8 RF level display: display the received RF signal strength.
- Level 8 audio level display: display the size of audio signal.
- A hand-held microphone power display.
- Channel menu display: when Chan is on, the current working channel is displayed.
- Mute display: when mute light is on, it means no RF signal is received.
- System lock key display: lock unlock
- Volume display
**Wireless smart induction wireless charging all-in-one receiver
operation**
-
Automatic search for idle channels In a complex environment, it takes time to manually select channels without interference. The new system is equipped with an automatic search for interference-free channels.
The operation method is as follows:
Press the “SCAN” key, the host enters the automatic search for non- interference channel function, when the host searches for a non-interference channel, it will flash and display Currently searched for a non-interference channel, turn on the hand microphone at this time, align the position of the hand microphone’s display with the host’s “IR” launch window, and press The “SET” button can be used to perform infrared pairing operations.
-
Lock and unlock the host Press the A channel and B channel “SET” keys at the same time, the display is the locked state, and press the A channel and B channel “SET” keys at the same time again to display the state.

-
Manual FM setting Long press the SET button, then press the VOL+ button or VOL- button to adjust the frequency point up and down. After the adjustment is completed, press the IR button to perform infrared frequency binding.
Note: since each frequency point has its own encryption algorithm, the host can only use the same frequency points as the last successful frequency matching. If it appears, the frequency points displayed by the hand and the host are the same, but if the host has any signal or no sound, it can be operated again.
**Wireless smart induction wireless charging integrated machine
transmitter microphone operation **
**
Description of microphone configuration
- Net head
- Upper tube
- Display screen
- switch
- Down tube
- Charging tail pipe
- Mute switch
- 14650 rechargeable battery
**Wireless smart induction wireless charging integrated machine
transmitter microphone operation**
-
Induction function on and off.

-
Infrared pairing The specific operation method is as follows: turn on the hand microphone, aim the display of the hand microphone at the R launch window of the host, press the IR button of the host, and the hand microphone will automatically synchronize to the frequency point set by the host.
-
Power on and off operation Press the power switch down for about 2 seconds, the microphone display will light up and the LCD screen will display related work information, including information such as operating frequency
(channel) and battery power. Pay attention to check the battery power display status every time you turn on the phone, and choose whether to charge or not according to the actual length of time to be used. Under normal circumstances, the battery can be used normally for 12 hours when fully charged. When the battery power is 1 bar, the low voltage prompt “LOW BAT” will flash on the display, indicating that the battery power is almost exhausted, please charge it. In addition, the backlight of the display will automatically turn off after a few seconds after the microphone is turned on and enter the energy- saving mode. If you need to view the display information during use, just tap the power switch. Press and hold the power switch for about 3 seconds, the display shows “OFF”, and then the microphone will shut down. -
Install the microphone battery Take out the handheld microphone from the package, unscrew the tail tube, insert a 14650 rechargeable battery according to the marked polarity, and then turn it back to the tail tube.

**Wireless smart induction wireless charging all-in-one charging
operation**
- The receiver has a built-in charging module. When the host is turned off, the transmitter microphone can still be charged when the power is connected;
- When the microphone is charging, the charging symbol will flash, and the charging symbol will stop flashing when the microphone is fully charged;
- It will automatically mute after inserting the handheld into the charging port for 3 seconds, and automatically turn off the handheld power after 5 minutes;
- It can be charged even when the power is turned off by hand;
**Technical parameters of wireless intelligent induction wireless
charging all-in-one**
- System indicators:
- Frequency range: 520-950MHz
- Modulation method: Broadband FM
- Adjustable range: 50MHz
- Number of channels: 200
- Channel spacing: 250KHz
- Frequency stability: ±0.005%
- Dynamic range: 100dB
- Maximum frequency deviation: ±45KHZ
- Audio response: 80Hz-18KHz (±3dB)
- Comprehensive signal-to-noise ratio: >106dB
- Comprehensive distortion: ≤0.3% will not degrade as the receiving distance becomes longer Working temperature: -10℃ ~+40℃
Receiver index:
- Receiver mode: double-conversion superheterodyne
- Intermediate frequency: the first intermediate frequency: 110MHz, 10.7MHz
- Wireless interface: BNC/50Ω
- Sensitivity: 12dBμV (80DbS/N)
- Sensitivity adjustment range: 12-32 dBμV
- Spurious suppression: >75dB
- Maximum output level: +10Dbv
Transmitter indicators:
Wireless program: wearable transmitter adopts 1/4 wavelength whip antenna, handheld microphone built-in helical antenna
- Output power: high power 30mW; low power 3mW
- Spurious suppression: -60dB
- Power supply: a 14650 rechargeable 3.7V 1200mah battery
- Use time: more than 8 hours at 30mW, more than 12 hours at 3mW
Operation methods and precautions
Operation method
- Connect the whole sound system;
- Adjust the volume of receiver and loudspeaker (karaoke power amplifier) to the minimum position;
- Turn on the power supply of the whole sound system according to the order from the front stage to the back stage;
- Turn on the power supply of the transmitter;
- Adjust the sound effect of the whole sound system: first, adjust the volume potentiometer of the receiver to the mid point position (for example, the receiver with the concealed potentiometer has been adjusted in the middle position when leaving the factory), turn on the microphone switch, speak to the microphone to make the volume appropriate, and then adjust the volume and volume controller carefully to make the sound clear and the volume appropriate. If necessary, take the microphone to carry out the “walking field” test in the whole use site. Generally, it is appropriate that the microphone does not produce howling during the whole “walking field” process;
- If there is a problem with the wireless receiver system, please refer to this manual for troubleshooting and solve the problem. If not, please ask professionals to solve the problem or directly negotiate with the dealer;
- After use, turn off the power supply of the transmitter first, and then turn off the power supply of the whole audio system according to the order from the previous level.
- The receiver has a built-in charging module. When the host is turned off, the transmitter can still be charged when the power is connected. 9. When the microphone is charged, the charging sign will flash, and when the microphone is fully charged, the charging mark will stop flashing;
matters needing attention
- The installation position of the antenna directly affects the receiving effect of the receiver, so pay special attention to the correct installation method. The most important principle is to keep the distance between the microphone and the receiver as short as possible.
- Avoid placing the receiver next to a computer or other equipment that generates RF signals.
- Avoid placing the receiver at the lowest level of the equipment rack, unless the antenna is Installed at a distance.
- The receiver system can meet the requirements of 200 wireless microphones to be used at the same time without interference. However, professionals are required to debug different channels.
- When multiple sets of wireless systems are used at the same time, please pay attention to the adjustment of “sq” position of the receiver. The lower the sensitivity is, the shorter the receiving distance is, but the stronger the anti-interference ability is. When the transmitter is close, it is better to switch to the low-power transmitting state to save points and reduce mutual interference.
Faults and Solutions
Troubleshooting the following table lists some common faults and solutions; if you can’t remove the fault, please contact your dealer.
| There is a problem | resolvent |
|---|
No sound; (status: RF display of receiver is not on)
|
Check whether the power switch of transmitter and receiver is in “on” position.
Check whether the positive and negative polarity of the battery is disordered.
Check the antenna connection of the receiver. Ensure that there are no obstacles between the antenna and the transmitter.
No sound; (status: RF display of receiver is normal, AF display is normal)| Check that the volume knob of the receiver is at the minimum position.
Check the connection between the volume of the receiver and the loudspeaker.
No sound; (status: RF display of receiver is normal, AF display is abnormal)|
Check that the receiver is powered on. Switch the microphone of the transmitter if necessary.
When the transmitter is connected, the received signal has noise or external noise interference.
| Check that the battery is firmly installed. Eliminate nearby RF interference sources.
If using a guitar or other instrument, check the connection.
Both transmitters may use the same frequency to find and turn off one of them.
The signal may be too weak, readjust the position of the antenna to be as close as possible to the transmitter.
Change other channels.
There is noise in the receiver after the transmitter is turned off.
|
Adjust the receiving sensitivity adjustment button of the receiver; sq knob.
Eliminate RF noise sources.
Readjust the position of the receiver or antenna.
The sound of the transmitter is lost occasionally during the movement of the venue.
|
Adjust the receiving sensitivity adjustment button of the receiver; sq knob.
Re place the receiver and conduct the “walk field” test to observe the RF display.
If you find that there is a sound loss, mark the point and avoid going there during the performance.
Unable to turn on transmitter| Replace the transmitter battery.
Read User Manual Online (PDF format)
Read User Manual Online (PDF format) >>