SOTOMO D-A10111111 Smart Toilet Instruction Manual
- June 4, 2024
- SOTOMO
Table of Contents
SOTOMO D-A10111111 Smart Toilet
- Thank you for purchasing our product. Please read this manual before installation and use it to ensure that your product will function at peak performance.
- Read this manual thoroughly and store it in a safe place for future reference.
IMPORTANT SAFEGUARDS
When using electrical products, especially when children are present, basic safety precautions should always be followed, including the following: READ ALL INSTRUCTIONS BEFORE USING
DANGER – To reduce the risk of electrocution:
- Do not use it while bathing.
- Do not place or store product where it can fall or be pulled into a tub or sink.
- Do not place in or drop into water or other liquid.
- Do not reach for a product that has fallen into the water. Unplug immediately.
WARNING – To reduce the risk of burns, electrocution, fire, or injury to persons.
- Close supervision is necessary when this product is used by, on, or near children or invalids.
- Use this product only for its intended use as described in this manual. Do not use attachments not recommended by the manufacturer.
- Never operate this product if it has a damaged cord or plug if it is not working properly, if it has been dropped or damaged, or dropped into water. Return the product to a service centre for examination and repair.
- Keep the cord away from heated surfaces.
- Never block the air openings of the product or place it on a soft surface, such as a bed or couch, where the air openings may be blocked. Keep the air openings free of lint, hair, and the like.
- Never use it while sleeping or drowsy.
- Never drop or insert any object into any opening or hose.
- Do not use outdoors or operate where aerosol (spray) products are being used or where oxygen is being administered.
- Connect this product to a properly grounded outlet only. See Grounding Instructions.
- Risk of Electric Shock. Connect Only to a grounding-type receptacle Protected by a Ground-Fault circuit interrupter (GFCI)
- Attention – Risk of electric shock, do not remove the cover (or back). Refer servicing to qualified service personnel.
GROUNDING INSTRUCTIONS
- This product should be grounded. In the event of an electrical short circuit, grounding reduces the risk of electric shock by providing an escape wire for the electric current. This product is equipped with a cord having a grounding wire with a grounding plug.
- The plug must be plugged into an outlet that is properly installed and grounded.
- DANGER – Improper use of the grounding plug can result in a risk of electric shock.
- If repair or replacement of the cord or plug is necessary, do not connect the grounding wire to either flat blade terminal. The wire with insulation having an outer surface that is green with or without yellow stripes is the grounding wire.
- Check with a qualified electrician or serviceman if the grounding instructions are not completely understood, or if in doubt as to whether the product is properly grounded.
The functions may vary from different parts no


Note: represents that the product has this function. – represents that the product does not have this function.
Parts Information
Overview, Remote controller
Overview
Remote Controller

Warnings and Safety
Please read thoroughly
- First of all, thank you for purchasing our product. To ensure proper and safe use of this product, carefully read this section before using it. Afterwards, store this manual in a safe place for future reference.
- The hazards and warnings listed herein are important for our users’ safety. Failure to heed warnings may have significant consequences.
- The company will not be held liable for any injuries to the user or damage to the product due to improper usage and/or failure to heed safety warnings.
Explanation of Terms and Symbols
- Warning Indicates possible injury resulting from improper usage due to negligence of this sign
- Attention Indicates the potential for human injury or property loss due to improper usage resulting from negligence of this sign.
- Note When used with the above “Warning” and “Attention” signs, indicates a strict request to follow noted precautions.
- Prohibits any individual from performing any action with this symbol.
- Prohibits any individual from dismantling the product.
- Keep the product away from any wet environments, including, but not limited to, humid environments, and proximity to baths, showers, or sinks.
- Do not touch
- Do not touch it with a wet hand
- Keep away from any extreme heat or fire
- Operate only as instructed
- Pull out the power plug!
- Protective grounding
Warning
- This product must be properly grounded.
- Risk of electric shock.
- If unsure, consult an electrician or electrical installation company.
- Do not place a lit cigarette along with other burning objects into the unit.
- Risk of fire.
- Do not touch, insert or pull out the power plug with a wet hand.
- Risk of electric shock.
- Do not use it during thunderstorms (unplug the power cord during storms).
- Failure to do so may result in injury or product malfunction.
- Do not use a power socket in poor condition or a damaged power plug.
- Risk of fire and/or electric shock.
- When the seat ring or the cover plate is damaged, to avoid any harm, be sure to pull off the power plug, close the water source and contact your local distributor for replacement.
- Risk of fire or electric shock.
- The power socket in use should be within the specified range (AC 120V ).
- Risk of fire and/or electric shock.
- Regularly pull out the power plug and wipe off any dust on the power plug using a clean dry cloth.
- Risk of fire.
- Individuals with disabilities, the elderly, and children should use this product under the supervision of another person.
- Please note that sitting on the heated seat for an extended period may result in burns.
- Do not pull, damage, bend, twist, stretch, roll, bundle, clamp or squeeze the power cable.
- Do not place anything on the power cable.
- Risk of fire and/or electric shock
- This product is not a toy. Advise children not to play with the product.
- Risk of injury.
- If the power cord is damaged, to prevent any injuries or accidents, it should be replaced by a professional.
- Risk of fire and/or electric shock
- Do not dismantle, repair or alter this product on your own. Call a professional for further advice.
- Risk of fire, electric shock, and/or other accident that may lead to injury.
- For cleaning or maintenance of plastic parts, do not use any harsh cleaning agents. (These include, but are not limited to, products such as concentrated sulfuric acid, concentrated nitric acid, glacial acetic acid, carbon tetrachloride, chloroform, acetone, butanone, benzene, methylbenzene, phenol, methyl phenol, dimethylformamide, methyl ether, soybean oil, acetate, 40% nitric acid, thick salt acid, 95% alcohol, gasoline, kerosene, or brake oil, etc.)
- Risk of damaging parts that can lead to accidents and injuries.
- Do not add water or detergent to the unit or onto the wireless remote.
- Do not soak the product with water or cleaner.
- Risk of fire and/or electric shock.
- Do not install the product in a humid environment or a soak room.
- Do not spray or soak this product with any form of liquid to prevent any damage to the product.
- Risk of fire and/or electric shock.
- Do not use polluted water or water intended for industrial purposes.
- Risk of urocystitis or dermatitis.
- Untreated water may also corrode the inner workings of the unit, potentially leading to electrical shock or a fire.
- Do not apply any force to the unit’s lid. Do not stand on the lid or open or close the lid and the seat forcefully.
- This may result in product damage and/or user injury.
- Do not place your hand or any other object into the dryer trap, and do not cover the dryer and dryer trap during product use.
- Risk of fire, electric shock, and/or other accident that may lead to user injury.
- Do not spray urine at the dryer trap.
- Risk of electric shock.
- Read the following for proper battery usage.
- Install the battery properly according to its correct polarity.
- Remove the battery during long periods of non-use.
- Replace the battery before it reaches the end of its usage.
- Failure to do so may result in interrupted control signals.
- Cover the battery with tape before disposal.
- This will prevent battery fluid leaks that may cause fire and/or other damages.
- Place the battery out of the reach of children and infants.
- If the battery is swallowed, contact a doctor immediately.
- If battery fluid leaks onto the user, quickly rinse the area using water.
- If battery fluid gets into the eyes, do not rub your eyes. Quickly rinse them with water and consult a doctor immediately.
- May result in vision impairment or blindness.
- When the battery is in use, do not perform the following operations:
- Do not hold or store it with metal objects (such as a necklace or a watch).
- Do not mix new and old batteries.
- Do not disassemble or throw the battery into water and/or fire. Battery fluids may cause a fire.
Attention
- Do not use the heated seat or warm dryer temperature for an extended amount of time.
- Extended use may result in burns.
- While using this product, make sure that the skin is in contact with the seat sensor area. Otherwise, a product may not operate correctly.
- Children and smaller individuals may have trouble staying in contact with the sensor area.
- Do not spray urine in the direction of the bidet nozzle.
- Doing so may result in blockage of the bidet nozzles and the cleaning area.
- Do not use your old hose component.
- Use the one provided with your product. Anything else connected to the older hose may need to be replaced.
- Risk of water leakage and/or property loss/damage.
- In case of sudden power failure, remove the power plug and close the angle valve to prevent water leakage.
- Risk of water leakage and/or property loss/damage.
- Avoid direct sunlight or heat.
- Risk of product discolouration.
- Do not supply electricity with an external switch, such as connecting the universal part to a timer switch.
- This may run the risk of issues caused by improperly resetting the thermal breaker.
- When the filter is being replaced, be sure to close the water supply angle valve. When the filter is being installed, be sure to fasten it securely.
- Risk of water leak.
- Pull out the power plug when the product is in disuse for an extended amount of time. Make sure to shut off the water and remove the water inside the product.
- Risk of fire, leaks, and product damage.
- When storing or transporting the unit in cold climates, make sure to remove all water!
- The product may crack due to freezing water, and other damages may occur.
- Risk of fire, leaks, and product damage.
Installation
Tools required for installation
Required tools
Required tools for installation. Please have these tools prepared before
installation. 
Item list Confirm that all below items are inside the
box
- Please confirm that all the aforementioned items are inside the package.
- If there are any omissions, please contact our customer service at admin@sotomo.us.
- The illustrations above are for reference only. Actual objects may look different in person.
- We provide you with 2 pieces of conversion nuts, each of a different version.
- Please select according to your plumbing requirements.
Before You Install
- Water pressure check, dimensional drawing
Checking your water supply
- The lowest operational water pressure is 11.6 psi, and the highest water pressure is 108.78 psi.
- The toilet cannot achieve optimal cleaning performance when the water pressure falls below 11.6 psi.
Confirm the dimensions of the product with installation
space
Installing Your Product
Install your unit using the following steps
- Open the box right side up
- Remove the accessories first, then remove the unit from the top, as shown in the diagrams below.

- Remove the accessories first, then remove the unit from the top, as shown in the diagrams below.
- Mark your drainage hole with a cross
- Cardboard installation
- Align cardboard with the centerline of the drain outlet;
- Draw contour lines according to cardboard;
- Mounting bracket installation
- Assemble the mounting bracket with bolts and then install it onto the pre-installed flange plate on the ground. Secure it tightly with nuts.
- Install the ceramic body, the water supply hose, and the T-valve
- Place the wax ring on the drain hole at the bottom of the ceramic.
- Insert the sealing flange into the drain outlet.
- Position the ceramic toilet on the corresponding spot as indicated by the contour line.
- Pass the screw through the fixing sleeve and then install it through the holes (on both sides of the toilet ceramic) into the mounting bracket on the ground. Tighten it securely using a tool.
- Place the decorative cap onto the fixing sleeve.
- Attach the flush water hose to the T-valve and tighten it.
- Attach the clean water hose to the T -valve and tighten it.
- Connect the T -valve to the water supply and tighten it. Use a gasket to prevent water leakage.
- Finish installation.
- Installing the remote
- Drill two 6mm (0.24 inches) diameter holes in the wall (approximately 1.77 inches deep).
- Insert the anchors into the holes using a hammer.
- Secure the holder with the anchors.
- Use screws to attach the holder to the wall.
- Remove the battery cover from the backside of the remote to install the batteries.
- Once finished, the remote is ready to be placed in its holder.
* **Detailed steps are illustrated in the diagram below:**
* Please use appropriate mounting tools for specific wall surfaces (such as wood, HOF, etc.).
* Ensure that the remote control holder is installed away from the bidet’s spray path.
* The remote control holder should be within reach when seated on the unit.
* Ensure there are no obstructions blocking communication between the toilet and its remote.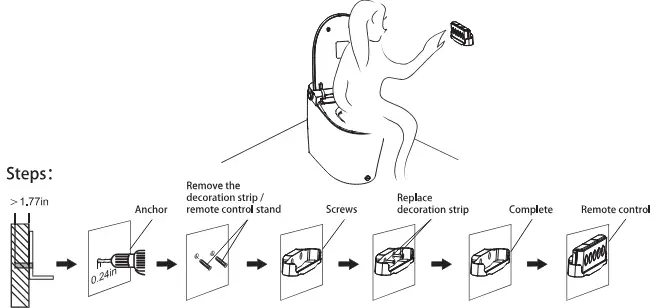- Installing and replacing the battery box
- Installing the external battery box:
- Remove the connecting cables from the designated positions.
- Connect the waterproof DC power plug and securely tighten the waterproof cap.
- Place the battery box in the appropriate position as shown.
- If you have any questions, please contact the customer service centre or your local dealer.
- The battery should be kept out of the reach of children.
- Some batteries and connecting wires may have slots. Please do not force them in; otherwise, it may lead to product damage.

- Replacing the external battery box:
- Unscrew the waterproof cap at the connection of the waterproof DC power plug.
- Pull out the waterproof DC power plug.
- Replace the battery box assembly with a new one, which can be used after installation.
- If you have any questions, please contact the customer service centre or your local dealer.
- The waterproof rating of the battery box for power failure and flushing is IPX6, and a single battery box can handle power failure and flushing approximately 200 times.
- Testing water flow
- Open the water supply angle valve to its maximum position as shown in the figure. Ensuring the water flow is above 0.61gal/10s.

- Ensure that there are no water leaks at various connection points.
* If there is a water leak, loosen the nuts again and reinstall them.- Connecting power
- Connect to the grounding.
- Plug-in AC 120V power plug.
- Check to see if the power light is on.
- Press the side knob to confirm that the toilet is powered on.
Testing the product
- Test whether the functions of the buttons on the remote controller and the knobs on the side of the body are normal
Are all the functions working properly?
- This includes Rear Wash, Front Wash (including water pressure and nozzle position adjustment), Heated Dryer, Water and Seat Temperature Adjustment, Nozzle Cleaning, and Remote Control. Please test all the functions listed above.
Checking Rear Wash
- Please place your hand over the seat sensor area, turn the knob forward, or press the “Rear Wash” button on the remote controller.
- Additionally, use your hand to cover the front of the washer to block the flow of wash water and prevent any water from spraying onto your body or clothing.
Matching your remote control code
- When the product leaves the factory, the remote control and the product are already paired.
- If the remote control malfunctions, please follow the methods below to re-establish the connection.
- Unplug the product’s plug, and press the stop key for a few seconds until the level light flickers.
- Plug in the connecting plug when the remote control gets closer to the product.
- The level light stops flickering, and then it lights up.
- All the level lights (red) are lit up.
- At that time, the remote control and product are reconnected.
Function Explanations

When starting up, short-press the knob to send ceramic flushing command when there is no function.
Auto flush
- When the seat sensor no longer detects a user, it will automatically flush.
- The toilet will only flush once.
Dryer
- Dries both front and rear areas.
- Press the ‘Dryer’ button once.
- Press the ‘Dryer’ button again to adjust the wind speed, which can be set to three levels from low to high.
Drying with flush
- Press the ‘Dryer ‘ button.
- The warm air function is activated and a flush is performed.
- Rear/ front wash is not available during flushing.
Kick flush
- Touch the ‘Kick Button’ gently.
- Tap the foot kick can realize the flushing function.
Kick to open ID/seat
- Tap the ‘Kick Button’ with your foot to raise your toilet lid/seat.
- Tap the kick button once: Lid opens.
- Tap the kick button twice : Seat raises.
- Tap the kick button three times: The seat and lid will close, and the toilet will flush.
- Please do not press the button forcefully.
- Rear/front wash is not available during flushing.
Microwave induction
- Microwave will detect any user within a 3ft radius.
- Automatically open the seat cover when the human body is near.
- If the product can not detect the presence of the human body for a while, it will automatically close the seat and cover.
Auto deodorization
- The function will operate automatically.
- The deodorization function will be activated when sitting on the toilet and will be closed after leaving the seat for 3 minutes.
UV sterilization
- Irradiation at the nozzle.
- 10 seconds after the user stands up, UV sterilization will automatically initiate and run for 3 minutes. During this time, you can either press the ‘stop’ button or activate the seat sensor to exit the UV sterilization.
- An ultraviolet lamp device is installed on the smart toilet.
Night light
- It operates automatically based on ambient light conditions.
- When the night light is turned on, it will automatically switch the night light on or off depending on changes in the outside light’s intensity.
- When the ambient light is strong, the night light is automatically turned off, and when the ambient light is weak, the night light is automatically turned on.
User-Friendly Design
- Slow-Closing Lid/Seat
- Preserve your toilet’s lifespan and allow for silent lid/seat closing.
- Damper
- The product is equipped with a damper that provides a buffering function for the toilet cover and seat, achieving a mute effect.
- Memory Mode
- After a power failure, water temperature, water pressure, seat temperature, and wand position are all restored to mid-range settings.
- The night light is turned on by default after a power failure. The On/Off function retains the last memorized setting state.
- Nozzle Self-Cleaning:
- The washer can automatically clean itself, keeping bacteria and stains at bay.
- Pre-Wetting
- After seating, the product will flush once towards the seat to ensure that the seat surface is moistened.
Maintenance
Regular maintenance is required to ensure normal use
Note
- Cut off the power and water supply before maintenance.
- Direct water washing of the entire product is prohibited.

Troubleshooting
Experiencing issues with your product?
If the user should run into any issues, please consult the troubleshooting guide below. If the problem persists, please contact a professional.
Power Button
Wash Functions Dryer
Dryer
Heated Seat
Remote Control
Toilet Unit
Soft-Closing Feature
Specifications
| Rated voltage | 1 20V – |
|---|---|
| Frequency | 60Hz |
| Rated power input | 1050W(When inlet water temp in 59″F) |
| Seat and dryer temperature range | 4 different levels |
| Dryer temperature range | 95 “F- 131 “F |
| Water supply hose type | DN15(G1/2″ ) |
| Water Inlet | Minimum pressure |
0.61gal/1Os
Maximum pressure| 108.78psi (static state)
Toilet| Flush type| Tornado flush
Rough-in| Rough-in 12in
Flushing| Heating type| Instant heating
Washing temp range| OFF/93.2 “F- 102 .2 “F (4 levels)
Safety system| Butterfly thermostat,t thermal fuse, flow sensor
Dryer| Dryer temp range| OFF/ 95″F -131″F(4 levels)
Dryer air speed| > 4m/s
Safety system| Thermal fuse, bi-metal
Heated seat| Heat temp range| OFF/ 93.2″F- 104″F (4 levels)
Safety system| Thermal fuse
Power cable length| Appx. 47.24in
Thanks for Choosing SOTOMO
- At SOTOMO, our mission is to provide the world with a healthy, hygienic, and comfortable lifestyle.
- We put our heart into designing each product, carefully balancing functionality, aesthetics, and materials.
- Our goal is to deliver superior products to our consumers, and we are truly grateful that you have chosen our products.
- We look forward to hearing from each customer, and we are passionate about providing you with the best service possible.
- Please feel free to reach out to us at admin@sotomo.us if you have any questions.
- Thank you for your trust and support.
Read User Manual Online (PDF format)
Read User Manual Online (PDF format) >>