RELIC EDC Knife Kit Instruction Manual
- June 1, 2024
- RELIC
Table of Contents
RELIC EDC Knife Kit

Product Information
Specifications:
- Brand: Relic
- Model: EDC Knife Kit
- Website: relicskills.com
- Included in the Kit: Right Handle, Right Liner Lock, Left Handle, Left Liner, Torx Wrenches, Bushings, Stop Pin, Standoffs, Screws, Thumb Opener, Pivot Pin, Spring, Pocket Clip, Nylon Sheath, Blade
Product Usage Instructions
- 1. Layout Parts & Identify Them
- Lay out all the parts on a flat surface and ensure you have the right handle, left handle, right liner lock, left liner, bushings, stop pin, standoffs, screws, pivot pin, thumb opener, spring, nylon pouch, and pocket clip.
- 2. Align Right Handle with Liner Lock
- Line up the holes in the right handle with the holes in the right liner lock, ensuring the holes are perfectly aligned.
- 3. Insert Pivot Pin in Handle & Liner Lock
- Unscrew the pivot pin then take the female part of the pivot pin and insert it through the aligned holes in the handle and liner lock, making sure the flat edge on the pin is lined up with the flat edge on the liner lock hole.
Frequently Asked Questions
- Q: What should I do if a part is missing from my kit?
- A: If any part is missing from your kit, please contact customer support at support@relicskills.com for assistance.
- Q: Can I disassemble and reassemble the knife multiple times?
- A: Yes, you can disassemble and reassemble the knife multiple times following the provided instructions. Make sure to handle all parts carefully to avoid damage.
INCLUDED IN YOUR KIT
- 1x RIGHT HANDLE
- 1x RIGHT LINER LOCK
- 1x LEFT HANDLE
- 1x LEFT LINER
- 2x TORX WRENCHES
- 2x BUSHINGS
- 1x STOP PIN
- 2x STANDOFFS
- 6x SCREWS
- 1x THUMB OPENER
- 1x PIVOT PIN
- 1x SPRING
- 1x POCKET CLIP
- 1x NYLON SHEAT
- 1x BLADE
NOT INCLUDED
- MASKING TAPE
- BAND-AIDS
- COLD BEER
LAYOUT PARTS & IDENTIFY THEM
Lay out all the parts on a flat surface and ensure you have the right handle,
left handle, right liner lock, left liner, bushings, stop pin, standoffs,
screws, pivot pin, thumb opener, spring, nylon pouch, and pocket clip.
Installation Instruction
ALIGN RIGHT HANDLE WITH LINER LOCK
Line up the holes in the right handle with the holes in the right liner lock,
ensuring the holes are perfectly aligned.
INSERT PIVOT PIN IN HANDLE & LINER LOCK
Unscrew the pivot pin then take the female part of the pivot pin and insert it
through the aligned holes in the handle and liner lock, making sure the flat
edge on the pin is lined up with the flat edge on the liner lock hole.
PLACE BUSHING ON PIVOT PIN
Grab one of the thin white bushings and carefully place it over the exposed
end of the pivot pin so it rests between the handle and liner lock.
PUSH STOP PIN INTO LINER LOCK
Locate the small stop pin piece and use it to push into one of the liner lock
holes near where the pivot pin is inserted.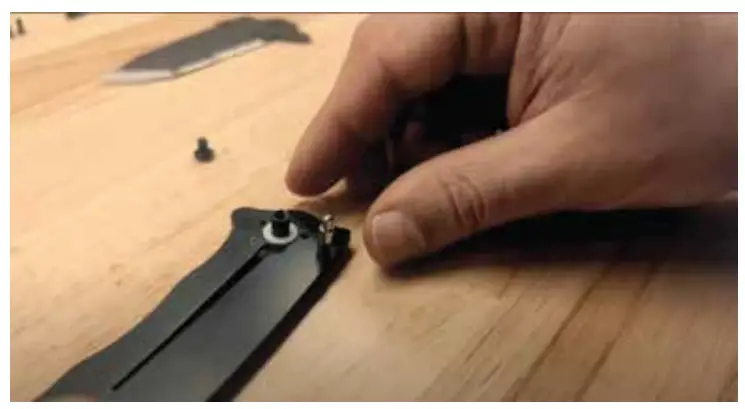
INSERT STANDOFFS
Pick up the two standoff pieces and insert each one into holes on the liner
lock, one at the back and one near the front, to provide structure to the
knife.
ATTACH THE BLADE
Hold the blade above the pivot pin area being careful of the sharp edge, and
lower it down so it rests on top of the bushings and pivot pin
POSITION SECOND BUSHING
Place the second bushing on top of the blade over the pivot pin.
INSERT SPRING INTO LEFT HANDLE
Pick up the left handle piece and left liner lock piece, and place them
together so the spring sits inside the inset area of the handle
POSITION LEFT LINER ON TOP
Place the left liner on top of the left handle, so that the tip of the spring
protrudes through the groove cut into the liner
FLIP OVER AND REMOVE HANDLE
Holding both the liner and handle together, flip both parts over and remove
the handle, keeping the spring in position in the liner.
ALIGN THE LINER TO THE BLADE
Align the liner with the pivot, the stop pin, and the two standoffs. Insert
the end of the spring into the hole in the blade.
POSITION THE LEFT HANDLE
Place the handle over the liner, ensuring the spring fits inside the inset
area of the handle
SCREW IN PIVOT PIN
Locate the male part of the pivot pin and use the larger T8 Torx wrench to
gently screw it into the exposed end to join all the pieces together.
INSERT SCREWS INTO HANDLE
Take the 4 small black screws and carefully insert each one into holes in the
handle and gently tighten with the smaller T6 Torx wrench
SCREW THUMB OPENER INTO BLADE
Unscrew the thumb opener if needed and insert the female end followed by the
male end into the hole at the back of the blade, then tighten with your
fingers
TIGHTEN SCREWS
Fully tighten all screws while checking that all of the different pieces
aligned and fit together nicely. Tighten the pivot pin more if needed.
ATTACH THE POCKET CLIP
Align the pocket clip holes with the 2 holes in the handle and then using the
final two, longer, screws tighten using the T6 Torx wrench.
CLOSE & SHEATH YOUR KNIFE
Remove the plastic tip protector front the blade, close your knife and insert
it into the nylon sheath.
Congrats, you just built you first RELIC knife!

References
Read User Manual Online (PDF format)
Read User Manual Online (PDF format) >>