SECUEYE C6HK-E27 Wireless Surveillance Camera Instruction Manual
- June 1, 2024
- SECUEYE
Table of Contents
SECUEYE C6HK-E27 Wireless Surveillance Camera

Specifications
- Models : C6HK-E27, C6SK-E27, C17C-E27, C17H-E27
- Manufacturer : SECULINK TECHNOLOGY (HK) LIMITED, SHENZHEN SECULINK TECHNOLOGY CO., LTD
- Website : www.seculink.net
- Email : info@seculink.net
Product Description
The SECUEYE WiFi Camera allows for easy monitoring and surveillance with
remote access through the SECUEYE APP. The camera is designed to be installed
in a E26/E27 bulb socket for convenient setup.
Connection and Setup
Installing the SECUEYE APP
Before powering on the IP Camera, ensure you have installed the SECUEYE APP
on your mobile device and registered an account.
- Scan the QR code in the user manual to download the APP.
- Alternatively, search for “SECUEYE” on Google Play or App Store to download the app.
Registering an Account
Open the SECUEYE APP and register an account by following the on-screen
instructions. Ensure to use the correct email or phone number and select the
appropriate country code.
Setting Up the Camera
- Plug the camera into a E26/E27 bulb socket.
- Connect the camera to your Wi-Fi network using the SECUEYE APP.
- Ensure all notification and location permissions are granted for seamless connection.
WiFi Connection
During setup, ensure that both the bulb camera and your mobile device are
on the same wireless LAN and network segment. The positioning function on your
phone must be turned on initially to allow the APP to detect the Wi-Fi list.
Connecting to the APP
Login to the SECUEYE APP and click on “Add Device”. Scan the QR code on the
camera to complete the initial setup process.
Configuration Succeed
After a successful connection, you can proceed with physically installing
the WiFi camera. If using a microSD (TF) card for local storage, ensure it is
inserted properly before installation. The camera supports TF cards up to
256GB and requires a Class 10 or higher TF card (sold separately).
Product Description

CONNECTION AND SETUP
Before the IP Camera is powered on, make sure you have installed SECUEYE APP on your mobile device and registered an SECUEYE account. For details, please refer to the following sections.
- Open mobile device, scan following QR code to download the APP
 If the download QR code in the user manual fails, please go to Google play or App store to search SECUEYE.
 - Open “SECUEYE” APP and click “Register now” at the top-right comer to select registration method as follows

Tip
- Please use the correct E-mail or Phone number.
- Please select the correct country code.
- When registering for a new account, please select the region where you are actually located.
Set Up As 1-2-3
- Plug in the camera to a E26/E27 bulb socket.
- Connect the camera with your Wi-Fi via the SECUEYE APP.
- Now you are ready to watch what you love!

Note : You will need to allow all notification and location permissions to allow the camera to connect to your mobile device.
WiFi Connection

Note : The bulb camera and the mobile device you are using must be on the
same wireless LAN and the same network segment during setup.
When configuring the network for the first time, please turn on the
positioning function of the mobile phone, so that the APP can obtain the WIFI
list. After completing the network configuration, you can turn off the
positioning function.
Connecting to the APP
Log in and click on “Add Device”. Scan the QR code on the WiFi camera and follow the onscreen instructions to finish initial setup.
WLAN Device Connection
Power on the device before connecting and wait for the device to start. Check
if the mobile phone is connected to the wireless network. The camera and the
mobile device you are using must be on the same network during setup.
- Smart Connection: “After the device prompts “Waiting For Connection”, click the Add button.
- Click Smart Connection

- Scan the QR code on the camera, enter “WiFi account password”, click I Heard “Waiting For Connection”:

- Wait for the device to connect, click “OK” after the connection is successful

NOTE : If your camera QR code was lost or ruined, please click the “QR code not found” enter next page and click the”ready for distribution network mode” ,your phone will come out a new QR code. Then Align the QR code with the camera lens, and maintain a distance of 5-10cm (2-4inches), and carefully listen to the camera playing “Wi-Fi Connection Successfully”. Click the “OK” button.

Smart Connection is simple and fast. The QR Code Connection can solve the
compatibility problem of router and improve the success rate of networking.
QR Code Connection
- CDAfter the device prompts “Waitting For Connection”, click the Add button
- Click the”QR Code Connection”Scan the QR code on the camera, enter “WiFi account password”, click I Heard “Waiting For Connection”, The APP will generate a QR code
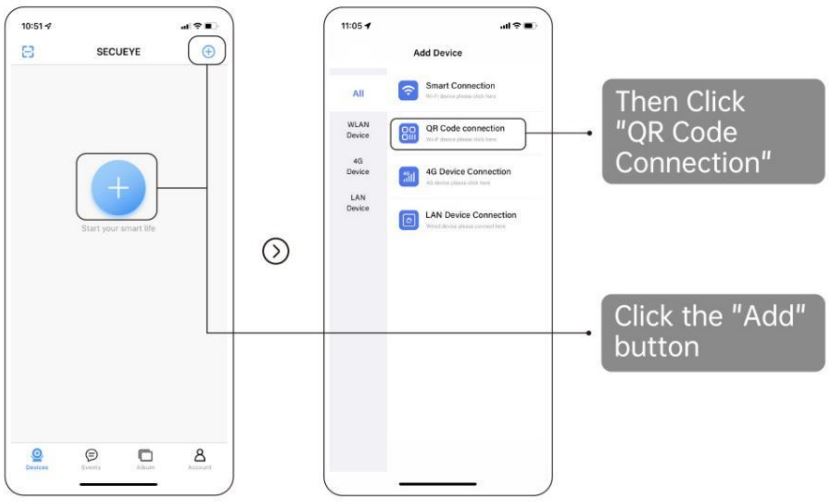
- Scan the QR code on the camera, enter “WiFi account password”, click I Heard “Waiting For Connection”, The APP will generate a QR code.

- Aim the QR code at the camera lens, when you hear the “QR Code Scanned Succesfully” prompt, you can stop scanning. Click to I heard “QR Code Scanned Succesfully”. as the picture shows:

- Wait for the device to connect, click “OK” after the connection is successful. as the picture shows:

- If the device prompts “Connection Failed”, please follow the prompts below to troubleshoot the problem:

Configuration Succeed
After the camera has been connected successfully to your SECUEYE account, you
can begin physically install the WiFi camera.

Inserting a TF Card
If you are using a microSD (TF) card for local storage, please ensure the TF card is properly installed before physically installing your camera.
The camera is compatible up to 256GB and requires a Class 10 or higher TF card to function. (Sold Separately)
FAQ
Q: What should I do if I lose or damage the camera’s QR code?
A: In case of a lost or damaged QR code, navigate to the “QR code not
found” section in the APP to generate a new QR code for setup.
References
Read User Manual Online (PDF format)
Read User Manual Online (PDF format) >>