CDM Custom Door and Mirror Installation Guide
- June 5, 2024
- CDM
Table of Contents
CDM Custom Door and Mirror

OWNER MANUAL + INSTALLATION GUIDE
DEAR CDM CUSTOMER
Welcome to the CDM family! If this is not your first CDM product— welcome
back! We are proud to manufacture quality products in our home state of New
York for over 60 years. It is our goal that you are completely satisfied with
your purchase and that your CDM door performs to your reasonable expectations
for its lifetime. We have over 1 million CDM doors installed to this day and
the list of happy customers continues to grow. If for any reason you are not
completely satisfied, please contact us and let us know what we can do to help.
HAPPY AND WANT TO LET PEOPLE KNOW?
Please take a moment of your time and write a review of your experience. You
can login to the retailer’s website where you purchased the door, Google or go
to our website. Small family business manufacturers like CDM rely on strong
reviews and happy customers that spread the news about our wonderful products.
If for any reason you feel like you can’t give us a positive review, please
contact us at
sales@customdoorandmirror.com and let
us know what we can do to get you added to the list of happy and completely
satisfied CDM customers.
CARE AND MAINTENANCE INSTRUCTIONS
Before installation, doors should always be stored flat and on a level surface.
Doors should never be leaning against a wall or not properly supported, as
this may cause warpage, especially if doors are acclimating to a new interior
climate/humidity level. Door hinges and rollers should be lubricated every 6
months. We recommend a dry lubricant. Look for a Teflon or Dry lubricant. Spray
each hinge sparingly from both front and back and wipe off excess. A little
will go a long way. The doors will work very smoothly for their lifetime if
they are properly lubricated.
MIRROR MAINTENANCE
DO NOT USE AN AMMONIA BASED CLEANING PRODUCT. These will shorten the life of
the mirror by creating a dark edge or dark spots over time. The most important
thing to remember is to use an alcohol or water based cleaner. There are many
fine aerosol and liquid products at your local retailer.
LIFETIME HARDWARE WARRANTY
The Custom Door and Mirror (CDM) Warranty is a statement of confidence to our
customers to the reliability of CDM’s products, which are designed and
manufactured to the highest standards in quality, appearance and durability.
This warranty reflects a tradition of excellence and a commitment to superior
manufacturing and innovative design dedicated to you, our customer. This
warranty is our pledge to you that we will proudly stand behind our products.
CDM warrants our hardware for its lifetime to be free from defects in
materials and craftsmanship. This Lifetime Warranty applies to the original
owner/purchaser of the CDM product and is not transferable.This includes
hardware, hinges, rollers, guides and handles for the natural life of the
product. CDM reserves the right to repair, replace, or refund the original
purchase price, at its option, any hardware found to be defective. Proof of
purchase required.
ADDITIONAL WARRANTY
In addition, CDM warrants the remaining components to be free from defects in
materials and workmanship upon inspection, and proof of purchase, will repair,
replace, or refund the original purchase price, at its option, if any
components are deemed to be defective by a representative of CDM. This
includes door panels, tracks, trim, etc. There are no additional warranties,
expressed or implied, which extend beyond the description on the face hereof,
including the implied warranty of fitness and the implied warranty of
merchantability.
WHAT THIS WARRANTY DOES NOT COVER
Broken mirrors, shipping damage, negligence, improper handling/storage, or any
costs associated with repairing or replacing a product found to be defective.
This warranty is applicable to original owner and only when the products
covered by it have been installed in accordance with the recommended written
installation instructions supplied by CDM and with established building
practices. In addition, the warranty is applicable only if the CDM products
have been accorded treatment which is considered good practice in the building
industry regarding storage and maintenance and have been subjected only to
normal use. Instances that involve improper installation, accident, natural
disaster, corrosive air, outdoor use, or product that has been altered will
not be covered. Because CDM cannot control the way its products are handled
after leaving its premises, this warranty does not apply to the finish or other
damage occurring during shipment. Some states do not allow the exclusion or
limitation of incidental or consequential damages, so the above limitation or
exclusion may not apply to you. This warranty bestows certain legal rights,
and you may also have other rights which vary from state to state.
SLIDING DOOR | INSTALLATION GUIDE


HARDWARE INCLUDED
-
WOOD BLOCK & METAL TRACK
-
PIVOT BLOCK
-
OAK SADDLE
-
METAL FLOOR PLATE
-
ROLLER BRACKET
-
SPRING
-
TOP PIVOT PIN
-
TOP PIVOT BRACKET
-
ADJUSTING BOLT
-
BOTTOM PIVOT BRACKET
-
HANDLE
-
2 – PLASTIC DOOR ALIGNERS
Only used when installing 2 pairs of bi-fold doors in the same opening -
2 – 2” WOOD SCREWS
-
24 – 5/8” #8 SCREWS

TOOLS REQUIRED

STEP 1
DETERMINE YOUR PIVOT & PREP THE TRACK
Slide and loosely secure plastic PIVOT BLOCK onto METAL TRACK Ensure that the
hole in the Pivot Block goes in the track closer to the edge and at the side
which you prefer your doors to open toward. The Flat surface of the METAL
TRACK is the front and it faces to the room. The PIVOT BLOCK should be 1” from
the edge of the track and loosely tighten the hex screw for now. For 4 door
openings you will need to repeat this process on the opposite end of the track
too. STEP 2
MOUNT UPPER TRACK
Attach WOOD BLOCK straight up to header of closet opening using 2 – 2” black
WOOD SCREWS M Block should sit 1/4” back from the front edge of the closet
door opening. With the flat side of the track facing the room push the METAL
TRACK over the WOOD BLOCK for snug fit. Cut aluminum track with a hacksaw if
necessary. Make sure that pivot block is positioned on the side you want the
door to open towards. Loosely fasten track to the block using two #8 SCREWS N
through the two holes on the inside of the track. 
STEP 3
MOUNT FLOOR HARDWARE
Place OAK SADDLE C on the floor, 1/4” back from closet opening front edge to
align with METAL TRACK above. Pre-drilled holes in OAK SADDLE go on the same
side as the plastic PIVOT BLOCK. The door opens to the left, and holes go on
the left. The door opens to the right, holes go on the right. Don’t fasten the
SADDLE to the floor until the end of the installation. Lay METAL FLOOR PLATE D
over holes drilled in OAK SADDLE (slotted holes in plate face inside closet
opening). Fasten plate to saddle using 2 – #8 screws through slots in the
metal floor plate. Do not tighten them down yet completely. We may need to
adjust left or right STEP 4
MOUNT DOOR HARDWARE
Next open your door & lay it face down. Drop SPRING F into hole on top of
the door; door opening to left use hole in top left & vice versa for door
opening to the right. Slide rounded end of TOP PIVOT PIN G up through TOP
PIVOT BRACKET H Mount this assembly over spring hole as shown. Fasten assembly
to back of door using two #8 SCREWS & test for correct installation by pushing
the PIVOT PIN G into door. Pin should now be spring-loaded. Fasten ROLLER
BRACKET E at top of door 1/4” from edge opposite of the pivot bracket using 2
– #8 SCREWS. Screw ADJUSTING BOLT into BOTTOM PIVOT BRACKET all the way up so
the door would sit as low as possible. Insert this assembly into hole at
bottom of door on the same side as TOP PIVOT BRACKET .Fasten BRACKET to
bottom back of door using 2 – #8 SCREWS 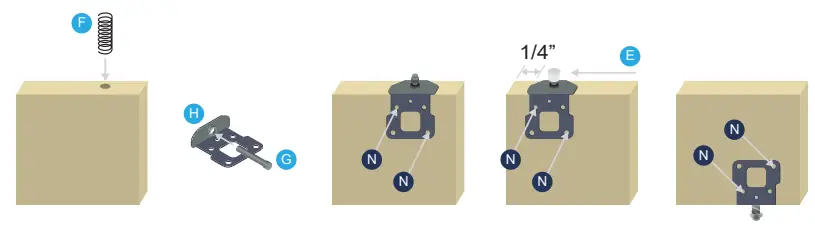 STEP 5
INSTALL DOOR
Fold doors together & stand upright. Lift at an angle to fit PIVOT PIN into
groove/hole in PIVOT BLOCK & ROLLER into track (1). You may hear the spring-
loaded pin “pop” into the hole. Lift to fit bottom ADJUSTING BOLT into cup on
METAL FLOOR PLATE (2). Sometimes it helps to have a 2nd person down low to
help find the cup. Make sure that the roller stays in the top track. Close
door slowly, making sure that there is at least 3/16” clearance between edge
of door & wall. If not adjust PIVOT BLOCK and/or METAL FLOOR PLATE left or
right accordingly.  STEP 6
ADJUST
To adjust HEIGHT alignment, turn bottom ADJUSTING BOLT to desired height. Use
5/16” wrench to adjust screw. Lock height adjustment by screwing one #8 SCREW
into smallest hole at back of BOTTOM PIVOT BRACKET. Now you can fasten the
saddle permanently to the floor. For wood floors we recommend 10d finish
nails, first pre-drill holes using 1/8” bit to prevent wood from splitting.
Cement floors require construction adhesive. To adjust WIDTH alignment, fold
and hold doors firmly in place and loosen hex head screws on PIVOT BLOCK and
METAL FLOOR PLATE. Position doors side to side, plumb and level, for best fit
and re-tighten PIVOT BLOCK and METAL FLOOR PLATE.  STEP 7
TIGHTEN, CLEAN & ENJOY
Place wrap-around Handle K approx. 39” from bottom of pivot panel. On a door
that opens to the LEFT, the pivot panel is the one on the LEFT. For doors that
open to the RIGHT, the pivot panel is the one on the RIGHT. Fasten it to back
of door using 1 – #8 SCREW. Now go back and make sure everything you’ve left
loose for the adjustments is tightened down. Aligners for 4-door units –
Install 2 sets of DOOR-TO-DOOR ALIGNERS L on the back of each meeting panel.
One set about a ½” up from the bottom and one set about 36” from the bottom.
These will keep your doors nice and flush with each other.
631.414.7725 | www.customdoorandmirror.com | sales@customdoorandmirror.com
References
- Custom Closet Doors | United States | Custom Door and Mirror
- Custom Closet Doors | United States | Custom Door and Mirror
Read User Manual Online (PDF format)
Read User Manual Online (PDF format) >>