Pitch Six EyeSend Adjustable View Belay Glasses Instructions
- June 15, 2024
- Pitch Six
Table of Contents
- Pitch Six EyeSend Adjustable View Belay Glasses
- Product Information
- Product Usage Instructions
- BOX CONTENT
- INTRODUCTION
- VIEW ANGLE ADJUSTMENT
- PRIOR TO BELAYING
- USE WHEN BELAYING
- ADDITIONAL POINTS OF USE
- SAFETY PRECAUTIONS
- CLEANING
- ONE-YEAR WARRANTY
- 30-DAY RETURN
- References
- Read User Manual Online (PDF format)
- Download This Manual (PDF format)
Pitch Six EyeSend Adjustable View Belay Glasses

Product Information
The EyeSend Adjustable-View Belay Glasses are designed to provide climbers with a comfortable and adjustable field of view while belaying. These glasses are the first on the market to offer an adjustable view angle, allowing users to customize their perspective. The glasses come with a protective case, a microfiber cleaning cloth, and a field service kit for maintenance.
Product Usage Instructions
- Introduction: Before using the EyeSend belay glasses, read the manual to understand their proper use and potential safety risks. If you have any questions or concerns, contact PitchSix at www.pitchsix.com.
- View Angle Adjustment: Pinch the view-adjustment lever and frame together to adjust the EyeSend view angle.
- Prior to Belaying: Practice using the glasses at the base of a climbing wall to become familiar with their adjustment range. Pay special attention to the steepest view setting, as it may cause disorientation or discomfort. If these issues persist during practice, discontinue use of the glasses.
- Use When Belaying:
- Remove the glasses from the case and place the neck strap over your head and around the back of your neck.
- Position the glasses high on your nose and ensure you can comfortably use the view-adjustment lever. Face the climbing wall and adjust the lever until the lower part of the climb is in a comfortable view. This may require rotating the lever to the lowest angle of view.
- Before your climber begins their ascent, move the glasses low on your nose and look over them. Keep them in this position until the climber reaches the second anchor point.
- Once the climber reaches the second anchor point, use one hand to slide the glasses back up to the top of your nose while maintaining a solid grip on the rope with your belay hand.
- As your climber ascends, adjust the view-adjustment lever upward to steepen your field of view as needed. Keep your neck in a neutral position to avoid potential neck pain.
- It is recommended to remove the glasses when lowering your climber. To remove, pull them off your head and let them hang from the neck strap.
- After belaying, store the glasses back in the protective case.
- Additional Points of Use:
- Over the glasses: Look over the top of the prisms when temporarily not using the glasses.
- Under the glasses: Look below the frames of the glasses to observe and orient yourself to the ground.
- Through the glasses: Look through the glasses to see the climbing wall while maintaining a neutral neck position.
- Safety Precautions: Follow all safety guidelines provided in the manual and understand the risks associated with climbing.
- Cleaning:
- Place all components on a flat, clean, lint-free cloth. This includes the EyeSend glasses, microfiber cleaning cloth, and L wrench.
- Work in an area where tiny components will not get lost.
Thank you for purchasing the EyeSend Adjustable-View Belay Glasses. With proper care and use, the glasses will give you years of use and comfort while belaying.
BOX CONTENT

INTRODUCTION
EyeSend belay glasses are the first glasses on the market with an adjustable field of view. Please read this manual prior to first use to avoid misuse or safety risks. If you have any confusion or concerns about using these glasses please contact PitchSix (www.pitchsix.com).
VIEW ANGLE ADJUSTMENT
Pinch the view-adjustment lever and frame together to adjust the EyeSend view angle.

PRIOR TO BELAYING
The EyeSend glasses change your view perspective. Practice using them at the base of a climbing wall prior to belaying. Become comfortable with the entire adjustment range of the glasses, especially at the steepest view setting as it may be the most disorienting. If discomfort or disorientation persists during practice, discontinue use of the glasses.
USE WHEN BELAYING
- Remove the glasses from the case and place the neck strap over your head and around the back of your neck.
- Place the glasses high on your nose and make sure you are comfortable using the view-adjustment lever. Face the climbing wall and adjust the lever so that the lower part of the climb is in a comfortable view. This likely means rotating the view-adjustment lever all the way down to the lowest angle of view.
- Before your climber begins their ascent, move the glasses low on your nose and look over the glasses. Leave them here, not in use, until the climber reaches the second anchor point up the climb.
- Once the climber reaches the second anchor point, use one hand to slide the glasses back up to the top of your nose. Maintain a solid grip on the rope with your belay hand while doing this.
- As your climber ascends the wall, rotate the view-adjustment lever upward to steepen your field of view as needed. Keep your neck in a neutral position the whole time to avoid possible neck pain.
- It is recommended to remove the glasses when lowering your climber. To remove, pull them off your head and let them han from the neck strap.
- When done belaying, return the glasses to the protective case.
ADDITIONAL POINTS OF USE
- For a low angle of view, rotate the view-adjustment lever all the way down. For a steeper angle of view, adjust the lever upward.
- EyeSend glasses offer three fields of view:

-
Over the glasses: Look over the top of the prisms when temporarily not using the glasses.
-
Under the glasses: Look below the frames of the glasses to observe and orient yourself to the ground.
-
Through the glasses: Look through the glasses to see climbing wall while maintaining a neutral neck position.
-
Keep the belay glasses in a dry environment and away from h eat sources.
-
EyeSend glasses fit over sunglasses and prescription glasses . To use, place the regular glasses on first and the EyeSend glasses over the top. Move the EyeSend glasses as high as possible up your nose.
-
Keep the belay glasses in a dry environment and away from h eat sources.
SAFETY PRECAUTIONS
- Using belay glasses may be disorienting. EyeSend glasses may feel more disorienting than common glasses due to their steeper view angle. Practice using the glasses prior to belaying. If disorientation persists, discontinue use.
- The location of the sun through the glasses is different tha n the location without glasses. Use caution to avoid looking directly at the sun.
- If the climbing wall is very steep it may be desirable to face away from the wall when belaying. Avoid doing so as it increases the risk of hitting your head on the wall if your climber takes a long fall.
- Don’t look through the belay glasses until your climber has reached the second anchor point up the wall.
- If an urgent situation occurs while belaying, remove the glasses and look directly at your climber.
- Adjust the EyeSend view angle using your left hand. When doing so, always keep your right hand securely on the belay rope.
- When lowering, remove EyeSend glasses as your climber nears the ground.
CLEANING
Clean the outside of the EyeSend prisms by gently rubbing them with the
included microfiber cleaning cloth. Most of the time it will be sufficient to
clean only the outside of the prisms.
In extreme circumstances, or after much use, it may be desirable to clean the
inside of the prisms and the moveable mirrors. All the components necessary to
do so are included with your EyeSend glasses. Follow these steps carefully.
Note: do not open and cl ean the glasses if they are only misty on the inside.
EyeSend glasses breathe and mist on the inside of the glasses may dissipate in
time.
- Lay all components on a flat area on top of a clean, lint-fr ee cloth. Needed components include the EyeSend glasses, microfiber cleaning cloth and L wrench. Work in an area where tiny components will not get lost.
- Place the glasses upside down on top of the lint-free cloth .
- Using the Phillips-side of the L wrench, remove the two sma ll retaining screws from the bottom cap of the EyeSend glasses. Carefully place these screws in a location where they won’t get lost (a upside-down plastic lid is a good choice).

-
Using the flat side of the L wrench, pry the bottom cap off. It will snap off, exposing the inside of the EyeSend glasses.
-
Before removing any more pieces, observe how all the remain ing components fit into the EyeSend glasses. This knowledge will be useful during reassembly.
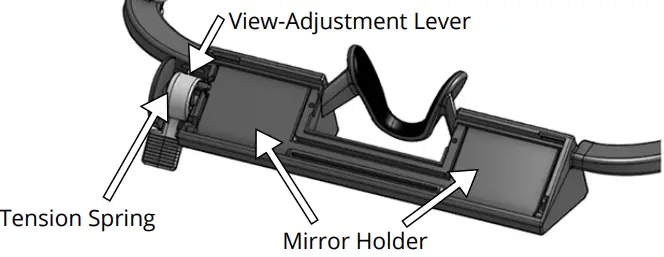
- Remove the mirror holder, view-adjustment lever and tension spring. Carefully place the view-adjustment lever and tension spring in a location where they won’t get lost.
- Clean the mirrors using the microfiber cleaning cloth. Be ca reful not to touch the mirror surface with your bare fingers. Set asid e, with the mirrored surface facing up.
- Turn the EyeSend glasses over and use the microfiber cloth t o clean the inside of the prisms. To clean the corners of the pri sm bottom it may be useful to wrap the microfiber cloth around the flat side of the L wrench. When doing this, fold the cloth over two or three times and use caution to avoid scratching the prisms.
- Once all components are clean, reassemble the glasses:
- Place the tension spring on top of the view-adjustment leve r and insert into the lever slot on the bottom of the frame.
- Insert the free side of the mirror holder into the frame. Position the mirror holder so that the drive pin fits into the view-adjustment lever drive slot. Note that the tension spring must be properly seated on the view-adjustment lever and inside the frame. The view-adjustment lever should rotate freely.

  * Insert the front edge of the bottom cap into the front edge of the glasses frame. Using caution to make sure the tension spring isn’t displaced, snap the bottom cap onto the frame. Be patient. This step may require a few attempts to execute correctly.

  * With the bottom cap secured, make sure the view-adjustment lever action is smooth. If so, screw the retaining screws into the bottom cap using the L wrench until they are just snug. Do not over tighten.
  * If necessary, clean the outside of the prisms with the microfiber cloth.
ONE-YEAR WARRANTY
PitchSix warrants the EyeSend belay glasses to be free from manufacturing defects for a period of one year. If you feel the glasses have a workmanship failure in one year from the date of purchase, contact PitchSix customer support (support@pitchsix.com) with photos and a description of the failure. If PitchSix deems the issue to be covered by warranty, PitchSix will repair or replac e the glasses free of charge (shipping not included). This warranty excludes normal wear and tear, oxidation, customer modifications , incorrect storage, improper maintenance, negligence and uses fo r which the product was not intended.
30-DAY RETURN
If you purchased the product directly from PitchSix, you may re turn the product up to 30 days after purchase for a full refund.
References
Read User Manual Online (PDF format)
Read User Manual Online (PDF format) >>