CADDYDRIVER QR1X Remote Control Electric Golf Bag Cart User Manual
- June 13, 2024
- CADDYDRIVER
Table of Contents
- CADDYDRIVER QR1X Remote Control Electric Golf Bag Cart
- Product Information
- Product Usage Instructions
- Operating Instructions
- Parts List
- Assembly Instructions
- Handle Controls
- Operating Instructions
- General Maintenance
- Trouble Shooting Guide
- Remote Control
- References
- Read User Manual Online (PDF format)
- Download This Manual (PDF format)
CADDYDRIVER QR1X Remote Control Electric Golf Bag Cart
Product Information
The product is a Caddydriver, designed to assist golfers in carrying their bags during a round of golf. It features handle controls, a power button, speed controller, GO/stop button, and an LED display. The Caddydriver can be operated manually using the dial throttle and offers a range of speeds from 1 to 9. The battery of the Caddydriver can be charged and requires proper care to ensure its longevity.
Product Usage Instructions
Assembly Instructions:
- Unpack all items carefully and check parts.
- Folding instructions: (No further details provided in the manual)
Handle Controls:
- Distance (remote), 10/20/30(handle) Auto Function: Pressing the 10, 20, or 30 buttons on the remote control will make the Caddydriver run for 10m, 20m, or 30m respectively, and then stop automatically. It is recommended to turn off the remote control when not in use to prevent accidental button presses.
- Power Button – ON/OFF Button: Hold the power button for 2 seconds until the lights come on to turn the Caddydriver on and off.
- Speed Controller: Use the scrolling speed dial to select your preferred speed level from 1 to 9. The display will show the chosen speed.
- GO/stop Button(handle): Press this button to start the cart with the handle at the same speed it stopped. Press again to stop the cart.
- LED Display: (No further details provided in the manual)
Operating Instructions
Operating your Caddydriver:
To turn on the Caddydriver, press the power button for 2 seconds until the
display screen turns on. To control the speed, hold the handle and turn the
manual dial throttle clockwise to increase speed or counter-clockwise to
decrease speed. To stop, either turn the dial completely counter-clockwise or
press the off button.
How to Charge the Battery:
(No further details provided in the manual)
Battery use and Care:
- a) Charging Precautions: Charge the battery in a well-ventilated area and avoid charging in a sealed container or upside-down position. Keep the battery away from heaters or heat accumulation.
- b) Handling Precautions: Do not touch the electric poles of the battery to avoid safety hazards.
- c) Battery Replacement: When replacing the battery, ensure correct polarity (red for positive, black for negative) to prevent damage to the Caddydriver.
- d) Lead Battery Charging: Charge the Lead battery after each round of golf to maintain its lifespan. The charger should turn from red to green within 2 hours.
- e) Lithium Battery Charging: The Lithium battery may be charged as needed.
- f) Long Periods of Non-Use: If not using the Caddydriver for an extended period, charge the Lead battery every 6 weeks and the Lithium battery every 8-10 weeks. Always disconnect the battery from the charger once it turns green.
General Maintenance:
To keep the Caddydriver in good condition:
- Wipe any mud or grass from the frame, wheel, and chassis after every round using a damp cloth or paper towel.
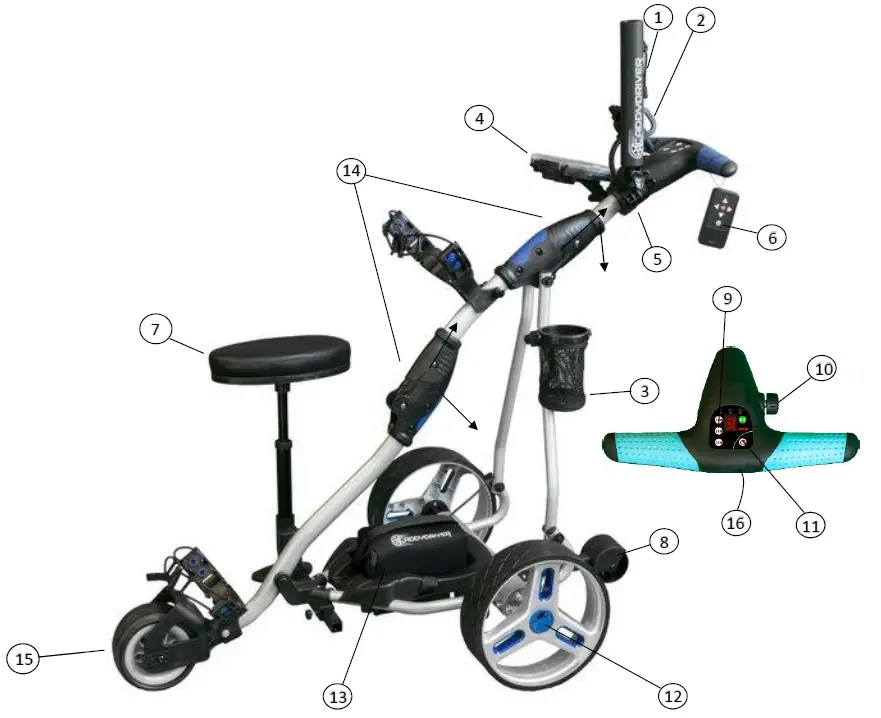
Parts List
- Umbrella Holder
- Cell Phone/GPS Holder
- Cup Holder
- Scorecard/Golf ball Holder
- Accessory Station
- Remote Control
- Seat
- Stabilizer Wheel
- Timer function
- Manual Dial Throttle
- Power Button
- Wheel/Easy release knob
- Battery
- Easy Slide Folders
- Front Wheel
- USB Port
Assembly Instructions
- Unpack all items carefully and check parts.
- Folding instructions:
- Attach wheels to axles by pushing the easy release knobs on the outside of the wheels and inserting the wheels into the axle. Make sure to continue pushing the easy release knobs on the outside of the wheels while sliding the wheels into the axles. Test that the wheels are locked in by giving each wheel a firm pull to ensure it does not slide out of the wheel’s pin.
- Attach accessories starting with the accessory station. For further instructions click on the “support” tab on our website www.caddydriver.com and scroll down to the instructional videos section.
Handle Controls
-
Distance (remote), 10/20/30(handle)
Auto Function
When pressed, the 10, 20, and 30 buttons will display on the screen either an A, B, or C and your Caddydriver will run for 10m, 20M, or 30M respectively, and then stop automatically.
Tip Always turn your remote control “OFF” when you put it in your pocket to ensure if any buttons are pressed while in your pocket the cart will not go anywhere! -
Power Button:
-
ON/OFF Button: Hold for 2 seconds until the lights come on to turn your Caddydriver On and Off.
-
Speed Controller
Scrolling of the speed dial lets you choose your preferred speed to suit your pace perfectly, and the display will show the preferred speed. The speed level is from 1 to 9. -
GO/stop Button(handle):
Press to start your cart with the handle at the same speed that it stopped. Or press to stop your cart. -
LED Display:
The green, yellow, and red LEDs on the handle indicate the level of charge of the battery. All on indicates a high charge, just yellow and red indicates a half round (9 holes) remaining and just red indicates under 2 holes of charge remaining. *note – the cart must be in motion for the most accurate reading.
Operating Instructions
Operating your Caddydriver
- To turn the Caddydriver on, press the power button for 2 seconds until the display screen turns on.
- To move and speed up your Caddydriver with the manual dial throttle, hold your Caddydriver’s handle and turn the dial in a clockwise direction until you get a desired speed.
- To slow your Caddydriver down, turn the dial in a counter-clockwise direction, and to stop you can either turn the dial completely counter-clockwise until you can no longer turn the dial, or you can press the off button and it will fully stop.
How to Charge the Battery:
- To charge the battery, plug the charger into the wall outlet 1st (the charger will turn green), then connect the battery to the charger(the charger will turn Red-charging). Charging is complete once the LED light on the charger changes from red to green. The battery must be disconnected from the charger once it has changed from red to green(within 2 hours of the charger turning green).
- Never leave the battery connected to the charger if the charger is green!
- Charging takes 4-6 hours depending on the depletion level of the battery. Ensure all connections are secured as a loose connection will result in a faulty charge.
Battery use and Care
PLEASE OBEY THESE PRECAUTIONS FOR BATTERY USE & CHARGING
- Do not charge the battery in a sealed container or in an upside-down position, as it is recommended to charge the battery in a well-ventilated area to prolong the lifespan of the battery.
- Do not charge the battery near a heater, or where heat accumulation may occur.
- Never touch the electric poles of the battery, as it is a safety hazard.
- The battery’s poles red color stands for positive, and the black for negative. In case of battery replacement please reconnect the poles of the battery correctly. Otherwise, your Caddydriver could suffer severe damage.
- Charge the Lead battery after each round of golf as the Lead batteries lifespan will be affected if it is drained. The Lithium may be charged as needed.
- If you do not use your Caddydriver for long periods of time (off season), the battery must be charged every 6 weeks(Lead battery), and every 8-10 weeks(lithium battery). Always ensure the charger is red(charging) and always disconnect the battery from the charger once the charger has changed from red to green within 2 hours.
General Maintenance
The steps below will ensure that you get a prolonged and reliable life out of your Caddydriver.
- The Caddydriver has been designed so that the user can concentrate on playing golf, while the Caddydriver does the work of carrying your bag. To keep your golf Caddydriver looking its best, we advise that you wipe any mud or grass from the frame, wheel, and chassis after every round with a damp cloth or paper towel.
- To prevent moisture from entering the electronic systems, motors, or gear boxes of the Caddydriver, DO NOT use any high-pressure jet washers or hoses to wash the Caddydriver.
- Remove the rear wheels every few weeks and remove any debris that might cause the wheels to drag. If your wheels do not slide off the axle easily, use steel wool to role around the axle to clear the axle of debris.
- Always disconnect the battery when you store the Caddydriver. Always store the battery at 15 to 25c, away from a heat source, in a dry place (not on a concrete floor).
All these recommendations will help keep your Caddydriver in top condition and ensure that it remains your reliable partner, both on and off the links.
Trouble Shooting Guide
Battery does not have power:
- Check battery charge
- Check all wiring connections and charger plug
- Check battery voltage
Motor is running but wheels do not turn:
- Check if wheels are secured to axle pin
Caddydriver pulls to left or right:
- Adjust front wheel alignment with dial knobs (see video under “support“tab at www.caddydriver.com).
- Check if your golf bag has excess weight on one side.
Remote does not work:
- Check to ensure the remote is on (button on the right side of the remote must be up/forward).
- Change the batteries in the remote (2 X AAA).
- Re-Sync the remote (see Sync instructions).
Dial throttle does not work:
- Turn the dial counter-clockwise until it “clicks” to “0”, then dial clockwise to run.
Please do not hesitate to contact us with any issue:
Remote Control
Functions
- Brake: To completely stop your Caddydriver, press the red stop button in the middle of the remote. Or press down button “F” to reduce the speed as desired.
- Dist: Press the Dist button on your remote to have your Caddydriver move forward for 10, 20, 30m (based on how many times you click the Dist button), the cart will stop automatically. Always ensure your cart has stopped safely when using this function. Always turn your remote off “G” when putting it in your pocket to ensure the cart will not move inadvertently.
- Forward Arrow: Pressing the forward arrow will set the Caddydriver in forward motion. Increase speed by pushing multiple times (1-9).
- Left Arrow: Initiates left turns. When the arrows are released the Caddydriver stops turning and continues straight with the original speed prior to turning.
- Right Arrow: Initiates right turns. When the arrows are released the Caddydriver stops turning and continues straight with the original speed prior to turning.
- Backward Arrow: Pressing the back arrow will decrease the speed or set the Caddydriver in backward motion. Increase speed by pushing multiple times (1-9).
- ON/OFF Switch: On the side of the device, move the switch to turn on/off the remote.
- Sync: Press and hold the “STOP” button on the remote transmitter, while pressing and holding the power button on the handle, after 3 seconds the LED lights will flash 4 times and your remote control is synced.

References
- Caddydriver Electric Remote Control Golf Bag Cart – caddydriver.com
- Caddydriver Electric Remote Control Golf Bag Cart – caddydriver.com
Read User Manual Online (PDF format)
Read User Manual Online (PDF format) >>