lowes RVH8300 Undermount Kitchen Sink Instructions
- June 6, 2024
- lowes
Table of Contents
lowes RVH8300 Undermount Kitchen Sink Instructions

We recommend that the sink be installed by a professional plumber.
Do NOT use the instructions for inset sinks.
YOU WILL NEED:
- Eye and ear protection
- Template (included)
- 4-16 Hooks with Μ6 screws (included)
- Sandpaper
- Colourless liquid silicone
- Hammer
- Drill with 10mm bits & stops for fixed bore depth
- Jigsaw
- Hand screwdriver
Note: Every model of sink comes with a box of 4-16 hooks, depending on the length of the sink.
Installation Instructions
STEP 1 Before commencing installation ensure that the template is in good condition and lined up parallel to the edges of the worktop.
STEP 2 Place the template on the worktop in the exact place where you
would like to install your sink and trace the outline of the template with a
pencil. Make sure it does not obstruct cupboard doors or other installations
(taps, pipes etc.) and check openings for these before installing the sink.

STEP 3 Cut the worktop according to the template outline then grind or
sandpaper the surface of the aperture to make it smooth. Always use the
template as a guide.
The final shape of the aperture will depend on the product.

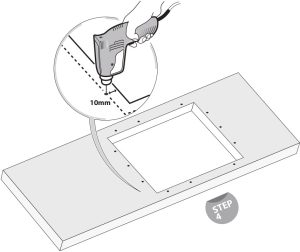
STEP 4 Install the sink into the underside of the worktop. Make pencil
marks 10mm from the outline of the sink to indicate the exact points for
drilling the holes for the hex screws, as shown in the diagram on the
template. The holes should be 10mm away from the outline of the sink and have
a depth of 20mm.
STEP 5 Apply adhesive of suitable type for your worktop material (marble,
graniteetc.) to each hole then insert the hex screws. Wait until the glue has
dried completely before proceeding. Apply a thick layer of silicon around the
bottom edge of the opening in the worktop at the point of contact with the
sink.

STEP 6 Centre the sink in the aperture and tighten the hooks. Tighten the
screws with a hand screwdriver because the pressure of an electric screwdriver
might throw the sink out of line.

STEP 7 Fill any remaining gaps between counter and sink with silicone.
Use a damp cloth to remove excess silicone along the joint between sink and
worktop.

Read User Manual Online (PDF format)
Read User Manual Online (PDF format) >>