Shenzhen Id Face Detection Future Technology ZMEP-VT303 Thermal Camera Instructions
- June 6, 2024
- Shenzhen Id Face Detection Future Technology
Table of Contents
Shenzhen Id Face Detection Future Technology ZMEP-VT303 Thermal Camera
Product Overview
·Black Hawk· face thermometer camera is powered by face recognition and infrared temperature measurement technology, which can scan the forehead intelligently and dynamically, measuring the temperature accurately. In the process of temperature measurement, only the forehead temperature of the human face is detected, and the system will not measure the temperature of hair, other body parts nor other objects, which can effectively avoid the temperature error caused by other environment or objects.
Product Features
- Intelligent dynamic face tracking temperature measurement technology, only measure forehead on the face.
- The system automatically recognizes the face and measures the temperature within 5 meters,
- One-key calibration temperature technology, no need for black body:
- No need to connect to a computer, it can work with a display device .
- The system fails to recognize the face and appears in the face box, the system does not measure the temperature
- Data management: supports one-click deletion of all temperature measurement data, and supports optional deletion of facial data with abnormal body temperature:
- display the face and temperature of abnormal body and the statistics of people with abnormal temperature:
- display the total number of temperature measurement,face and temperature statistic
- support a variety of displays, HDMI interface, optional large and small screens,
- Over-temperature alarm mode: the frame of the face turns red and the alarm sound is triggered:
- This machine is stand-alone version, data cannot be connected to the Internet
Product Parameter
| Thermal imaging resoIution | 206*156 |
|---|---|
| Applicable system | Android 7.1 |
| Temperature measurement distance | support 5.0m temperature |
measurement, and the best distance is within 4m
Temperature measurement accuracy| ±0.3o
Temperature measurement speed| s0.1s
Calibration temperature model| Temperature measuring system , one-key
temperature calibration
Data storage| supports 50,000 face information storage
WiFi| 2.4GHz
Number of peopIe measuring temperature simultaneously| 20
CPU| RK3288 4-coreprocessor
Camera| sony 2 million pixel
HDMI| 1080P HDMI 2.1
USB cable| one micro UsB
Output power| 12V/3A
Input power| AC100—240V
Working temperature| -20C~40C
Working humidity| 10%~90%
Product appearance and size

Equipment InstaIIation
Interface Description:
- HDMI: Video connection between thermal camera and display
- USB: Use the mouse to operate the thermal camara system
- POWER: Power connection of the thermal camera
- DC Power: The installation sequence of power supply is as follows:(make sure everything is connected, then power the camera.
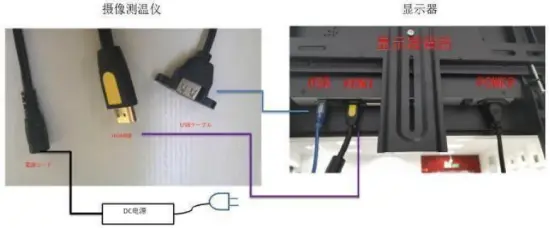
Step1: The thermo camera is connected to the power supply, it starts to
work
Step 2: Connect the thermo camera and the display device through HDMI
cable, then the temperature measurement information can be displayed on the
screen
Step 3: Connect the USB mouse to perform system debugging operations,
please refer to system -Operation Manual- for details
Software installation instructions
-
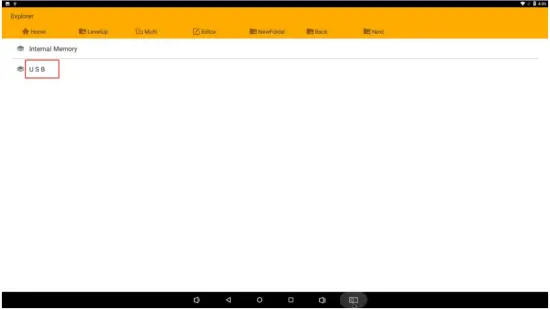
After inserting the USB memory with the software installation package apk. use the mouse to cIick to enter the “ExpIorer” (the button in the red frame in the figure. then cIick the USB. and cIick the corresponding installation package (suffix.apk according to the specific Need to choose the installation package)

-
Install the software, click the button “install” in the lower right corner

-
After the installation is complete, click the button “Open” in the lower right corner”

-
To allow the permissions required by the software, click “Allow”
-
Enter the software interface

-
Enter the account number and password, click the button “initialize” on the right to enter the software interface

Software instructions
- Interface and key description.
After all connections. installations and erection are completed. connect the power supply. and the temperature measurement screen will automatically open after the device is turned on.

- Cancel key: If you don!t need to save when calibrating temperature. you can press bIank to cancel.
- Display area for infrared test.
- Calibration temperature save key: when calibrating temperature. “calibration. please wait” appears and press this blank to save.
- Temperature calibration button: Press three times in the red frame area and “Enable parameter calibration mode” will appear.
- Direction keys: up, down, Ieft, and right control. when instaIIing new system software. correct the adjustment of infrared aIignment to the face and forehead. (This button is the project setting mode. the user does not need to operate)
-
Set and adjust the temperature measurement point (adjust when installing or updating the software. users generally do not need to adjust.

Debugging environment: Keep a distance of 1.52 meters between the face and the camera.
Method: use the left button of the mouse to quickly click the “4” temperature calibration button 310 times (if there is no slight change of position. click several times. the folowing screen appears.
Note: Only one human face can appear on the screen during adjustment. and it must be static and unable to move.

When the infrared thermal image appears. the red card square should be in the center of the eyebrow of the face. If it is not in the center. you can adjust the direction by clicking the “5” arrow key with the mouse. when the “start parameter calibration mode” appears on the screen. click the screen “3” to calibrate Confirm the temperature save key mouse. when the “start parameter caIibration mode” appears on the screen. cIick the screen “3” to caIibrate Confirm the temperature save key.

Cancel the saving (return to the last calibration parameter screen to cancel the saving that is return to the last calibration parameter.) -
Set the calibration reference temperature. (Calibration is only required when the ambient temperature fluctuates greatly. and it is recommended to calibrate it once a day before use)
Method: use the left button of the mouse to quickly click the “4” temperature calibration button for 3–10 times (if it does not appear to change the position slightIy. click a few more times). The “calibration. please wait” screen appears. 5 seconds it is automatically saved afterwards.
Note: Only one face can appear on the screen during calibration. and the person must be stil and cannot move.
Precautions
- The face part should be more than 2/3 of the face area to be recognized; otherwise, the temperature measurement is invalid.
- When calibrating the temperature, only one person is allow ed in the screen, otherwise the calibration fails.
- All external devices (such as UsB and HDMI) do not support hot unplugging. If unplugging occurs during work, the camera should be powere d off and started again; otherwise, the temperature measuring system fails.
- The UsB cable of the camera can be connected to the touch screen, wired or wireless mouse. The touch screen and mouse cannot be used simultaneously.
- When using the mouse, all left button operations are click.
- The HDMI cable is version 2.1 (gold-plated metal case). Please note that version 1.4 or below cannot be used when repla cing the cable.
- The system is recommended to be used indoors. it must be protected from water if it is used outdoors.
FCC Statement
This equipment has been tested and found to comply with the limits for a Class
B digital device, pursuant to part 15 of the FCC Rules. These limits are
designed to provide reasonable protection against harmful interference in a
residential installation. This equipment generates, uses and can radiate radio
frequency energy and, if not installed and used in accordance with the
instructions, may cause harmful interference to radio communications. However,
there is no guarantee that interference will not occur in a particular
installation. If this equipment does cause harmful interference to radio or
television reception, which can be determined by turning the equipment off and
on, the user is encouraged to try to correct the interference by one or more
of the following measures:
–Reorient or relocate the receiving antenna.
–Increase the separation between the equipment and receiver.
–Connect the equipment into an outlet on a circuit different from that to
which the receiver is connected.
–Consult the dealer or an experienced radio/TV technician for help.
This device complies with part 15 of the FCC Rules. Operation is subject to the following two conditions: (1) This device may not cause harmful interference, and (2) this device must accept any interference received, including interference that may cause undesired operation.
Caution: Any changes or modifications not expressly approved by the party responsible for compliance could void the user’s authority to operate the equipment.
FCC Radiation Exposure Statement
This equipment must be installed and operated in accordance with provided
instructions and the antenna(s) used for this transmitter must be installed to
provide a separation distance of at least 20 cm from all persons and must not
be co-located or operating in conjunction with any other antenna or
transmitter. End-users and installers must be provide with antenna
installation instructions and transmitter operating conditions for satisfying
RFexposure compliance.
Read User Manual Online (PDF format)
Read User Manual Online (PDF format) >>