YUNKEEC H600 ATL Drone User Guide
- June 1, 2024
- YUNKEEC
Table of Contents
- H600 Overview
- T-One Overview
- Battery Charging
- Assembly
- Power On/Off
- Compass Calibration
- Calibrate Steps
- During Calibration
- Calibration Finished for all Axis 5.8G
- CORS Network Binding(RTK Version Only)
- Flight Control
- Re-Bind
- Mission Plan
- BATTERY WARNINGS AND USAGE GUIDELINES
- GENERAL SAFETY PRECAUTIONS AND WARNINGS
- STATEMENT
- FCC STATEMENT
- RF EXPOSURE WARNING:
- CE WARNING STATEMENT
- References
- Read User Manual Online (PDF format)
- Download This Manual (PDF format)
YUNKEEC H600 ATL Drone User Guide

H600 Overview
-
Propeller

-
LED Status Indicator
-
Obs. Avoidance Lens
-
Landing Gears
-
Artosyn Antennas
-
Type-C USB 3.0 Port
-
Autopilot UART Port
-
Micro SD Slot
-
Battery
-
RTK Antenna (RTK Version Only)
-
I/O Board LED
-
Binding Button
-
Gimbal Port
-
I/O Board Debug Type-A 3.0 USB Port
-
XT30 Power Output Port (19.8V-26.4V Max 3A)
-
Autopilot Debug Type-C USB Port
-
Optical Flow Lens
-
GPIO, PWM & UART Port
-
GMAC Port
-
TOF Height Sensor
T-One Overview

- Antennas
- Previous Button
- Left Control Stick
- Zoom Knob
- Power Button
- 5D Button
- Flight Mode Switch
- Battery Level LEDs
- Home Page Button
- Right Control Stick
- Motor Start/Stop Button
- Return to Launch Button
- Type C USB Charging Port
- Micro SD Card Slot
- Headphone Port
- HDMI Port
- Video Record Button
- Shutter Button
- Gimbal Tilt Control Knob
- Gimbal Pan Control Knob
- Hot Key/Gimbal Back to Center (Double click)
- Battery
- USB 2.0 Port
- Battery Release Button
- USB 3.0 Port
- Landing Gear Button
Battery Charging
Charge the Drone Battery }
Power the Charger from a 100-240V AC outlet. Then press the power button to
switch on the charger.
Plug the aircraft battery into the charger port as illustrated.
Then the battery will be charged automatically.

Notice:
Plug out the battery from the charger after the charging finished to prevent
possible over discharged is suggested.
Warning:
The cut-off voltage of the battery is 3.0V for each cell (18.0V total) please
do not over discharge lower than this voltage.
Battery Maintenance Guide
The battery should be charged and discharged at least once eve- ry 3
months. Fully charged then discharged to the drone forced landing voltage, and
then recharged to 50% capacity
Notice:
The batteries are a consumable material and that they have to be replaced
after they show weakness.
Charge the T-One Battery
Charge the T-One battery by using the Type C USB cable.
Insert the connector into the Type C USB charging port as the picture shown.

Assembly
Assembling the Arms
Unfold the motor arms and secure them until hearing a ‘click’.
Disassembling the Arms
Press the Press Button on the Motor Arm to release the hook first when
folding.

Installing the Propellers
Mount propeller ‘A’ on motor ‘A’ and propeller ‘B’ on motor‘B’.
Press and rotate propellers in the direction the [ ] points to until the
propellers locked.
Cross-check to be sure propellers are properly locked in place.

Installing the Flight Battery
Push the battery into the battery compartment until hearing a ‘click’.
To remove the battery please press and hold the release button from both
sides, then pull the battery backward.

Tips:
Short click the power button on the battery to roughly estimate the power
level.

Power On/Off
NOTICE:
Please make sure all firmware is the latest version. Firmware can be updated
via the OTA update function, and the user manual can be downloaded from the
website: www.yuneec.com. The quick start guide does
not replace the user manual.
Power on/off the T-One Transmitter
Press and hold the Power Button to power on/off the T-One.
Power on/off the H600 Drone
Press and hold the Power button on H600 Flight Battery to power on/off the
drone.
NOTICE:
Always Power on the T-One before powering on the UAS.

Compass Calibration
In the following situations re calibrating the compass is suggested for flight safety:
- Before the first flight when you take the drone out of the box;
- When feeling the drone is drifting after a long distance trip;
- The drone alarms a compass warning;
- There are metal materials beside the drone during storage and transport.
Calibrate Steps
Notice:
Do not calibrate the compass in parking garages, close to building or near
roads with a metal core. For optimum performance, only calibrate the drone in
open spaces, far away from power lines and other metal structures or concrete
buildings.
Be sure to perform the compass calibration procedure at least 3 meters (11 feet) away from the nearest cell phone or other electronic devices to ensure proper calibration.
Step 1:
After the drone and transmitter already connected, place the drone on a
horizontal and stable surface, and tap the Settings Icon then tap the
“Compass” under the Sensors Item.

Step 2:
Tap “Ok” button to start calibrate.

Step 3: Calibrating.
Follow the onscreen display and instructions. During Compass calibration, the
H600 will need to rotate along the specific axis which shown by the LED of
each motor arm, until a tone is heard to change the next axis. Repeat this
procedure for all six positions. A yellow box with a red arrow indicates the
rotation axis which is calibrating. A green box indicates a completed
calibration.
During Calibration

Calibration Finished for all Axis 5.8G

Step 4: Reboot the drone.
After all axis have been calibrated, tap the “Reboot Vehicle” Button on the
popped up dialog box to make the calibration effective.

CORS Network Binding(RTK Version Only)
The Network CORS and RTK GPS have been disabled by default setting. The H600
Drone will be positioned and navigated by using the single GPS technology.
The RTCM Source was also set to disabled by default under the GNSS RTK item.
Users can connect the drone with the Network CORS according the following
steps to get the higher positioning accuracy.
Step 1:
After the T-One Transmitter and drone are bound, tap the Wi-Fi Icon and select
a Hotspot to make the T-One Transmitter connect to the internet.

Step 2:
Tap the Settings Icon, and then enter the “Vehicle” Menu. Tap the “RTK GPS”
Button and select “gps rtk” Selection, after that restart the drone.

Step 3:
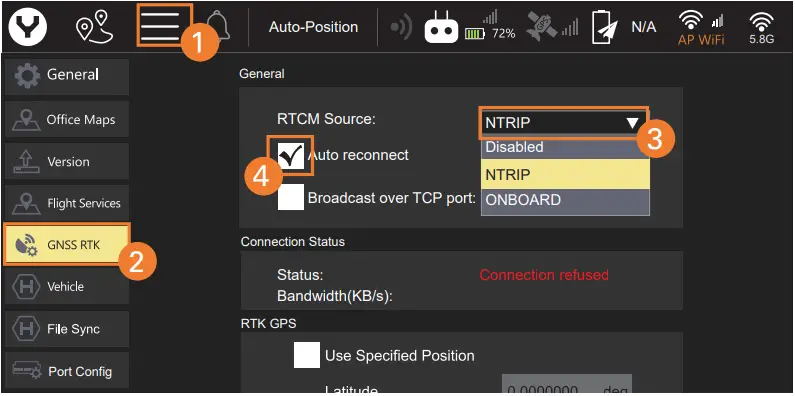
Tap the Settings Icon then tap “GNSS RTK”. Select “NTRIP” as the RTCM Source,
then tick Auto reconnect.
Step 4:
Fill the following “NTRIP Stream Settings” parameters according to your CORS
Network.

Notice:
You must fill out the “Required” tagging forms.
Step 5:
Tap “Apply” Button to finish the connection process.
Notice:
When connection to the CORS Network has been successful, the Connection Status
display will display a green “Connected”.

Notice:
Do not enable the RTK GPS when the RTCM Source is unavailable.Unless specially
required by the payload instructions or quick start guide.
The drone has 4 different basic flight modes we suggest place the flight
switch at the middle position to use the Angle mode to take off.

Optimal Transmission Range
The signal between the drone and the T-One Transmitter is most reliable when
the antennas are positioned in relation to the drone below.

Ensure that the drone is flying within the optimal transmission range.
Take Off Operation 1:
After the drone was positioned by GPS we can start the motors by pressing and
holding the Motor Start/Stop Button on the TOne Transmitter and release it
when the motors start.
Slowly raise the Left Control Stick to take off (Mode 2 Shown)

Take Off Operation 2:
Tap the “Takeoff ” Icon and set the takeoff altitude, then slide on the screen
to take off. There is also a “Landing” Soft Key beneath the “Takeoff ”
SoftKey that may be used for auto-landing.
Retractable Landing Gears Control
Press and hold the C2 button on the backside of the T-One transmitter to
control the landing gears.
Notice:
Always put down the landing gear before landing.
Land
Slowly lower the throttle/altitude joystick below the centre position, H600
will descend slowly and land. After the drone lands, the motors will stop
after 2 seconds without any operation.

Flight Control

Never attempt to operate the H600 near tall buildings/obstructions that do not offer a clear view of the sky (a minimum clearance of 100°).
Always operate the drone in open areas (approximately 10000 square feet/930
square meters or more) that are free from people, vehicles, trees and other
obstructions. Never fly near or above crowds, airports or buildings.

Angle Mode
When in Angle Mode and GPS is available, the H600 will respond according to
the T-One Transmitter.
Sport Mode
In Sport Mode, the drone responses are optimised for agility and speed
making it more responsive to joystick movements.

RTL Mode
The Return to launch (RTL) function brings the drone back to the last
recorded Home Point and land automatically. To enter the RTL Mode please press
and hold the RTL Button on the T-One Transmitter after the drone took off.
Manual Mode
When in Manual Mode, GPS will be deactivated.
The aircraft will only use its IMU module for positioning to control the
altitude.

Tips:
Manual mode is not recommended for the first-time pilots. Without GPS, the
drone will drift in slight winds and will not maintain position.
Re-Bind
The drone and T-One Transmitter are already bound before being shipped from the factory. It is unnecessary to bind them again. The operator can follow the steps below if rebinding is needed.
A
Power on the H600 Drone. Wait a few seconds for all systems to be boot up.
Step 2:
After initialization completes, use a paperclip or similar item to push the
Binding Button inside the hole as the picture shows. Release the button when
the blue LED blinks quickly.

Step 3:
Power on the T-One Transmitter and tap the “USYNC” Button to bind.

Step 4:
Tap the “Next” Button to start the binding process.

Step 5:
Connecting.

Step 6:
Tap the “Finish” Button to finish the bind process.

Mission Plan
Way point
A way point defines a specific location and behaviour at a specific point
in time, allowing for intelligent auto functions during flight
Way point flight is ideal for perimeter monitoring and many other uses.

Pattern
Pattern is designed for mapping and 3D scanning of ground-based objects.
Read the H600 manual for operational information.

BATTERY WARNINGS AND USAGE GUIDELINES
WARNING:
Lithium ion (Li-ion) batteries are significantly more volatile than alkaline,
NiCd or NiMH batteries.
All instructions and warnings must be followed exactly to prevent property
damage and/or serious injury as the mishandling of Liion batteries can result
in fire.
By handling, charging or using the included Li-ion battery you assume all
risks associated with Li-ion batteries.
If you do not agree with these conditions please return the complete product
in new, unused condition to the place of purchase immediately.
You must always charge the Li-ion battery in a safe, well-ventilated area away
from flammable material.
Never charge the Li-ion battery unattended at anytime. When charging the
battery you must always remain in constant observation to monitor the charging
process and react immediately to any potential problems that may occur.
After flying/discharging the Li-ion battery you must allow it to cool to
ambient/room temperature before recharging.
To charge the Li-ion battery you must use only the included charger or a
suitably compatible Li-ion battery charger. Failure to do so may result in a
fire causing property damage and/or serious injury.
If at any time the Li-ion battery begins to balloon or swell, discontinue
charging or discharging immediately.
Quickly and safely disconnect the battery, then place it in a safe, open area
away from flammable materials to observe it for at least 15 minutes.
Continuing to charge or discharge a battery that has begun to balloon or swell
can result in a fire.
A battery that has ballooned or swollen even a small amount must be removed
from service completely.
Do not over-discharge the Li-ion battery. Discharging the battery too low can
cause damage to the battery resulting in reduced power, flight duration or
failure of the battery entirely.
Li-ion cells should not be discharged to below 3.0V each under load.
Store the Li-ion battery at room temperature and in a dry area for best
results.
When charging, transporting or temporarily storing the Li-ion battery the
temperature range should be from approximately 40–120° F (5–49° C).
Do not store the battery or aircraft in a hot garage, car or direct sunlight.
If stored in a hot garage or car the battery can be damaged or even catch
fire.
Never leave batteries, chargers and power supplies unattended during use.
Never attempt to charge low voltage, ballooned/swollen, damaged or wet
batteries.
Never allow children under 14 years of age to charge batteries.
Never charge a battery if any of the wire leads have been damaged or
shorted.
Never attempt to disassemble the battery, charger or power supply.
Never drop batteries, chargers or power supplies.
Always inspect the battery, charger and power supply before charging.
Always ensure correct polarity before connecting batteries, chargers and
power supplies.
Always disconnect the battery after charging.
Always terminate all processes if the battery, charger or power supply
malfunctions
GENERAL SAFETY PRECAUTIONS AND WARNINGS
WARNING:
Failure to use this product in the intended manner as described in the quick
start guide and instruction manual can result in damage to the product,
property and/or cause serious injury. A Radio Controlled (RC) multi rotor
aircraft, APV platform, drone, etc. is not a toy!
If misused it can cause serious bodily harm and damage to property.
WARNING:
As the user of this product you are solely and wholly responsible for
operating it in a manner that does not endanger yourself and others or result
in damage to the product or the property of others.
Keep your hands, face and other parts of your body away from the spinning propellers/rotor blades and other moving parts at all times.
Keep items that could impact or become entangled away from the propellers/rotor blades including debris, parts, tools, loos clothing, etc.
Always operate your aircraft in open areas that are free from people, vehicles
and other obstructions.
Never fly near or above crowds, airports or buildings.
To ensure proper operation and safe flight performance never attempt to operate your aircraft nearby buildings or other obstructions that do not offer a clear view of the sky and can restrict GPS reception.
Do not attempt to operate your aircraft in areas with potential magnetic
and/or radio interference including areas nearby broadcast towers, power
transmission stations, high voltage power lines, etc.
Always keep a safe distance in all directions around your aircraft to avoid
collisions and/or injury.
This aircraft is controlled by a radio signal subject to interference from
many sources outside your control. Interference can cause momentary loss of
control.
To ensure proper and safe operation of the automatic landing function in Home Mode you must start the motors with the aircraft in a position that has at least 10 feet (approximately 3 meters) of clear and open space around it and achieve a proper GPS lock.
Do not attempt to operate your aircraft with any worn and/or damaged
components, parts, etc. including, but not limited to, damaged
propellers/rotor blades, old batteries,etc.
Never operate your aircraft in poor or severe weather conditions
including heavy winds, precipitation, lightning, etc.
Always begin to operate your aircraft with a fully charged battery.
Always land as soon as possible after the first level low voltage battery
warning or land immediately after the second level low volta- ge battery
warning (as indicated by the vibrations and audible alerts from the
transmitter/personal ground station).
Always operate your aircraft when the voltage of the battery in the
transmitter/personal ground station is in a safe range (as indica- ted by the
battery charge status icon on the screen of the transmitter/personal ground
station).
Always keep the aircraft in clear line of sight and under control, and
keep the transmitter/personal ground station powered onwhile the aircraft is
powered on.
Always move the throttle control stick down fully and turn off the motors
in the event the propellers/rotor blades come into contact with any objects.
Always allow components and parts to cool after use before touching them
and flying again.
Always remove batteries after use and store/transport them per the
corresponding guidelines.
Avoid water exposure to all electronic components, parts, etc. not specifically designed and protected for use in water. Moisture causes damage to electronic components and parts.
Never place any portion of the aircraft or any related accessories, components or parts in your mouth as doing so could cause serious injury or even death.
Always keep chemicals, small parts and electronic components out of the
reach of children.
Carefully follow the instructions and warnings included with this aircraft and
any related accessories, components or parts (including, but not limited to,
chargers, rechargeable batteries, etc.).
CAUTION:
The electronic speed controls (ESCs) installed in the H600 are not compatible
with any other product, and H600 is not compatible with any other ESCs. Use of
any other ESCs in H600 will cause a crash, which may result in damage to the
product, property and/or cause serious injury.
STATEMENT
FCC STATEMENT
This equipment has been tested and found to comply with the limits for Part 15 of the FCC rules. These limits are designed to pro- vide reasonable protection against harmful interference in a residential installation. This equipment generates, uses and can radiateradio frequency energy and, if not installed and used in accordance with the instructions, may cause harmful interference to radio communications. However, there is no guarantee that interference will not occur in a particular installation. If this equipment does cause harmful interference to radio or television reception, which can be determined by turning the equipment off and on, the user is encouraged to try to correct the interference by one or more of the following measures:
- Reorient or relocate the receiving antenna.
- Increase the separation between the equipment and receiver.
- Connect the equipment to an outlet on a circuit different from that to which the receiver is connected.
- Consult the dealer or an experienced radio/TV technician for help.
This device complies with part 15 of the FCC rules. Operation is subject to
the following two conditions:
(1) This device may not cause harmful interference, and (2) this device must
accept any interference received,including interference that may cause
undesired operation.
RF EXPOSURE WARNING:
This equipment must be installed and operated in accordance with provided
instructions and the antenna(s) used for this transmit- ter must be installed
to provide a separation distance of at least 20 cm from all persons and must
not be co-located or operating in conjunction with any other antenna or
transmitter.
End-users and installers must be provide with antenna installation
instructions and transmitter operating conditions for satisfying RF exposure
compliance.
CE WARNING STATEMENT
This device meets the EU requirements on the limitation of the general public to electromagnetic fields by way of health protection.
EU Operation Frequency (The Maximum Transmitted Power) T-One Transmitter:
2.4G: 2400-2438.5MHz (18dBm);
5G: 5725-5850MHz (12dBm);
2.4G Wi-Fi : 2400-2438.5MHz (18dBm);
5G Wi-Fi: 5725-5850MHz (12dBm).
H600:
2.4G: 2400-2438.5MHz (18dBm)
5G : 5725-5850MHz (12dBm).
EU Compliance Statement
Hereby, Yuneec International (China) Co., Ltd. declares that this device is in
compliance with the essential requirements and other relevant provisions of
the Electromagnetic Compatibility Directive 2014/30/EU.
The full text of the EU Declaration of Conformity is available at the
following internet address: www.yuneec.com. Please
visit the address above and enter into corresponding product page.
This content is subject to change. Download the latest version from www.yuneec.com
If you have any questions or inquiries about this document, please contact us by starting a conversation on www.yuneec.com
ATL Drone – Global Headquarters Weierstrass 18, 8952 Schliemann, Switzerland

References
Read User Manual Online (PDF format)
Read User Manual Online (PDF format) >>