NUCS 100 BOX Series Powerful New Mini PCs User Guide
- May 15, 2024
- NUCS
Table of Contents
NUCS 100 BOX Series Powerful New Mini PCs

Package Contents
-
NUCS Ultra 100 BOX Series
-
19V Power Adapter
-
Power Cord (by request)
Thy barebone system does not include memory, hard drive and M.2 SSD.
-
VESA Mount Bracket & Screw Package
-
Quick Installation Guide
-
M.2 Screw
The pictures shown in this quick installation guide are examples only; the actual look may be different slightly.
Product Overview
Front Panel Features

Rear Panel Features


Motherboard Layout

To use DisplayPort as a display output, please connect your monitor/display to
HDMI Port when installing OS system.
This DisplayPort only supports DP to HDMI dongle and DP to DVI dongle, and
does not support DP to D-Sub dongle.
How to Install
M.2 SSD: How to Install the M.2 SSD (Type 2242)

-
Locate the M.2 slot on the motherboard.
-
Carefully insert the M.2 SSD (Type 2242) into the the slot at a 30-degree angle

-
Tighten the screw to secure the M.2 SSD (Type 2242) to the motherboard.
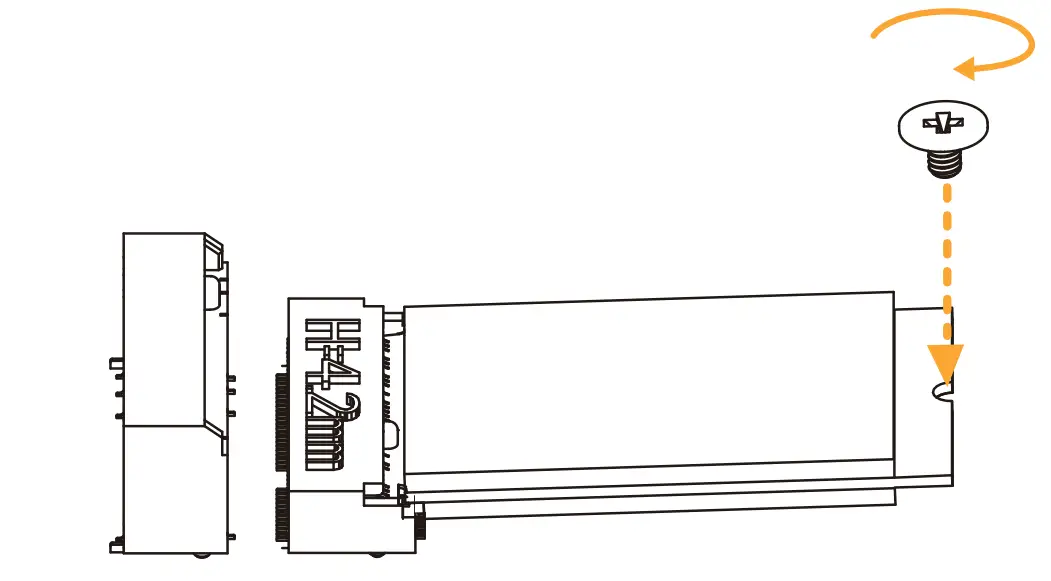
M.2 SSD: How to Install the M.2 SSD (Type 2280)

-
Locate the M.2 slot on the motherboard.
-
Carefully insert the M.2 SSD (Type 2280) into the the slot at a 30-degree angle.

-
Tighten the screw to secure the M.2 SSD (Type 2280) to the motherboard.

WiFi Module: How to Install the WiFi Module
-
Locate the WiFi Module slot on the motherboard.
-
Carefully insert the WiFi Module into the slot at a 30-degree angle.

-
Tighten the screw to secure the WiFi Module to the motherboard.

SO-DIMM Slot: How to Install the Memory Module (DDR5)
-
Carefully insert the SO-DIMM memory modules into the slot at a 30-degree angle.

-
Push down until the modules snap into place.

Note:
- The NUCS Ultra 100 BOX Series requires DDR5 SO-DIMM.
- For dual channel configuration, you always need to install identical (the same brand, speed, size and chip-type) DDR5 SO-DIMM pairs.
How to Install the VESA Bracket
-
Attach the two screws to the base of the NUCS Ultra 100 BOX Series .

-
Attach the VESA Bracket to the rear of a compatible display using the four screws. *Choose mounting holes depending on the mounting hole pattern of your LCD screen (75 mm × 75 mm or 100 mm × 100 mm).

-
Mount the NUCS Ultra 100 BOX Series by sliding it into place.

Positions of the NUCS Ultra 100 BOX Series
The NUCS Ultra 100 BOX Series can be placed in vertical or horizontal position.
-
Horizontal Position

-
Vertical Position

-
VESA-mounted

Please note that keeping the NUCS Ultra 100 BOX Series in a vertical position will ensure better cooling performance.
- INGESTION HAZARD: This product contains a button cell or coin battery.
- DEATH or serious injury can occur if ingested in as little as 2 hours.
- A swallowed button cell or coin battery can cause Internal Chemical Burns.
- KEEP new and used batteries OUT OF REACH OF CHILDREN
- Seek immediate medical attention if a battery is suspected to be swallowed or inserted inside any part of the body.
- For treatment information call: [ phone number for the National Battery Ingestion Hotline, currently 1-800-498-8666].
|
The terms HDMI® and HDMI High-Definition Multimedia Interface, and the HDMI logo are trademarks or registered trademarks of HDMI Licensing LLC in the United States and other countries.
Warranty Term
- Warranty of host of NUCS Ultra 100 BOX Series super m microcomputer (casing excluded): 1 year
- Warranty of transformer (including the plug) and wireless module: 1 year
- Our warranty does not cover the casing of the product, the CD drive, the metal frame and fastenings and screws, or packaging accessories.
- Data stored in the product may be lost as a result of the repair work or re-formatting of the hard drive disk. We does not provide data recovery services or data storage. Please back up your data regularly to protect the data and avoid loss. For details of our warranty terms, please refer to the individual warranty statement applicable to the district where your product was bought.
Safety & Regulatory Information
Failure to use the included Power Adapter may violate regulatory compliance and may expose the user to safety hazards.

Read User Manual Online (PDF format)
Read User Manual Online (PDF format) >>