SUFFLA MS1220DV01 Waterproof Digital Metal Detector Owner’s Manual
- June 17, 2024
- SUFFLA
Table of Contents
SMD-04A Metal Detector
Owner’s Manual

INTRODUCTION
Thanks for choosing our metal detector. With this metal detector, you can hunt for coins, relics, jewelry, gold, and silver just about anywhere. The detector comes with high sensitivity and strong ability of discrimination. It is versatile and easy to use.
THE DETECTOR’S FEATURES INCLUDE:
LCD Display: Shows the probable type of metal. the depth of the target, range of DISC, the level of SENS, and battery condition It also has digital display for target ID.
Three Tone Audio Discrimination: Sounds three distinctive tones (high, medium and low) for different types of metal.
Seven Controls:
- POWER: Turns on or off the power.
- VOLUME/BACKLIGHT: Short press for adjusting volume level. Press it for about 2 seconds to turn on the backlight.
- MODE: Press it to select desired operation mode. There are four modes to be selected from MODE indicator on LCD.
- INCREASE (+):To increase the level of volume, sensitivity and the range of discrimination working with VOLUME, SENS and DISC.
- DECREASE (-):To decrease the level of volume, sensitivity and the range of discrimination working with VOLUME, SENS and DISC.
- SENS: Adjusts the level of sensitivity working with”+” or”-” control button.
- PP: Pinpoints the location of the target accurately.
Headphone Jack: Lets you connect headphones of 1/8″ (3.5mm) and operate without trouble.
10 inch Waterproof Search coil: lets you use the detector even if you must put it under shallow water.
Adjustable Shaft: Lets you adjust the length of shaft for comfortable use.
Power: The detector requires two 9-volt alkaline batteries (not incl.).
ASSEMBLING THE DETECTOR
- You can watch the assembly and operation video on the Amazon product page
- Search “Suffla” on Facebook to join our Public Homepage,
you can also watch the assembly and operation video and exchange treasure hunting skills with other buyers in the page.
If you have any questions about our products and need to consult, you can contact our after-sales email: support@suffla.com
Assembling your detector is easy and requires no special tools.
JUST FOLLOW THESE STEPS:
(1) (2) (3) (4)
(5) (6) (7)
- Search coil
- Cable plug
- Fixing knob
- Connector
- Lower stem
- Middle stem
- Lock nut
- Control box
- Top stem
- Silver button
- S Stem
Step 1
Unscrew the fixing knob on the search coil and remove the knob connector. Place the washers into the groove of the lower stem. Then insert the stem and align the holes on the search coil bracket and the stem. Push the connector through the holes and tighten the knob.
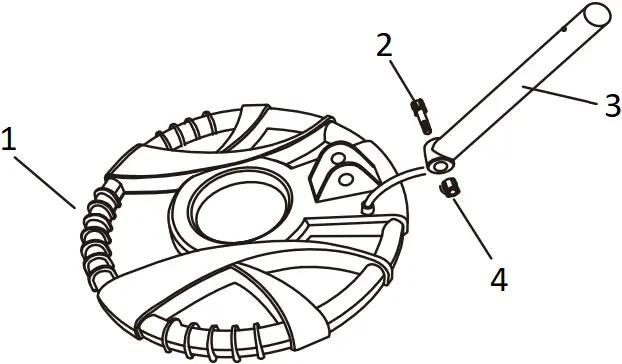
- Search coil
- Connector
- Lower Stem
- Fixing knob
Step 2
Press the silver button in the lower stem, and slide the stem into the middle stem.
- Silver button
- Middle stem
- Lower stem
Step 3
Press the silver button in the middle stem, and slide the stem into the S
stem.
Tighten the lock nut on the S stem.
- S Stem
- Silver button
- Middle stem
Step 4
Press the silver button in the top stem, and slide the top stem into the S stem.
- Top stem
Step 5
Adjust the stem to a length that you feel comfortable when you stand upright with the detector in your hand, and the search coil is level with the ground with your arm relaxed at your side. Then counter-clockwise rotate to tighten the lock nut on the middle stem.

Step 6
Fix the control box on the S stem and tighten the fixing screw properly. Wind the search coil cable around the stem. Insert the search coil’s cable plug into the five-pin jack at the back of the control box.
CAUTION:
- Do not over-tighten the search coil or use tools such as pliers to tighten it.
- The search coil’s plug fits into the connector only in one way. Do not force the plug and do not pull on the cable or you could damage it.
Step 7
Installing The Battery
01 Turn off the power before installing the batteries.
02 Slide the battery cover off in the direction of the arrow.
03 Place two 9V alkaline batteries into the battery compartment matching
the polarity symbols (+ and -) marked inside.
Note: The detector will maintain full performance until the batteries need to be replaced. Replace batteries when there is no segment remaining on battery level indicator. Alkaline batteries should be used
Warning:
- Dispose of old batteries properly. Never bury or burn them.
Cautions:
- Use only fresh alkaline batteries of required size.
- Do not mix the old and new batteries or different types of batteries.
- If you don’t plan to use the detector for a week or more time, remove the batteries Batteries can leak chemicals that can destroy electronic parts.
Stand and Stretch your arm, holding the metal detector to make the search coil above the ground for about 1 to 2 inches.
USING HEADPHONES
01 It is recommended to choose the headphones with volume control.
02 Insert the headphones’ 1/8″(3.5mm) plug into the headphone jack at the
bottom of the control box. At this time the internal speaker disconnects.
USING BACKLIGHT
In dark area, you can use BACKLIGHT for better searching.
Press VOLUME/BACKLIGHT button for about 2 seconds to turn on the
backlight. long press it again to turn the light off.
NOTE
01 To save power, the backlight will turn off automatically after 10
minutes.
02 As the light consumes more power, it’s better to turn off the
backlight in normal environment
CONTROL PANEL

- TARGET ID
- COIN DEPTH indicator
- BACKLIGHT Control button
- LOW BATT indicator
- SENS Control button
- DECREASE Control button
- PINPOINT Control button
- INCREASE Control button
- MODE Control button
- POWER Control button
- MODE indicator
01 LCD DISPLAY

- target ID DISC range
- target depth
- battery indicator
- sensitivity level indicator
- volume indicator
- mode indicator
- digital target ID
02 CONTROL BUTTONS
POWER: Press the button to power on the detector. Press it again to power off the detector.
VOLUME/BACKLIGHT: Short press for adjusting volume level. Press it for about 2 seconds to turn on the backlight. Long press again to turn off the backlight.
Note: As the backlight consumes more power, it’s better to turn off it in light places.
MODE: There are four modest° be selected from MODE indicator on LCD.
SENS: Used to adjust sensitivity level. Press SENS, then press + or – button to increase or decrease the sensitivity. The level will be displayed on the LCD.
INCREASE (+): To increase the level of sensitivity and the range of discrimination working with SENS and DISC.
DECREASE (-): To decrease the level of sensitivity and the range of discrimination working with SENS and DISC.
PP: Pinpoints the location of the target accurately.
SEARCH MODES
The detector includes four search modes: A/M (ALL METAL), DISC (DISCRIMINATION), MEMORYJEWELRY. Select the mode that suits the targets you hope to find.
01 A/M (ALL METAL) MODE
This mode is designed to detect all types of metal.
Press MODE to select A-M (ALL METAL) mode. A-M is displayed on LCD.
This means ALL METAL mode is selected. You can detect all kinds of metal.

02 DISC (DISCRIMINATION) MODE
The DISC mode can eliminate the unwanted metal targets and works with “+”.
A Press MODE to select DISC. DISC is displayed on LCD. This means
DISC mode is selected.
B Press “+” to eliminate the unwanted target(s) in sequence from left to
right. The eliminated target icon(s) will disappear on LCD. The detector will
not detect such target(s). User can select several targets to be eliminated by
using DISC mode. But silver target such as one dollar coin or 25 cent
can’t be eliminated. Because they are valuable.
C To pick up the eliminated target ID, simply press and the recovered target
icon(s) will be displayed again on LCD.

03 MEMORY MODE
The detector is designed to detect the only memorized metal target.
Press MODE to select MEMORY. MEMORY is displayed on LCD. This
means MEMORY mode is selected.
This mode is designed to detect the only memorized metal target. For example, if you want to find Icent coin, sweep a sample of (cent over the search coil. The detector will memorize the target. LCD only displays the memorized target icon and other target icons will be removed. In this case the detector will only detect Icent coin and will have no response to other metal targets.

04 JEWELRY MODE
This does not mean that the detector will search only for jewelry while in JEWELRY Mode. It simply indicates that the discrimination pattern is optimized for locating most jewelry items. The JEWELRY mode will still find coins, relics and other non-jewelry items. It ignores most nails and small iron pieces automatically.

05 PP MODE
01 Press PP button, “ PP ” on LCD flashes. When LCD displays
steady “ PP “, you can start to move the search coil slowly above the
sound area. If the detector finds the target, it sounds a tone. Also the
digital value of the target and depth are displayed on LCD.
02 Press PP button again. After steady “ PP ” displays, sweep the
search coil, keeping the same distance of search coil, sound disappears.
Closer the search coil to the sound area, the detector sounds again.
Repeat the above steps until the detector displays the constant signal where the location of the target is.
ADJUST SENSITIVITY LEVEL
The metal detector are highly sensitive and have adjustable sensitivity.
Setting the correct sensitivity level for individual detecting conditions will
maximize the detection depth. It also helps to reduce interference items and
reduce noise. Improve the accuracy of metal detection.
Press SENS , then + or-to increase or decrease the sensitivity.
01 Hold the coil stationary, then use the Sensitivity Plus button to increase the sensitivity until false signals begin to occur.
02 Reduce the sensitivity level by pressing the Sensitivity Minus button, just enough that the false signals disappear.
03 Sweep the coil over a clear patch of ground, and reduce the Sensitivity Level further if any ground noise is encountered.
PINPOINT (PP)
After you find a metal object, you can use PP to pinpoint the target.
PRESS PP BUTTON
“ PP ” on LCD flashes. When LCD displays steady “ PP “, you can start to move the search coil slowly above the sound area. If the detector finds the target, it sounds a tone. Also the digital value of the target and depth are displayed on LCD.
PRESS PP BUTTON AGAIN
After steady “ PP ” displays, sweep the search coil, keeping the same distance of search coil, sound disappears. Closer the search coil to the sound area, the detector sounds again.
Repeat the above steps until the detector displays the constant signal where the location of the target is.
OPERATION
Hold the search coil level to the ground about 1-2 inches above the surface, slowly move the search coil over the area where you placed the sample, sweeping the search coil in a side-to-side motion.
01 Never sweep the search coil as if it were a pendulum. Raising the search coil while sweeping or at the end of a sweep will cause false readings.


- CORRECT SWING
- INCORRECT SWING
02 Sweep slowly, hurrying will cause you to miss targets.
03 It’s better you sweep the search coil from side to side in an arc line of 3 inches motion and keep the search coil parallel with the ground.
If the detector detects the item, it sounds a tone, and the target icon flashes. Also LCD displays the digital value of target as well as the depth.
If the detector does not detect the item, make sure that the mode is set correctly for the type of metal you’re searching for Also make sure that you’re moving the search coil correctly.
NOTES:
- The detector responds with a signal when it detects most valuable metal objects. If a signal does not repeat after you sweep the search coil over the target a few times, the target is probably junk metal.
- False signals can be caused by trashy ground, electrical interference, or large irregular piece of junk metal.
- False signals are usually broken or non-repeatable. normal environment.
TEST STEPS
Turning on the detector| Setting the operation mode| Adjusting
sensitivity
---|---|---
Find a ground without metal| Place the test metal| Start
testing
TARGET INDICATIONS
Target
| Iron| 5 cent Nickel Jewelry| Pull tab Jewelry| 1cent/zinc S-caps Jewelry| 10
cent Copper coin| 25 cent Silver coin
---|---|---|---|---|---|---
Tone| Low| Low| Medium| Medium| High|
High
ID Display
| | | | | |
Digital value| 10-40| 41-50| 55-70| 72-75| 80-83|
86-88
NOTES:
There is a wide variety of metals and no target can be identified for certain until unearthed. This table is for general reference only.
FACTORS THAT AFFECT THE DETECTING
It’s difficult to have an accurate detecting result. Sometimes the detecting may be restricted by some factors:
01 The angle of the target buried in the soil.
02 The depth of the target.
03 The level of oxidization of the target.
04 The size of the target.
05 Electro-magnetic and electrical interference surrounding the target.
In area of highly mineralized ground, or fertile ground, or wet sand, the detector will sound even if there is no metal. In this case, you can lower the sensitivity. Meantime enhance the distance between the search coil and the ground.
Metallic digging tools will also affect the detection if they are near the search coil. So it’s better place them a little far away.
TROUBLESHOOTING GUIDE
Problem
| Reason| Suggestion
---|---|---
The detector displays or sounds without detecting any target
|
- The detector may receive interference and false signal from broadcast antenna and other electronic lines
- The humidity of environment may be extremely high
|
- Change searching place
- Wait for some time to check again
The detector sounds false signals.
|
- Sensitivity set too high/ environmental electromagnetic interference
- Sweeping the detector’s search coil too fast or at wrong angle
- Using 2 detectors in close proximity
|
- Reduce sensitivity
- Sweep the search coil more slowly and hold the detector correctly
- Keep two detectors at least 6 meters(20′) apart
The detector does not detect anything
|
- Sensitivity set too low
- Target range is eliminated
- Search coil is not parallel to the ground
|
- Increase sensitivity
- Recover all target range
- Adjust the search coil angel to be parallel to the ground
LCD display multiple target categories or emits several sounds at once
|
- There may be over one kind of metal targets
- The detector can’t identify the target. Sometimes, oxidized metal also causes the excursion of target arrow and tone.
|
- Reduce the sensitivity to eliminate the detection of the deeper target
- Sweep the search coil with different angles
The detector does not function.
|
- Five-pin cable not connected well
- Dead battery
|
- Re-plug it properly
- Replace batteries
Read User Manual Online (PDF format)
Read User Manual Online (PDF format) >>