Tec Vanlife 202309 Sprinter Rear Door Tire Ladder Carrier System Installation Guide
- June 15, 2024
- Tec Vanlife
Table of Contents
Tec Vanlife 202309 Sprinter Rear Door Tire Ladder Carrier System
Installation Guide

Product Information
Specifications
- Product Name: Tec Vanlife Sprinter Rear Door Tire Ladder Carrier System
- Tools Required: Metric wrench, ratchet and deep sockets, Drill, Rust Proof Solutions
- Recommended: Lock tight
Package Contents
- Mounting brackets (2)
- Door mounting tab
- Hardware for installation
- Rubber washer

Note: Please read these instructions thoroughly before beginning the installation.
Tools Required
- Metric wrench, ratchet and deep sockets
- Drill
- Rust Proof Solutions
- Lock tight is recommended
Package Contents
Installation Steps
- Step 1: Install Mounting Brackets
- Install the two mounting brackets onto the driver’s side upper and lower rear door hinges.
- Follow the order as shown in the figure below.
- The smaller bracket is intended for the upper door hinge, while the larger bracket is meant for the lower door hinge.
- Do not tighten the bolts and nuts at this point.

- Picture 1: Here’s the inside view of the upper hinge with the bracket installed.

- Picture 2: Here’s the inside view of the lower hinge with the bracket installed.

- Picture 3: Here’s the outside view of the upper hinge with the bracket installed.

- Picture 4: Here’s the outside view of the lower hinge with the bracket installed.

- Step 2: Next, install the door mounting tab onto the tire ladder rack, following the illustration below for reference.
-
* **Picture 5:** This image illustrates how the mounting tab should be attached to the tire ladder rack.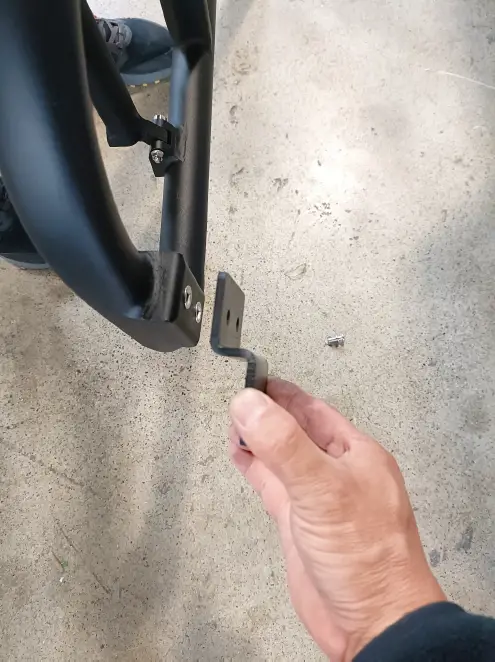
-
- Step 3: Attach Tire Ladder Rack
- Attach the tire ladder rack to the mounting brackets using the included hardware.
- Do not tighten the bolts and nuts at this stage.

- Step 4: Align and Tighten Hardware
- With the assistance of another person, ensure that the tire ladder rack is properly aligned with the van.
- Proceed to tighten all the hardware.
- Step 5: Mark and Drill
- Mark the hole location through the mounting tab.
- Drill through the rear door.
- Note: remember to rust-proof the holes drilled.

- Step 6: Bolt Mounting Tab
- Bolt the mounting tab to the rear door using the rubber washer provided.

- Bolt the mounting tab to the rear door using the rubber washer provided.
Your installation is now complete.
Important Notes:
- Before final tightening, double-check to ensure that the tire ladder carrier is correctly aligned.
- Regularly inspect the tire ladder to ensure it remains securely fitted.
Frequently Asked Questions (FAQ):
Q: Can I install this system on any type of van?
A: This system is specifically designed for Tec Vanlife Sprinter vans.
Q: What is the purpose of the mounting brackets?
A: The mounting brackets provide a secure attachment point for the tire
ladder rack.
Q: Is any additional rustproofing required?
A: It is recommended to rust-proof the holes drilled during installation to
prevent corrosion.
Read User Manual Online (PDF format)
Read User Manual Online (PDF format) >>