Skimbi 76172699 Pool Surface Skimmer User Manual
- June 12, 2024
- Skimbi
Table of Contents


 Pool Surface Skimmer
76172699 Pool Surface Skimmer
A. Skimmer tank (with locking screw)
B. Floating chamber
C. Basket
D. Hook foot
E. Hook arm (for assembly of “F” or “G”)
F. Hook arch (for hook fixation on inflatable top ring)
G. Hook base with screws (for hook fixation on metal frame)
H. Ø32mm flexible skimmer hose
J. Hose adaptors x 5
K. Locking screw (for securing position of “F” & “G” )
Filtration Flow rate requirement: 3m³/hr – 15m³/hr WARNING!
– This is not a TOY. Children should be supervised to ensure that they do not
play with this skimmer and its accessories.
– Never allow children to install and operate this product.
– Keep this skimmer and all accessories out of reach of children.
– Do not use this product and its accessories if any damage is found.
– Do not use this skimmer without basket.
– Risk of Suction Entrapment Hazard. Avoid hair, body or any loose parts of
your clothing to contact with this skimmer during operation.
– TURN OFF THE PUMP before performing cleaning and maintenance.
– Never remove skimmer and its accessories when pump is in operation.
– Do not operate this skimmer and pump when people/pets are in the water.
Above warnings are not intended to incorporate all possible instances for
risks and / or severe injury.
Pool owners should always exercise intensive caution and common sense when
utilizing this skimmer.
Instructions
- Connect the flexible hose “H” provided to the cuff underneath the skimmer tank “A” and slide on as far as it can go. (Fig.1)

- Select proper hook assembly according to type of your pool.
For pool with inflatable top ring, press the side buttons of the hook foot “D” and insert into the end of the hook “E”. Slide the hook arch “F” into the slot of the hook “E”. Tighten the screw “K” on the hook arch “F” to secure the hook arch position. (Fig.2) For metal frame pool, slide the hook base “G1” into
the slot of the hook arm “E”. Tighten the screw “K” on the hook base “G1” to
secure the hook base position. (Fig.3) 
-
Loosen the locking screw of skimmer tank and insert the end of hook foot “D” into the slot. Tighten the locking screw by hand to secure the skimmer tank position. (Fig.4)

-
Select and assemble the hose adaptor on pool water outlet (where water flows out from the pool) for skimmer hose connection. Hose adaptors provided in the kit fit to most strainers (see diagrams) used in soft wall pools. Locate the strainer on pool water outlet. According to the type of strainer used in your pool, select the correct hose adaptor to replace the strainer. Tighten by hand only.
WARNING! Turn OFF the pump before replacing the strainer with hose adaptors.
Ø40mm (13 /5 in) Strainer plug with non-removable grid cover
Refer to pool instruction manual for how to remove the strainer plug from the water outlet and then insert “J5” connector as shown. Note: if your pool strainer plug is secured inside the pool water outlet
with pool hose together by hose clamp, you may need to loosen the hose clamp
to release the strainer plug. Pay attention not to let the pool hose become
detached from the water outlet when loosening the hose clamp. Remove the plug
and insert the “J5” connector into water outlet as much as possible. Tighten
the hose clamp to secure the pool hose and the connector to the water outlet
Note: if your pool strainer plug is secured inside the pool water outlet
with pool hose together by hose clamp, you may need to loosen the hose clamp
to release the strainer plug. Pay attention not to let the pool hose become
detached from the water outlet when loosening the hose clamp. Remove the plug
and insert the “J5” connector into water outlet as much as possible. Tighten
the hose clamp to secure the pool hose and the connector to the water outlet
Ø80mm (3in) Strainer plug with non-removable grid cover
Refer to pool instruction manual for how to remove the strainer plug from the water outlet and then insert “J5” connector as shown.
 Note: if your pool strainer plug is secured inside the pool water outlet
with pool hose together by hose clamp, you may need to loosen the hose clamp
to release the strainer plug. Pay attention not to let the pool hose become
detached from the water outlet when loosening the hose clamp. Remove the plug
and insert the “J5” connector into water outlet as much as possible. Tighten
the hose clamp to secure the pool hose and the connector to the water
outlet.
Note: if your pool strainer plug is secured inside the pool water outlet
with pool hose together by hose clamp, you may need to loosen the hose clamp
to release the strainer plug. Pay attention not to let the pool hose become
detached from the water outlet when loosening the hose clamp. Remove the plug
and insert the “J5” connector into water outlet as much as possible. Tighten
the hose clamp to secure the pool hose and the connector to the water
outlet. Ø80mm (3in) Strainer plug with removable grid cover
Unscrew the strainer cover and screw on “J3”.
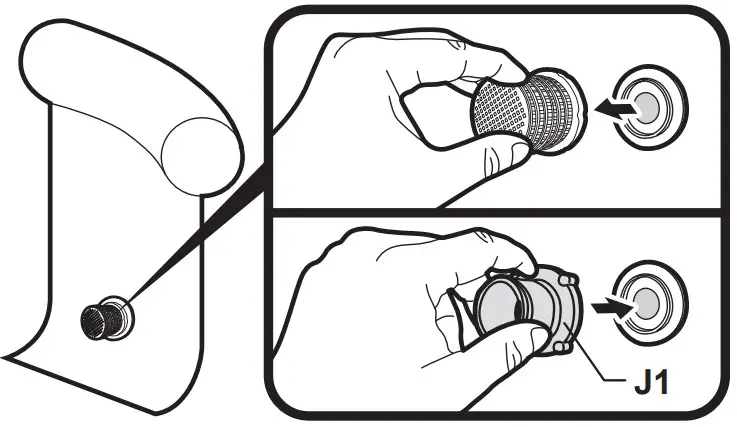
Ø40mm (1 3 /5 in) Strainer plug with removable grid cover
Detach the grid cover and press “J1” on it.
 Ø92mm (33 /5 in) Strainer (with side thread)
Screw “J3” onto “J2”, and then align and screw “J2” onto the strainer. Ø36mm (1/5 in) Strainer hole
Detach the strainer cover and directly insert “J4” into the strainer hole.
 Ø110mm (41 /3 in) Strainer
Unscrew the strainer grid cover and screw “J3” onto the middle thread of the strainer.
-
- Place the skimmer in the pool.
For pool with inflatable top ring, place the whole assembled hook on the inflatable top ring near the pool water outlet.
Loosen the locking screw “K” and slide the arch “F” to the position that makes the hook snug around the top ring, with skimmer tank positioned vertically in the water. Tighten the lock screw to secure the arch position. (Fig.5)
 For a
metal frame pool, attach the hook base “G1” onto the top beam near the water
outlet. Assemble “G2” to the hook “E”. Align and clamp both “G1” and “G2” to
the beam, then tighten the locking screw “K” on “G1” and “G2” to secure the
set-up. Ensure the skimmer tank is positioned vertically in the water. If the
tank is too close to the pool wall, loosen the locking screw “K” to reposition
“G2” accordingly. (Fig.6)
For a
metal frame pool, attach the hook base “G1” onto the top beam near the water
outlet. Assemble “G2” to the hook “E”. Align and clamp both “G1” and “G2” to
the beam, then tighten the locking screw “K” on “G1” and “G2” to secure the
set-up. Ensure the skimmer tank is positioned vertically in the water. If the
tank is too close to the pool wall, loosen the locking screw “K” to reposition
“G2” accordingly. (Fig.6)  6) Connect the skimmer in the pool.
WARNING! Turn off the pump before connecting.
Immerse the open end of skimmer hose in the water and let it fill with water until all air escapes. Connect it onto the hose adapter and slide on as far as it can go.
Place the chamber “B” and basket “C” into the skimmer tank. Loosen the locking screw and adjust the skimmer tank position on hook foot “D” until the floating chamber floats above the skimmer tank by 2.5cm(1in) – 11.5cm(4.5in). Also ensure the top of floating chamber is parallel with the water level.
NOTE: Skimmer tank should be mainta ined in vertical position and under water level in operation. Adjust its position if necessary. 7)
Cleaning and storage.
7)
Cleaning and storage.
WARNING!
– TURN OFF THE PUMP before performing cleaning and maintenance.
– Never remove skimmer and its accessories when pump is in operation.
Hold the basket handle and take both chamber and basket out from the skimmer
tank. Clean out the debris.
Use clean water to rinse all accessories and dry them with a clean cloth.
Store them in a dry and safe place indoors.
K074/22
© 2021 Kokido Development Ltd.
All rights reserved. No part of this document may be reproduced or transmitted
in any
form or by any means, electronic, mechanical, photocopying, recording, or
otherwise,
without prior written permission of Kokido Development Ltd. 210007005
Read User Manual Online (PDF format)
Read User Manual Online (PDF format) >>