SPL Washroom Sanela Spartan Sensor Tap Instruction Manual
- September 12, 2024
- SPL Washroom
Table of Contents
SPL Washroom Sanela Spartan Sensor Tap
Specifications
- Finish: Tempered Water
- Water Temperature: Cold and pre-mixed water
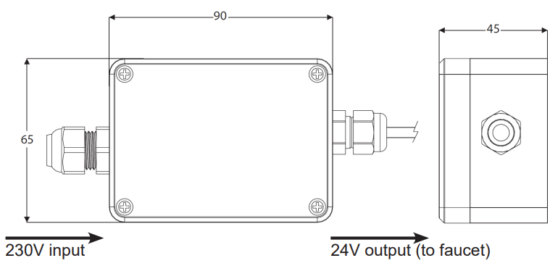
- Power Supply: 230V input
- Control Operating Voltage: 24V output (to faucet)
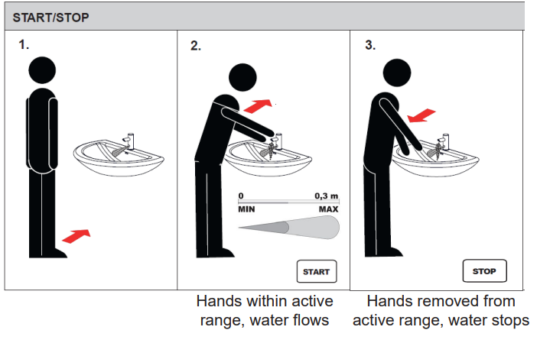
- Active Range: SENSING RANGE
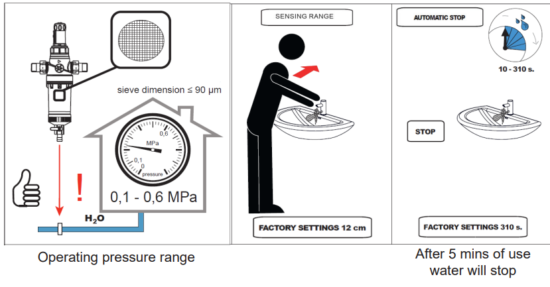
- Recommended Pressure: Operating pressure range
- Rate of Flow: 10L
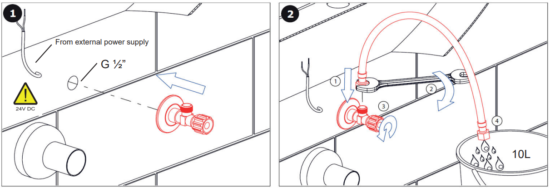
- Water Inlet: G 1/2
Product Usage Instructions
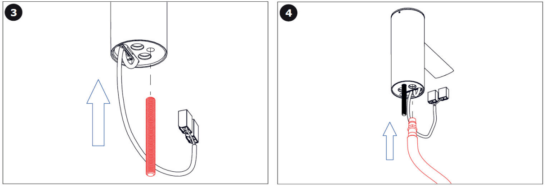
External Power Supply Installation
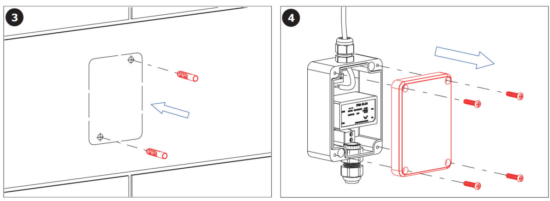
- Ensure mains power supply is off.
- Mark mounting point(s) on the surface.
- Drill and insert appropriate wall anchors if required.
- Remove cover from mounting box.
- Fix mounting box to the wall.
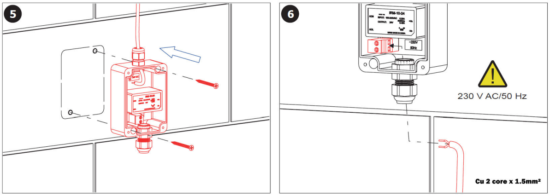
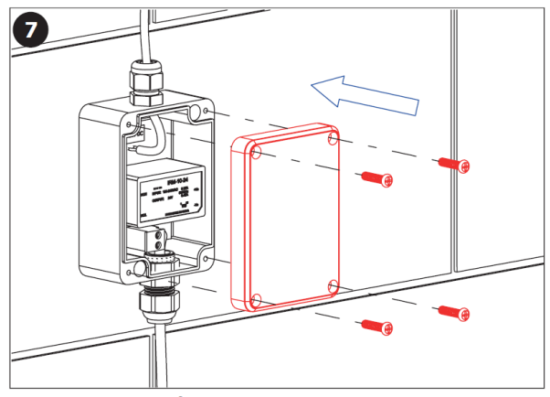
- Pass mains (230V) power supply into mounting box via grommet and terminate accordingly.
- Reinstall cover of mounting box and ensure it is sealed. Tighten grommet around cables.
Faucet Installation
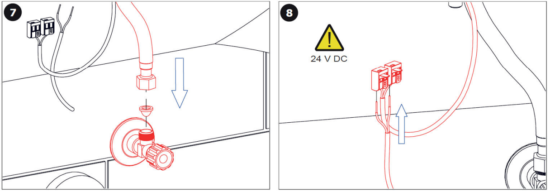
- Install 1/2 angle valve.
- Flush lines thoroughly.
- Fit mounting screw into the base of the faucet.
- Fit connection hose to the base of the faucet.
- Fit stainless mounting plate (top) and gasket (top) between basin and faucet. Pass mounting screw, hose, and electrical connections through vanity.
- Fit gasket (bottom), mounting plate, and hex nut.
- Fit filter into angle valve and connect hoses.
- Connect external power (24V outlet) supply to wago connectors on the faucet (Note polarity: brown to brown, white to white).
- Turn angle valve on and check all connections.
Important: Do not come within the active range during installation. Once power is turned on, the faucet will automatically adjust sensing range during the first 10 seconds. The LED on the sensor will continually flash; do not come within active range during this time.
FAQ
Q: How do I request to modify factory settings?
A: If you require to modify any of the factory settings, please request
the Sanela remote SLD03.
Installation & maintenance instructions.
General Information
- Designed for indoor use only. Do not expose to elements of nature.
- All plumbing and electrical connection must be made in accordance with AUS / NZ standards.
Warnings
- Read all instructions before attempting to install this system. It is recommended a qualified & registered plumber completes the install.
- Ensure pipe work is thoroughly flushed before installing the faucet (internal solenoid). Solenoid components are susceptible to debris and require additional flushing compared to a standard plumbing fixture.
- Consideration should be given to any regulations relating to an air gap, an air break or double check valve to protect against back flow.
Operating Instructions and Parts Manual
Please read carefully before attempting to assemble, install, operate or
maintain the product described. Protect yourself and others by observing all
safety information. Failure to comply with instructions could result in
personal injury and/or property damage. Retain instructions for future
reference.
Sanela Spartan Sensor Tap
Sensor activated tapware for cold and pre-mixed water. High quality
electronics combined with elegant aesthetics.
Specifications
- Finish Stainless Steel construction
- Water Temperature For cold or premixed water (thermostatic mixing valve available)
- Power Supply 24V DC (230V AC into power supply)
- Control Infra-red sensor
- Operating Voltage 24V DC, 3W
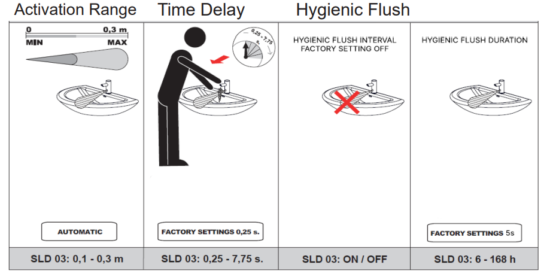
- Active Range Standard 0.13 – 0.19 m, START/STOP program 0.25 – 7.75secs
- Recommended Pressure 0.1 – 0.6 Mpa (1-6 Bar)
- Rate of Flow 3.8 l/min (6 l/min or 1.9L/m available on request)
- Water Inlet Male thread G 1/2”
- Dimensions Height 141mm, Depth 140mm, Tap diameter Ø 50mm, Hole Ø 35mm, Nosing 105mm, Discharge height 98mm
- Warranty 24 Months
Planning
- Ensure an appropriate piping design (sizing etc). This will eliminate issues arising from flow, pressure and water hammering.
- Where appropriate install necessary filters, water hammering arrestors and water pressure reducing valves (recommended pressure 1 to 6 bar). This will minimise future maintenance.
- Install the angle valve to enable ease of future maintenance.
Tempered Water
An appropriate thermostatic mixing valve (TMV3) should be installed to ensure
a safe regulated water temperature. These are available from SPL – SST THERMO
VALVE
Components
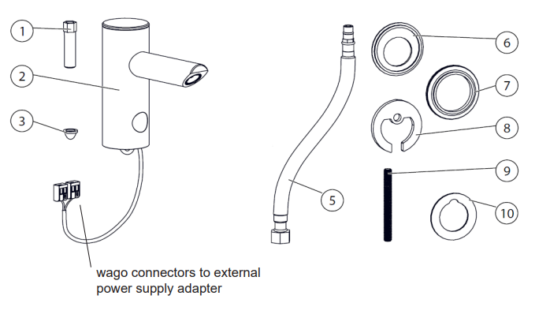
| 1 | Hex nut |
|---|---|
| 2 | Internal solenoid valve |
| 3 | Filter |
| 5 | Connection hose |
| 6 | Gasket (top) |
| 7 | Mounting plate (top) |
| 8 | Mounting plate (bottom) |
| 9 | Mounting screw |
| 10 | Gasket (bottom) |
Standard Functions
External Power Supply Installation
| Input | 230V / 50 Hz |
|---|---|
| Output | 24 V DC |
| IP rating | IP 55 |
| Operating temperature | 5°C – 40°C |
| Rated power | 10W |
 Important
To be installed in accordance with all NZ electrical regulations. It must be
carried out by a qualified professional.
Positioning of the mounting box should be 500mm from the floor and consider:
- Moisture ingress due to plumbing fault
- Ongoing maintenance and accessibility
The mounting box can be surface mounted or within the service or ceiling cavity.
- Ensure mains power supply is off
- Mark mounting point(s) on surface

- Drill and insert appropriate wall anchors if required
- Remove cover from mounting box
- Fix mounting box to wall
- Pass mains (230V) power supply into mounting box via grommet and terminate accordingly
- Reinstall cover of mouting box and ensure sealed. Tighten grommet to ensure snug around cables
Note: Power supply should be secured via current breaker before the external supply (not included)
Faucet Installation
- Install 1/2” angle valve
- Flush lines thoroughly
- Fit mounting screw into base of faucet
- Fit connection hose to base of faucet
- Fit stainless mounting plate (top) and gasket (top) between basin and faucet. Pass mounting screw, hose and electrical connections through vanity
- Fit gasket (bottom), mounting plate and hex nut

- Fit filter into angle valve and connect hoses
- Connect external power (24V outlet) supply to wago connectors on faucet (Note polarity: brown to brown, white to white).
 Turn angle valve on and check all connections
- Do not come within active range
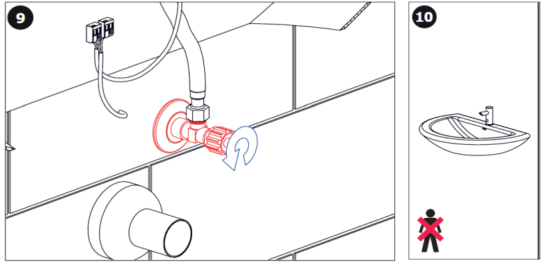 Turn power supply on.
 - It is necessary, for the proper function, to keep the unit under constant voltage (don´t connect the power supply unit behind the switch into the light circuit)
- Once power turned on, faucet will automatically adjust sensing range during first 10 seconds. The LED on sensor will continually flash, do not come in active range during this time
Important
- Pipework is required to be flushed thoroughly prior to faucet and solenoid installation. Foreign debris may reduce level of flow and in some cases damage the solenoid valve.
- The sensor of the faucet must not be obstructed.
- Avoid positioning reflective objects or surfaces in front of the faucet sensor. This can cause false activation i.e. mirrors opposite faucet. With wall mounted faucets pay particular attention to the distance between the bottom of the basin and the faucet (minimum of 300mm) and the location and material of the basin waste (avoid mounting directly over the waste and/or choose non reflective options).
- All plumbing and electrical installation must be carried out by a qualified person and in accordance with applicable codes and regulations.
Note: If you require to modify any of the factory settings please request the Sanela remote SLD03.
Maintenance
- It is recommended that the solenoid valve and all filters be inspected for foreign debris and cleaned annually (more frequently if necessary)
- Clean faucet regularly using soapy water and a soft cloth or wet sponge
- DO NOT clean faucet with any abrasive material or chlorine/acid based cleaning product. This may damage the filter of the infrared sensor and/or the finishing of the faucet.
Troubleshooting
| Symptom | Possible Cause | Corrective Action |
|---|
No water flow – is LED on sensor flashing red when hands are within active range?|
- Water supply
- Water connections
- Filter is clogged
- Faulty solenoid
|
- Ensure water at source
- Ensure connections
- Clean filter (angle valve and solenoid)
- Replace solenoid
No water flow – LED on sensor NOT flashing when hands are within active range.|
- Power supply
- Power connections to faucet (wago connectors)
- IR sensor damaged
- Faulty IR sensor
|
- Ensure power at source
- Check all connections and polarity
- Replace IR sensor filter
- Replace IR sensor
Water doesn’t
stop flowing
|
- Dirty IR sensor
- Obstruction in detection zone
- Water drop on sensor eye
- Ghost sensing due to reflection
- Debris in solenoid
|
- Clean IR sensor
- Remove obstruction
- Wipe sensor
- Remove reflective surface or reposition
- Clean and/or replace solenoid
Reduced flow rate|
- Filter clogged
- Aerator clogged
- Water supply
|
- Clean filter
- Clean aerator
- Check pressure / flow at source
Supreme Comprehensive Warranty
Your Sanela Sensor Tap is fully guaranteed against defective materials and
faulty workmanship commencing from the date of sale (according to SPL’s
records), subject to it being installed and maintained in accordance with the
manufacturer’s instructions.
SPL (2021) Limited warrants that should any part of the sensor tap fail within
the given warranty period (24 months), it will be remedied by SPL. The tap
should be returned to SPL (2021) Limited for all warranty claims. The cost of
cartage will be payable by the customer.
Due to the signifi cant variation in tradesmen’s knowledge, experience, and
productivity, labour charges will NOT be accepted unconditionally. We strongly
recommend contacting our offi ce for advice before proceeding with any warranty
repairs.
This warranty excludes:
- Incorrect installation, or installation that does not specifically follow the installation guidelines supplied
- Defects arising from improper installation, or incorrect electrical supply where applicable
- Failure to follow manufacturer’s maintenance instructions
- Damage/Failure resulting from:
- the use of non-authorised parts
- authorised parts not installed in accordance with the manufacturer’s instructions
- accidental damage, negligent use, misuse, vandalism, neglect
- damage caused either directly or indirectly by external sources (incorrect power supply, natural disaster, or insect infestation)
- Water ingress caused by property maintenance or flooding
- Negligent cleaning practices (water ingress, harmful chemicals etc)
The above includes consequential damage to any other goods, furnishings, or property.
- Normal wear and tear and consumable parts (batteries etc)
- This warranty does not displace any statutory warranty in relation to the dispenser but any liability of SPL (2021) Limited under any statutory warranty will be limited to a replacement or repair of the dispenser or payment of the cost of such replacement or repair at the sole discretion of SPL (2021) Limited
Note
- Warranty only extends to products purchased and installed in New Zealand.
- Contamination or poor water quality is not covered by product warranty.
- Damage to solenoid caused by inadequate fl ushing or excess water pressure is not covered by the product warranty.
SPL Limited
Cambridge 3434
New Zealand
p. +64 7 823 5790
e. office@splwashrooms.co.nz
References
Read User Manual Online (PDF format)
Read User Manual Online (PDF format) >>