MUD 02-24-V1 Station Wagon Side Window Trims Instruction Manual
- July 29, 2024
- MUD
Table of Contents
MUD 02-24-V1 Station Wagon Side Window Trims
Specifications
- Product Name: MUD Station Wagon Side Window Trims
- Model: 02/24/V1
- Material: Aluminium, Plastic, Foam
- Compatibility: Defender 90 & 110 models
Product Usage Instructions
Installation of Window Trims
- Place the large brackets along the top edge of the window trim, hooking them into the internal gutter of the Defender.
- Use witness marks for rivet fixing locations and fit plastic cup washers under the head of the 3mm rivets before installation.
- Rivet the brackets in place and snap the grey caps onto the cup washer base.
- Wrap foam strips over the top brackets to prevent metal-to-metal rattles.
- Attach aluminum tubular spacers to the back of the large holes running across the bottom of the panel.
Spacer Attachment
- Ensure the shallow end of the spacer goes into the hole in the panel from the reverse side.
- Peel out the center of the washer, remove one side of the adhesive backing, slide over the shallow end of the spacer, and stick the washer onto the spacer.
- Peel off the backing from the other side of the washer and stick the spacer into the hole-in trim from the inside. Press firmly.
Fixing Plates and Fasteners
- Threaded lower fixing plates slide into rectangular openings in the bottom of the body capping rail corresponding with spacer locations.
- Use M6 fixings with spring washer and flat washer through rear seat bracket uprights to secure the panel.
Additional Instructions
- If not installing seats in the back, attach the panel using supplied fasteners.
- Rear end of Cant Rail trim tucks behind the front edge of the window trim on 110SW; the front end tucks behind top of the B-pillar trim.
FAQ
- Q: How many spacers are needed for Defender models 90 & 110?
- A: The number of spacers varies due to differences in seat fixing points. Land Rover recommends using foam to prevent vibration on specific areas.
- Q: How to secure the B-Pillar trim in place?
- A: The B-Pillar trim is fixed using 2 x fir-tree fasteners.
- Q: Any tips for installing seats on Defender models?
- A: For models with rear seats, ensure that seat frames align with spacers to avoid damaging trim panels.
Installation Instructions
MUD Station Wagon Side Window Trims
The installation of the MUD panels replicates the OE method of securing the
Station Wagon Trims in place on the Defender.
NOTE: These MUD trims are designed to fit the pre-TDC model Defender
only. Later Defender windows have a different corner radius and the Tdci
models use an alternative design of side window and quarter window trim to
accommodate the 3-point seat belts for the forward-facing tip-up seats.
The various metal fixing brackets are not available to buy from Land Rover as
separate parts so we’ve replicated all the Land Rover fixing brackets to
create the fitting kit for the MUD panels. All of our fixings can also be
utilized on original Land Rover trim panels.
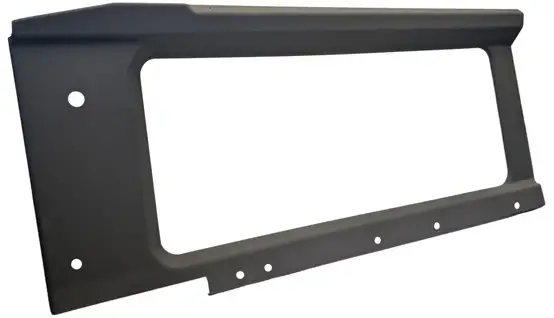
The six large brackets fit along the top edge of the window trim. These brackets (three per side) hook
into the internal gutter of the Defender to locate the trim in place.
Witness marks are provided for the rivet fixing locations.
|
---|---
Fit plastic cup washer under the head of the 3mm rivet before installation.|
Rivet bracket in place and snap the grey cap onto the cup washer base.|
Wrap a piece of the foam strip over the top brackets to prevent metal-to-metal
rattles.|
The aluminum tubular spacers attach to the back of the large holes running
across the bottom of the panel.|
Note that one side of the spacer is shallower than the other.
The shallow end of the spacer goes into the hole in the panel from the reverse side of the panel.
|
---|---
To attach the spacers in place peel out the center of the washer and remove
one side of the adhesive
backing. Slide over the shallow end of the spacer and stick the washer onto the spacer.
|
Peel off the backing from the other side of the washer and stick the spacer
into the hole in the trim from the inside of the trim. Press firmly.
Note that 90 & 110 models use a different number of spacers because of the differences in seat fixing
points.
|
Land Rover attaches a piece of foam to the area next to the seat belt bracket
(90 only) to prevent the inside of the trim from vibrating on the seat belt
bracket.
Use spare foam on the inside of the panel.
|
The threaded lower fixing plates slide into the rectangular openings in the
bottom of the body
capping rail that corresponds with the location of the aluminum tubular spacers in the trim panel.
|
Use the M6 fixings with the spring washer and flat washer through the rear
seat bracket uprights to secure the panel. Yes. They’re awkward and fiddly to
get started! Blame Land Rover. A pen-style magnet can be useful for holding
the threaded plates for this task.|
The rear seat frames butt up against the spacers to prevent you from crushing
the trim panels.|
If you’re not installing seats in the back of your Defender then simply attach
the panel in place using the supplied fasteners.|
---|---
The front lower corner of 90 & 110 panels is secured with fir-tree fasteners.
Note that if you’re converting a 90 Hardtop (van), the Hardtop models are not
fitted with the corresponding corner bracket that the fir tree fits into. The
Land Rover part number for the bracket fitted to factory Station Wagon models
is MXC3276 or create your own from a bent piece of steel.|
The Cant Rail has witness marks on the reverse of the RH panel that will need
cutting out to provide the mounting hole for the alarm sensor (when fitted).|
The rear end of the Cant Rail trim tucks behind the front edge of the window
trim on 110SW. The front end of the Cant Rail trim tucks behind the top of the
B-pillar trim. Can Rail is fixed in place with the grab-handle screws.|
B-Pillar trim is fixed in place with 2 x fir-tree fasteners.|
On 110 models slide the seat belt through the gap in one side of the seat belt
escutcheon trim and clip it into place.
Note the location of prongs on the escutcheon. Escutcheon will only fit one way into the trim. Align prongs with notches in trim.
|
MUD Station Wagon Window Trim 02/24/V1 mudstuff.com.
Read User Manual Online (PDF format)
Read User Manual Online (PDF format) >>