Somlos G1S Robotic Lawn Mower User Manual
- June 5, 2024
- Somlos
Table of Contents
- Preface
- Safety Instructions
- Transport
- Know Mower
- Guide Line Map
- Placement of the dock station
- Connection Of BoundaryWire And Dock Station
- Installation of Boundary Wire
- Quick start:
- Charging mower
- Instruction Of Mower
- Start
- Mower Maintenance
- Change Cutting Blades
- Winter Storage
- Technical Data
- References
- Read User Manual Online (PDF format)
- Download This Manual (PDF format)
![]() Somlos G1S
Robotic Lawn Mower
Somlos G1S
Robotic Lawn Mower
Preface
- Congratulations on your choice of an exceptionally high-quality product. To get the best performance, your SØMLØS G1s require knowledge of its function. Operator’s Manual contains important information about your robot mower, how you install it and how you use it.
- Read the Operator’s Manual carefully and understand the contents before using your SØMLØS G1s.
Safety Instructions
- Please read the Operator’s Manual carefully and make sure you understand the instructions before using your robot mower, otherwise it may be damaged if incorrectly used.
- Itis not permitted to modify the original design of mower. All modifications are made at your own risk.
- Check that there are no stones, branches, tools, toys or other objects on the lawn that can damage the blades and cause the mower to stop.
- Never use a high-pressure washer or running water to clean the mower.
- Do not ride or sit on the mower, little children and pets should be kept away from the mower when in operation.
- Never lift the mower up or carry it around when the power is on.
- Do not let anyone who does not know how the robot mower works to use it.
- Do not put anything on top of the mower or its dock station.
- Do not allow the mower to be used with a defective blade or body. Neither should it be used with defective blades, screws, nuts or cables.
- Never put your hands and feet under the mower.
- The mower does not guarantee full compatibility between moOwer and other types off wireless systems such as remote controls, radio transmitters, buried electric animal fencing or similar,
- Start the mower according to the instructions
- It is recommended that the height of cutting be less than 5.5cm.
- It is forbidden to cut at the lawn with a slope more than 25 degrees.
- Turn the power switch off before cleaning the machine.
- Carefully read all warnings on the machine, battery, dock station and user manual.
- Check the blades before use to ensure they are secure.
- During thunder/lightning storms, turn off your robot mower and the power supply connected to the docking station.
- Do not let children and pets be around the mower. Accidently turning it on or being in the VICinity of the mower whilst operating can cause serious injury.
Transport
- Power off the mower, if you intend to carry it.
- Carry by the handle at the rear under the mower. Carry the mower with the blade plate away from the body.
- Do not lift up the mower by the outer case

Know Mower


- Emergency button
- The control panel cover
- Cutting height adjustment cover
- Rain sensor
- Charging socket
- Front-wheel
- Blade plate
- Blade
- Rear-wheel
- Battery cover
- Handle
- Cutting adjustment knob
- LCD display
- Wi-Fi indicator light
- Keyboard
- Charging electrodes
- Signal indicator light
- Power connector
- Boundary connector
- . Dock station base
- Operator’s manual
- Power adapter
- Pegs for boundary wire
- Ground screws for the dock station
- Installation ruler
- Spare blades
- Boundary wire
- Allen wrench
Guide Line Map
As below is a general guideline map on how to install the mower including
placement of the dock station and installation of the boundary wire.
At the corners, don’t lay the boundary wire at a sharp or right angle, make
sure it has 35 cm space to the wall or other obstacles; an arc with a radius
of at least 50 cm is preferable.
Placement of the dock station
- Places the dock station in a flattering position.
- Make sure the dock station entrance is pointing in a counter-clockwise direction.
- Make sure there is a minimum of 2 meters of straight wire in the front and 30cm straight wire in the back of the dock station.
CAUTION:
Don’t secure the dock station to the ground with ground screws before the
boundary wire and adaptor cable connected with dock station.
Connection Of BoundaryWire And Dock Station


-
Follow up Fig.1 to Fig. 4 to connect the boundary
-
Connect the adapter power cord to a 100-240 V wall socket.
-
LED indicator status of charging staon:
Solid red light: Power supply normal;
blue light: Mower gets charging;
Solid blue light: Loop signal normal or fully charged. -
Secure the dock staon to the ground using the supplied ground screws by Allen wrench
Installation of Boundary Wire
- Big trees, poles, flower beds and can be an obstacle for the mower and prevent you from burying the boundary wire.
- If flowers should not be mowed, use the boundary wire to protect them.
- A big tree with roots that can be an obstacle for the mower should be protected by burying the boundary wire.
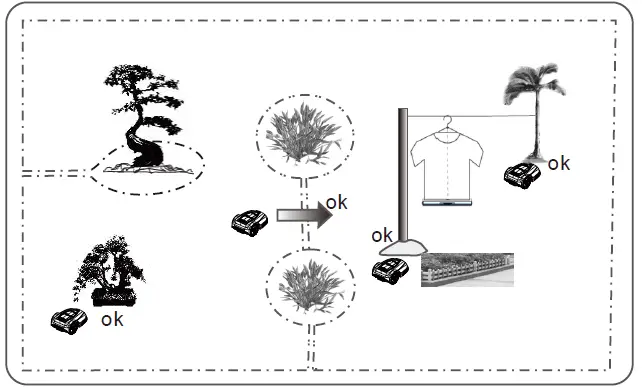
- Make sure to lay the boundary wire tight to the ground. If the boundary wire is loose or looped on the ground, the mower will cut the wire and the signal may be not strong enough for the mower to receive. The lawn mower can detect the signal from the boundary wire within a 20m radius.
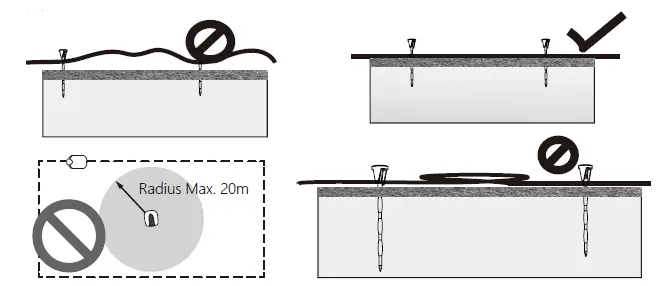
- Use a hammer to knock the pegs in the ground. Take care when hammering pegs and make sure the wire is flat on the lawn; the distance between pegs should be approximately 100cm. The distance between pegs should be 30- 50cm at corners.
- Don’t let the boundary wire loop around itself.

- If you intend to bury the boundary wire, make sure to place the boundary wire between 1 mm and 15 mm into the ground; the boundary wire should not be looped under the ground.

Quick start:
- Place the mower in the area inside the boundary wire.
- Press the STOP button to open the lid, hold the power button for three seconds to activate the LCD display, set the date and time, set the password, then it enters into the menu. Initial default password is ‘AAAA
- Click the start button, press OK button and close the lid, the robot lawn mower will work automatically.
Charging mower
The mower will go back to dockk station for charging when it is out of power
Instruction Of Mower
Control Panel
Menu Function
| Sub-menu 1 | Sub-menu 2 | Sub-menu 3 |
|---|---|---|
| Spot mode | – | – |
Se�ng
| ****
Language
| English
Germany
France
…
Date&�me| –
Rain mode| –
Work �me| –
WiFi se�ng| –
Change PIN| –
Factory reset| –
Informa�on
| About
Error log
Work log
Schedule| –| –
Zone| –| –
Status
| Status | Meaning |
|---|---|
| Standby | Mower is ready to work. |
| Mowing | Mower is mowing automa�cally. |
| Spot Mow | Mower is mowing spirally. |
| Returning | Mower is going back to sta�on. |
| Charging | Mower is charging. |
| Charge to work | Mower is charging and con�nues to work when ba�ery is |
recharged.
Emergency stop| Mower is stopped manually.
Error| Mower cannot work with errors.
Firmware update| Firmware is upda�ng.
Power On
- Press the STOP button to open the control panel lid.
- Press the button for 3s to power on.
- Enter the 4-letter PIN code. The original PIN code is ‘AAAA’.
- The mower waits for further operation in standby mode.
Power Off
- Press the STOP button to open the control panel lid.
- Press the button for 3s to power off.
Cutting Height Adjustment
- Open the knob lid.
- The cutting height can be adjusted from 2.5cm to 5.5cm by rotating the knob.
Tips: If the grass is high, it’s appropriate to let the mower start mowing at 5.5cm cutting height. Once the grass is shorter, you can gradually lower the cutting height.
Start
- Press START button under standby or charging mode.
- Close the hatch to start.
- If the battery is lower than 70% in charging mode, the mower enters ‘charge to work’ mode and should get charged to 90% before mowing.
- If the battery is lower than 30%, the mower goes back to the station automatically for charging under ‘charge to work’ mode.
Work time setting
- Press OK button to enter sub-menu 1.
- Select ‘setting’ to enter sub-menu 2.
- Select ‘work time’.
- Set work time by UP and DOWN buttons.(Default value is 8hrs).
- Press OK button to confirm setting.
Stop
- Press the STOP button.
- The mower stops immediately and the control panel hatch opens.
- The screen shows ’emergency stop’
- Press OK or RETURN button.
- Enter the correct PlIN code.
- For the case that mower was working before pressing the STOP button, the screen shows ‘continue to work?’. Users can press the OK button to continue the previous task, or press the RETURN button to cancel it.
Back to station
- Press HOME button for 3s.
- Close the hatch to go back to the station for charging.
Charging
- Place the mower in the station (or press HOME buon for 3s).
- Mower will get charged to 100% before standby.
- Mower will get charged again if battery is lower than 75%. (The electrodes of mower and charging staon must be connected).
Schedule
- Press OK button to enter sub-menu 1.
- Select ‘schedule’.
- Press OK button to select the desired day.
- Press UP, DOWN, LEFT and RIGHT buttons to set the start and end time.
- Press OK button to confirm the daily setting.
- Repeat step 3 to 5 to complete the weekly plan.
- Press OK button to confirm the weekly setting.
Zone
- Press OK button to enter sub-menu 1.
- Select ‘zone’.
- Press OK button to select the desired zone.
- Press UP, DOWN, LEFT, and RIGHT buttons to set the distance and percentage.
- Press OK button to confirm the setting of the single zone.
- Repeat steps 3 to 5.
- Press OK button to confirm the setting of all the zones.
Notice:
- The distance refers to how far the mower will go along the boundary wire before entering into the yard. The percentage refers to how often the mower will start mowing from each zone.
- The value of distance should be 0-500m, while the percentage should be 0-100%. The sum of percentage of each zone should be 100%. Or the setting cannot be completed.
Spot Mow
- Place the machine inside the yard.
- Press OK button to enter sub-menu 1.
- Select ‘spot mode’.
- Close the lid to start.
Rain Mode
- Press OK button to enter sub-menu 1
- Select ‘setting’ to enter sub-menu 2.
- Select ‘rain mode’.
- Press UP and DOWN buttons to disable or enable the rain mode.
- Press OK button to confirm setting.
Language
- Press OK button to enter sub-menu 1.
- Select ‘setting’ to enter sub-menu 2.
- Select ‘Language.
- Press UP and DOWN buttons to select the desired language. (Will update the language very soon)
- Press OK button to confirm setting.
Date and Time
- Press OK button to enter sub-menu 1.
- Select ‘setting’ to enter sub-menu 2.
- Select ‘date&time’.
- Press UP, DOWN, LEFT and RIGHT buttons to set the date and time.
- Press OK button to confirm setting.
PIN Codee
- PIN COde should be entered after powering on, pressing STOP button, and before clearing error status and changing PIN COde.
- If the PIN COde is incorrect, the screen will showPIN wrong, please retry
- If the PIN code is entered incorrectly for
- times, the screen will be locked for 15s. The lock time will double for a further incorrect PIN.
Change PIN code
- Press OK button to enter sub-menu 1.
- select setting to enter sub-menu 2.
- Select ‘change PIN’.
- Enter the original PlIN code.
- Enter the new PIN code.
- Enter the new PIN code again. (‘New passwords do not match will be shown for inconsistent passwords.)
- Press OK button to contirm.
Factory Reset
- Press OK button to enter sub-menu 1.
- Select ‘setting’ to enter the sub-menu 2.
- Select ‘factory reset.
- The screen shows”Reset to factory moder
- Press OK button to confirm.
Error Log
- Press OK button to enter sub-menu 1
- Select ‘setting’ to enter sub-menu 2.
- Select ‘information’ to enter sub-menu 3.
- Select ‘error log.
- The past 10 records (including date, time and error message) will be shown.
Work Log
- Press OK button to enter sub-menu 1.
- Select ‘setting’ to enter sub-menu2.
- Select ‘information’ to enter sub-menu 3
- Select ‘work log’.
- The past 10 records (including date, time, work mode and work time) will be shown.
About
- Press OK button to enter sub-menu 1.
- Select ‘setting’ to enter sub-menu 2.
- Select information’ to enter sub-menu 3.
- Select ‘about.
- The software version information will be shown.
Save Power
The backlight will switch off after 2min and the mower will power off after
8min, respectively, without user interference.
LED indicator
The backlight will switch off after 2min and the mower will power off after
8min, respectively, without user interference.
| LED | Solid red light | Breathing blue light | Solid blue light |
|---|---|---|---|
| Status | Power supply normal. | Mower gets charging. | Loop signal normal. Or |
fully charged.
ERROR
| Error message | Cause | Solu�on |
|---|---|---|
| Mower outside | Mower is outside the yard. | Place the mower inside the yard. |
| Mower li�ed | Mower is li�ed away from the |
ground.
| Place the mower on the ground.
Mower �lted| Mower is �lted too much.| Place the mower in flat yard.
Mower overturned| Mower is upside down.| Place the
ground.
| mower| normally| on| the
Mower trapped| Mower is trapped by obstacles.| Remove the obstacles out of the
yard.
Loop signal lost| Power supply or the wire is not connected to the sta�on.
Wire is
broken.
| Check the power supply, sta�on, wire are connected normally.
Motor fault| Blade motor or drive motor is
stuck. The motor current is too high.
| Clear the grass or soil in cu�ng means
and driving wheels. Cut the high and thick grass by tradi�onal lawn mower.
High temp| The ba�ery temperature is too
high.
| Wait un�l the temperature decreases.
Ba�ery abnormal| The ba�ery is damaged.| Call for help from service center.
Mower Maintenance
- Check and clean mower regularly once a week.
- When you first start using the mower, the blade plate, protection plate and blades should be checked once a month.
- It is important that the blade rotates easily. Additionally, if the blades is fixed, the blade plate must rotate easily.
- Blade edges should not be damaged. Blade life depends on the type of grass, soil, lawn, etc.
- Working with dull blades gives a poor mowing results, which needs more power, therefore the mower can only cover a smaller area.
- Charge the battery fully at the end of the season before winter storage. If storage time is longer than one year, please recharge the mower again.
Cleaning
- Never use a high-pressure washer or running water to clean mower.
- It is important to keep the mower clean. Mowing with a large number of clippings and high slopes, mower needs more power to drive the blade plate.
- We recommend using a brush to clean mower underneath, and, a damp sponge or cloth to clean the top body and outer case.

Change Cutting Blades
To replace the blades:
- Power off the mower.
- Wear protective gloves.
- Turn mower upside down.
- Rotate the skid plate so that its hole aligns with the blade screw.
- Unscrew the blade. Use a flat head or head screwdriver
- Pry the protection plate and blade plate a little apart and remove the blade and screw.
- Tightly screw on new blade.
- Change the blade to another side if current side is broken, worn, damaged or dulled.

Winter Storage
- Mower must be carefully cleaned before winter storage. Charge the battery fully before winter storage
- Store the mower in the station and place in dry area to protect from frost, preferably stored in the original packaging
- Boundary wire can be left in the ground. As the charging station is removed, you should protect boundary wire end from moisture with electrical tape.
After Winter Storage
- Check whether the mower, boundary wire, and charging electrode need to be cleaned before use. If the charging or contact strips appear to be rusty, clean them by using emery cloth. Check whether the mower’s time and date are correct.
- Check whether the blades need to be changed.
- Check whether the blades and blades plate turns easily. If not, please contact the service center for help.
After Winter Storage
- Check whether the mower, boundary wire and charging electrode need to be cleaned before use, . If the charging or contact strips appear to be rusty, clean them by using an emery cloth. Check whether the mower’s time and date are correct.
- Check whether the blades need to be changed.
- Check whether the blades and blades plate turn easily. If not, please contact the service center for help.
Technical Data


Support: support@somlos.com Visit us here: www.somlos.com
References
Read User Manual Online (PDF format)
Read User Manual Online (PDF format) >>