RIMAGE MDD-2450 CD Burning System User Guide
- June 5, 2024
- RIMAGE
Table of Contents
- Introduction
- Identifying the Parts of the Professional 2450
- Status Light and Control Panel
- Getting Started
- Bin Settings, Loading, and Label Creation
- Disc Production
- Display Name and Beeper Settings
- Setting Your Printing Preferences
- Printable Area and Print Alignment
- Maintaining the 2450
- Tacky Roller Cleaning
- Sensor Cleaning
- Filter Maintenance
- Contact Information
- Cautions and Warnings
- Country-specific Cautions and Warnings
- Compliance Information
- CONTACT US
- References
- Read User Manual Online (PDF format)
- Download This Manual (PDF format)
RIMAGE MDD-2450 CD Burning System User Guide

Introduction
This manual provides the information needed to configure, operate, and
maintain the Rimage Professional 2450 system. The terms “system” and
“autoloader” may be used throughout this manual to refer to the 2450.
The term “printer” is used to refer to the integrated Everest 400 printer.
For technical information, refer to the Rimage Professional 2450 Specification
document found at rimage.com/support.
Important: Your Rimage Professional 2450 system may not look exactly like the model featured in this user guide.
About This User Guide
- While we try to maintain all versions of our manuals and other documentation, please note that the English version found on our web site always contains the most up-to-date information.
- Unless otherwise indicated, all Windows navigation instructions feature Windows 10 paths. Other Windows versions may differ.
These notes and symbols are used throughout the manual to help clarify information:
Tip: A Tip suggests alternative methods that may not be obvious and helps you understand the benefits and capabilities of the product.
Important: An Important note provides information essential to the completion of a task, or other important supplemental information.
Caution: A Caution indicates that failure to observe this guideline could result in loss or damage to the equipment, product, software, or data.
Warning! A Warning indicates that failure to follow this guideline could result in bodily injury to personnel operating or maintaining the equipment.
About the Professional 2450
The 2450 is a part of the Rimage Professional series of products. The 2450 system consists of the 2450 autoloader and an integrated Everest 400 printer. Information about the integrated Everest 400 printer is included in this user guide.
An external PC must be used with the 2450 system. Refer to the Minimum PC Specifications document found at rimage.com/support for information regarding the minimum and optimal hardware and operating system requirements for the 2450.
Accessory Kit
The accessory kit that shipped with your 2450 contains the following:
- Rimage Professional 2450 Setup and Installation Guide
- Rimage Professional 2450 User Guide (this document) on disc
- Disc holder with Rimage Software Suite
- Rimage Product Warranty/Guarantee
- NEMA 5-15P power cable (North America)
- CEE 7/16 power cable (Europe)
- USB cable
- 4 Air Filters
Unpacking and Setup Instructions
To unpack your Professional 2450, refer to the unpacking label on the
autoloader box. For setup instructions, refer to the Setup and Installation
Guide that shipped with your product.
Identifying the Parts of the Professional 2450
This section describes the hardware and features of the 2450 system.

Status Light and Control Panel
Status Light
The Professional 2450 is equipped with a built-in status light that indicates
various conditions. The table below illustrates status light states and
explains the conditions indicated by each state.
| Light State | System Condition |
|---|
 | Green light on| The system is
operating properly. No jobs are currently processing.
| Green light on| The system is
operating properly. No jobs are currently processing.
 | Green light blinking| The
system is operating properly. Jobs are currently processing.
| Green light blinking| The
system is operating properly. Jobs are currently processing.
 | Yellow light on| The autoloader
is waiting for the software to start. If the control center is not started,
power on the control center. Check the cable connections on the autoloader and
control center.
| Yellow light on| The autoloader
is waiting for the software to start. If the control center is not started,
power on the control center. Check the cable connections on the autoloader and
control center.
 | Yellow light blinking| The
front door is open. Close the front door to allow jobs to process.
| Yellow light blinking| The
front door is open. Close the front door to allow jobs to process.
 | Red light on| A red light could
indicate several issues. The most common are as follows:
| Red light on| A red light could
indicate several issues. The most common are as follows:
- The carousel is out of blank discs.
- A system error requires operator intervention.
- An error with the printer or recorders occurred at initial startup.
To help determine these and other red light system conditions, check the client workstation or control center for a message.
Control Panel
The control panel is located on the front of the 2450. It includes the
operator panel, the rotate carousel button (button 1), and the printer tray
button (button 2). The table below identifies the name and function of all
parts of the control panel.

Important: You must open the front door of the autoloader to access the
control panel.
| Name | Function |
|---|---|
| Operator panel | The operator panel has a two-line display that informs you of |
operations or conditions that require operator intervention. This includes the consumable status.
Refer to the Display Name and Beeper Settings section on page 10 to see other options for configuration.
Rotate carousel button (button 1)
| Press the rotate carousel button to:
- Rotate the carousel and position a bin to load and unload discs. Each time you press the rotate carousel button, the carousel rotates to the next bin.
- Enter diagnostic test mode. Refer to the Diagnostic Test Instructions on the documentation disc that shipped with your system.
Printer tray button (button 2)
| Press the printer tray button to:
- Open and close the printer tray
- Reset after an error
Printer indicator light (on the printer tray button)| The printer indicator
light illuminates when the printer is powered on and has completed
initialization. The printer indicator light also flashes when the Everest 400
printer is receiving data from the host.
Rotate carousel indicator light (on the rotate carousel button)| The rotate
carousel indicator light illuminates when you rotate the carousel. The rotate
carousel indicator light also flashes when the autoloader is receiving data
from the host.
Getting Started
This section provides instructions for basic system use after setup and installation. If setup and installation has not been completed, please first refer to the Setup and Installation Guide at rimage.com/support. Additionally, while the following pages walk users through the essentials of disc production, most people will also benefit from consulting the Help files in Rimage Software Suite to learn about additional functionality to suit their unique requirements and workflow.
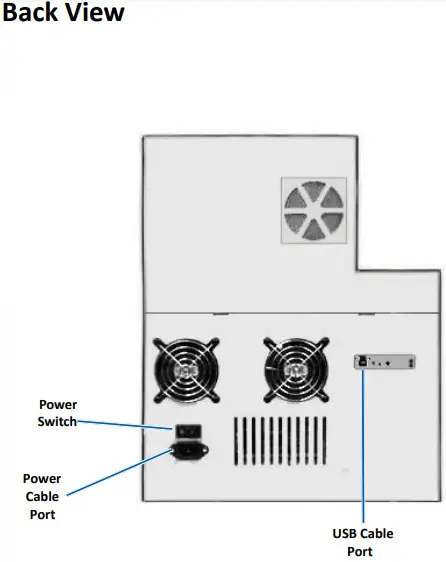
Powering On the System
- Press the power switch on the rear of the autoloader to turn on the system, including the integrated printer.

Production Server Configuration Cycle
The Professional 2450 must run through a full configuration cycle before it is
ready for production. For this to occur, the 2450 autoloader must be powered
on and connected to a PC with Rimage Software Suite installed.
With this in place, the Production Server should automatically begin the
configuration process. If this does not occur, you will need open Rimage
System Manager, right click on the appropriate system on the left under Rimage
Systems, choose Stop, and then click Yes to confirm. From there, wait for five
seconds and then right click again on the system and choose Resume.
You must allow the entire configuration cycle to run uninterrupted, which takes about four minutes. In this timespan, the 2450 will do the following:
- The firmware version displays on the control panel and the status light changes from green to red to yellow and then remains solid yellow for the remainder of the configuration. If you have Rimage System Manager open, you will also see the system information update as the configuration cycle proceeds.
- The Everest 400 begins its initialization process.
- The lift arm moves to a neutral position and the bin carousel rotates to bin 1.
- The lift arm descends, one of the recorder trays ejects, and the lift arm presses against the tray three times. If a disc is present, the lift arm will pick the disc up and then release it. This same process then occurs for the remaining recorder.
- The printer tray ejects and the lift arm lowers and presses against the tray once. If a disc is present, the lift arm will pick the disc up and then release it.
- The lift arm then drops down to bins 1, 2, and 3, with the carousel rotating to each bin in numerical order. If a disc is present, the lift arm will pick the disc up and then release it. The number of discs in each bin will also be updated on the control panel display.
- Finally, the lift arm moves to a neutral position again and the status light changes to solid green, indicating that the 2450 is now ready for production.
Bin Settings, Loading, and Label Creation
Changing the Bin Configuration
Through the Rimage Software Suite, you may specify a media type for each media bin and designate bins as Input, Output, Reject, Reserved, Collate, or Unused.
- Double-click on the Rimage System Manager shortcut on your desktop.
- Click on the Configure Bins… button within the Media section of Rimage System Manager.
- If only using one Media Type (CD/DVD/Blu-ray), choose that Media Type and configure the bin designations as desired.
- If using multiple media types, choose Combination as the Media Type and configure the bin designations as needed.
- Click on OK.
Tip: Changing the bins may change the picking configuration. For example, if bin 2 is configured for input DVDs, a DVD job will pull directly from bin 2 instead of the system default of bin 1. The competed DVD will then be deposited into the chosen output bin, or, if not successfully completed, to the bin selected for rejects.
Loading Discs
You can load up to 50 discs in each input bin. Use the procedure below to load discs in each bin.
-
Open the front door.
-
Press the rotate carousel button as needed to rotate the carousel to the desired bin.
Add required type and number of discs, placing them so the recording surface is face down. -
Repeat steps 2 – 3 until the required bins are filled.
-
Close the front door.
Refreshing Bin Levels
Selecting Refresh Bins resynchronizes the quantities of media in each bin so that it shows correctly on the control panel display and in Rimage System Manager. This should be done after adding media to one or more bins after startup. Because the system cannot register the updated quantities until the lift arm determines the new amount, the display will show “?? ?? ??” as the bin qualities until the levels have been refreshed.
- To refresh bin levels, double-click on the Rimage System Manager shortcut on your desktop.
- Click the Refresh Bins… button within the Media section of Rimage System Manager.
- Click OK.
Important: If, after following the Refreshing Bin Level instructions, the lift arm has not recounted the media, you will need to manually rotate the disc carousel at least one quarter turn in either direction and repeat steps 2 and 3 above.
New Label Creation
- Double-click the CD Designer shortcut on your desktop.
- Click on Start a new CD Designer document…
- Choose Blank Template and click on Next.
- Retain the Default printer setting and click Next.
- Choose Full Surface or Standard, depending on your needs and disc type, and click Next.
- Select from the following Background Features:
- Color: This allows you to use a fill color as your background
- Picture: This allows you to use an image as your background
- Template Image: This allows you to use a set image of a completed design and manipulate images and text in the foreground to conform to that set image.
Disc Production
Burning Discs
-
Double click the QuickDisc shortcut on your desktop.
-
Choose the desired media type (CD, DVD, Blu-Ray, etc.) from the QuickStart menu
Tip: The media type required for your disc project must match the media placed in your supply bin. To change the media type and bin settings to match the media placed in each input bin, refer back to page 8. -
Select the appropriate data option.
- For data discs, choose Create a Data CD/DVD/Blu-ray CD/DVD/Disc that contains files and folders in accordance with the loaded media.
- For multimedia discs, choose Create an Audio CD/Video DVD/Video Blu-ray Disc in accordance with the loaded disc(s).
- To copy an existing disc, choose Copy a CD/DVD/Blu-ray Disc in accordance with the loaded disc(s).
- For other options, please refer to the QuickDisc Help menu.
-
When the Add Content dialog box opens, click on the Add button to find and select the data or media you wish to burn to your disc(s).
-
Highlight the folder or files you want to add to your disc(s) and select Add. As you add files and folders, the Disc Size and Free Space numbers are updated.
-
When you are finished adding the required files and folders, select Done.
-
Click on the Next icon
-
In the subsequent window, click Choose and select the appropriate label template, if required, or drag and drop the file into the Label Preview window. Then click Next.
-
Next, enter the number of copies, title the disc if desired, and then click on the Record icon.
Tip: After submitting the job for production, a dialog box will pop up asking if your want to save the project. Doing so will allow you to resubmit the same job with the same perimeters in the future without going through all of the previous steps.
Pausing the Autoloader to Add Media
You can pause the system to add discs to the carousel.
- Open the front door. Production will pause and you will be able to add additional discs.
- Close the front door and production will resume.
Unloading the Discs
- Open the front door.
- Press the rotate carousel button to rotate the desired bin into an accessible position.
- Remove the discs from the bin.
- Repeat steps 2 – 3 until the competed discs are removed.
- Close the front door.
Powering Off the System
- Close all open applications.
- Press the main power switch on the back of the system to power off the system, including the integrated printer.
Important: If the printer is idle for more than 30 minutes, it enters sleep mode. When this occurs, the printer will take up to 4 minutes to warm up after a job is sent.
Display Name and Beeper Settings
The Rimage software includes an application called Gemini Utilities, which is used to change the display name of the system and toenable the beeper. Gemini Utilities is part of Rimage Software Suite and must be run from the computer connected directly to the system.
Tip: Unless otherwise indicated, all Windows navigation statements are Windows 10 paths. Other Windows versions may differ.
Changing the Autoloader Display Name
Use Gemini Utilities to enter the name displayed on the operator panel.
Important: Changing the display name does not change the name of the system on a network or workgroup. To change the name on a network or workgroup, refer to your setup and installation instructions or the Rimage Advance Setup (Networking) Guide.
- From the Windows Start menu select All Programs > Rimage > Utilities > Gemini Utilities.
- Select the Override Name checkbox.
- Clear the Use Computer Name checkbox.
- In the Display Name field, enter the new name.
- Select Set Params to set the name.
- Restart the computer for changes to take effect.
Enabling the Beeper
You can change the number of beeps that occur when the unit is out of media or when there is an error.
- From the Windows Start menu select All Programs > Rimage > Utilities > Gemini Utilities.
- In the # of Beeps on Fault field, select the number of beeps you wish to hear when there’s an error.
- Select Set Params to set the number of beeps
- Restart the computer for changes to take effect.
Tip: To disable the beeper, set the number to zero
Setting Your Printing Preferences
This section provides the information needed to set up your Printing Preferences, which allows you to customize the settings of the integrated Everest 400 to use its more advanced features.
Important: Unless otherwise indicated, all Windows navigation statements are Windows 10 paths. Other Windows versions may differ.
Accessing Printing Preferences
Access Printing Preferences through the Start Menu
When you use this method, the Printing Preferences are saved are applied by default to all newly created labels.
- Select Start > Settings> Devices > Printers & Scanners.
- Select Rimage Everest 400 on HID-0 if it is not the default already and then click the Manage button.
- Select Printing Preferences.
Access Printer Preferences through CD Designer Software
When you use this method, the Printing Preferences are saved with the label file and are used instead of the printer driver settings.
- Open the desired label file in CD Designer.
- From the File menu, select Print.
- From the Name dropdown list, select the Rimage Everest 400 printer on HID-0 if it is not the default already.
- Select the Document Properties button.
Tip: Refer to the Troubleshooting Color Matching document to address any color printing issues at rimage.com/support.
Changing the Ribbon Type Settings
The Ribbon settings should be modified if you change between CMY and Monochrome ribbons. To change the settings:
- Access Printing Preferences.
- Select the Main tab
- Choose the installed ribbon type from the Ribbon drop down menu.
- Click on the Apply button to retain your changes.
- Click on the OK button to exit the window.
Important: In the Main tab of Printing Preferences, do not change the settings for Media Type, Media Size, Copies, or Orientation unless instructed to do so by a Rimage Technical Support Representative.
Changing Print Quality Settings
The Print Quality settings may need to be changed from Photo to Graphics to prevent color inconsistency if a disc label contains one color or more than 30% of one uninterrupted color. For all other labels, the Photo setting is will likely produce the best results.
- Access Printing Preferences.
- Select the Advanced tab.
- Click on the radio button for Photo or Graphics.
- Click on the Apply button to retain your changes.
- Click on the OK button to exit the window.
Printable Area and Print Alignment
Setting the Printable Area
This functionality allows you to adjust the printable area settings for standard CD/DVD/Blue-ray media, which sets the outer and inner diameters to print the disc label without overlapping the disc edges.
Tip: Printable area settings created within a CD Designer label file will override the printer and fax settings on Windows.
- Access Printing Preferences. (Refer to page 11 for instructions.)
- Select the Advanced tab.
- Select the Modify button in the Printable Area section
- To modify only Standard Area settings, select the Standard radio button.
- To print on a disc with a stacking ring, select the Advanced radio button to access the Hub Area measurements.
- Select the desired Unit radio button to choose between 1mm and .0.1mm units of measurement
- Select OK, which will close the Printable Area Settings window.
- Click Apply to save the selected settings.
- Select OK to close the Printing Preferences window.
Adjusting Print Alignment
- Select Start > Settings> Devices > Printers & Scanners.
- Select Rimage Everest 400 if it is not the default already and then click the Manage button.
- Select Printing Preferences.
- Select the Utility tab.
- Select the Status Monitor button. The Rimage Everest 400 Status Monitor window will open with the Status tab active.
- Select the Printer Information tab to view or change the Print Alignment Settings and Color Density Settings, or view the Everest 400 Printer Status.
Tip: On the Status tab, you can view the progress of a print job, the type of print ribbon installed, the estimated amount of remaining ribbon, and the estimated number of label prints remaining.
Tip: Refer to the Troubleshooting Color Matching document regarding how and when to modify the Color Density settings.
Maintaining the 2450
This section provides maintenance information for the 2450 system, including the integrated Everest 400 printer.
Important: For optimum performance, keep the 2450 in a clean, dustfree environment.
Importance of Maintenance
Regular preventative maintenance of your system can help to ensure error free recordings and clean printed labels. Maintenance involves cleaning the system.
Cautionary Information
Caution: To avoid damaging the 2450 during maintenance:
- Never use oils, silicone, or other lubricants on any part of the system.
- Use only non-abrasive cleaners to wipe down the surfaces of your system.
- Avoid pouring cleaners directly onto the autoloader. Instead, apply the cleaner on a clean, lint-free cloth.
Preventative Maintenance Schedule
The following is a table of maintenance tasks, the tool required to complete them, and their required frequency.
| Task | Tools | Frequency |
|---|
Autoloader Maintenance
Wipe down the lift arm shaft. Pay close| Lint-free| Weekly
attention to:| cloth|
- The base of the shaft
| |
- The area just above the lift arm
| |
Wipe down all surfaces of the| Lint-free| Weekly
autoloader including:| cloth|
- Sides and top
- Door
- Output bin
- Carousel
| Non- abrasive, all-purpose|
· Base (remove the carousel first)| cleaner|
· Top surface on the lift arm| |
Inspect air filter on the side of the system and replace if necessary.| N/A|
Monthly
Inspect the openings at the back of the autoloader. Remove dust and debris if
necessary.
Remove the carousel and remove dust and debris from the openings.
| Vacuum| Monthly
Integrated Everest 400 Printer Maintenance
Clean the tacky rollers. Refer to the Cleaning the Tacky Rollers and Sensors
section on page 14.|
- Sponge swabs (included in the Everest cleaning kit)
| After 2000 discs or at every ribbon change
|
- 99% Isopropyl alcohol
|
Clean the sensors. Refer to the Cleaning the Tacky Rollers and Sensors
section on page 14.|
- Sponge swabs (included in the Everest cleaning kit)
- 99% Isopropyl alcohol
| If the print ribbon is not detected, the upper or lower sensor is not responding, or the label is off center
Tacky Roller Cleaning
Cleaning Tacky Roller 1
Regular tacky roller cleaning keeps the integrated Everest 400 printer in optimal operating condition.
Tools Required
- Sponge swabs with long handles (included in the Everest Cleaning Kit)
- 99% isopropyl alcohol
-
Make sure the system is powered off and that there are no active or pending production jobs.
-
Remove the print ribbon carrier and print ribbon. For specific instructions on how to do this, refer to the Change the Print Ribbon procedure on the inside of the printer cover.

-
Clean tacky roller 1 on the print ribbon carrier:
-
Remove the sponge swab and the swab handle from the Everest cleaning kit.
-
Insert the sponge swab into the unnotched end of the swab handle, if necessary.
-
Apply isopropyl alcohol to the sponge swab.
-
Use the sponge swab to clean any dust or waxy residue from tacky roller 1.

-
Refer to page 15 for instructions on how to clean tacky roller 2.
Cleaning Tacky Roller 2
Important: Please follow steps 1 and 2 on page 14 to prepare the tacky roller 2 for cleaning if you have not done so already.
-
Remove tacky roller 2:
-
Turn the thumbscrew counterclockwise three complete rotations.
-
Push the end piece outward and to the left until it is free from the center bracket.
-
Grip the end piece and pull the entire tacky roller 2 out of the printer.

-
Clean tacky roller 2:
-
Remove the sponge swab and the swab handle from the Everest cleaning kit.
-
Insert the sponge swab into the unnotched end of the swab handle, if necessary.
-
Apply isopropyl alcohol to the sponge swab.
-
Use the sponge swab to clean any dust or waxy residue from tacky roller 2.
-
Reinstall tacky roller 2:
-
Hold the tacky roller by the end piece and insert the other end of the tacky roller into the hole with the white plastic supporting tray at the back of the printer enclosure.
-
Hook the end piece around the inside of the thumb screw and position the end piece so it is flush with the center bracket.
-
Tighten the thumbscrew until the end piece is secure.

Sensor Cleaning
Cleaning the Sensors
Tools Required
- Can of Compressed Air
-
Make sure the system is powered off and that there are no active or pending production jobs.
-
Remove the print ribbon carrier and print ribbon. For specific instructions, refer to the Change the Print Ribbon procedure on the inside of the printer cover.

Tip: One end of the handle has a slot with a notch in it near the end. This is the end that goes into the printer. (See below.)

-
Locate the swab and handle in the Everest Cleaning Kit.
-
If necessary, remove the swab from the handle.
-
Position the slotted end of the handle in the print ribbon sensor. Refer to the diagram to the left to see the locations of the sensors.
-
Position the can of compressed air’s nozzle in the unnotched end of the handle.
-
Blow compressed air into the end of the handle three times in twosecond intervals.
-
Repeat steps 5-8 for the upper and lower sensors.

Filter Maintenance
Cleaning the Filters
Your filters should be cleaned with water when you can see that they have
accumulated a layer of dust. Please follow these steps to do so:

- Remove the filters from the vents by squeezing the long edges of the filter casings and pulling outward.
- Remove the filter sponges from the filter casings.
- Rinse both sides of each sponge under cold tap water until the water runs through it clearly.
- Gently ring out the water until no droplets are visible in the mesh of the sponges, being cautious not to stretch out or tear the material.
- Put the sponges back into the filter casing.
- Reinstall the filters by again squeezing the long edges of the filter holder until the filters are securely fixed to the case vents. See the image to the right for correct placement.
Tip: If your filters become worn or damaged, contact Rimage Support for replacements.

Contact Information
This section provides support contact information, cautions, and warnings
specific to the Professional 2450.
Technical Specifications for this product can be found at
rimage.com/support.
Support Contact Information
US, Canada, Latin America
Rimage Corporation
201 General Mills Boulevard North Golden Valley, Minnesota 55439 USA
Attn: Rimage Services
| Email:support@rimage.com
Telephone:
North America: 800-553-8312
Mexico/Latin America: 952-944-8144
Europe|
Rimage Europe GmbH|
Email:support@rimage.de
Wernher-von-Braun Straße 9
63303 Dreieich-Offenthal, GERMANY
| Telephone: +49 (0)6074.8521.0
Asia/Pacific
Rimage Japan Co., Ltd.|
Email:apsupport@rimage.co.jp
4F Arai #38 Bldg.,
2-7-1 Hamamatsu-cho,
Minato-ku, Tokyo 105-0013 JAPAN
| Telephone: +81.3.6452.8780
Contact Rimage Services
Website:www.rimage.com
When you contact Rimage Services, please provide:
- System serial number and software version
- Functional and technical description of the problem
- Exact error message received
| Copy this information from your Rimage product for future reference.
Note: Make sure you update the serial number here anytime you receive a replacement system .
Serial Number:
Product Name:
Date of Purchase:
Learn More Online
At rimage.com/support, you can experience Rimage’s worldclass Support and Services.
From the Support home page:
- Select your product series.
- Select your product.
- Learn more on the product page.
From your product page you can access:
- Information about the latest software and firmware updates
- Product specifications
- The latest documents
- Current firmware and driver downloads
Technical Support
Rimage offers a variety of service and support options that differ by region, including Rapid Exchange+ and Software Subscription and Support. Please contact your Rimage Value Added Reseller or Rimage for additional information and pricing.
Optical Disc Recording Software Disclaimer
This Product, Software, or Documentation is designed to assist you in reproducing material in which you own the copyright or have obtained permission to copy from the copyright owner. Unless you own the copyright or have permission to copy from the copyright owner, you may be violating copyright law and be subject to payment of damages and other remedies. If you are uncertain about your rights, you should contact your legal advisor. If you are neither in possession of the copyright nor have authorization from the owner of the copyright, unauthorized copying of copyrighted material on an optical disc or any other media violates national and international legislation and can result in severe penalties.
Cautions and Warnings
Safety and Compliance Information
This manual and the indications on the product allow proper and safe
operation. The indication marks below help protect you and other persons from
injury, and equipment from damage.
Safety Precautions
To ensure safety, read these precautions and familiarize yourself with their
meaning before using the equipment.
Warnings!
- The laser beam used by the CD/DVD/Blu-ray Recorder is a Class 1 laser. Do not attempt to open the recorder. An authorized technician should perform all service procedures.
- Use of controls or adjustments or performance of procedures other than those specified herein may result in hazardous radiant exposure.
- Never use any optical instrument in conjunction with this unit. To do so will greatly increase the hazard to your eyes.
- Do not disassemble or use tools on the printer. All service procedures should be performed by a Rimage-authorized technician, or sent in for Rimage-authorized repair.
- The interior of the printer contains sharp edges.
- Do not touch the heat roller.
- Do not touch the circuit boards. The circuit boards can be damaged by electrostatic discharge.
- Do not remove the back panel unless the autoloader has been powered off.
- Changes or modifications not expressly approved by the party responsible for compliance could void the user’s authority to operate the equipment.
- This transmitter must not be co-located or operated in conjunction with any other antenna or transmitter.
- This equipment complies with FCC radiation exposure limits set forth for an uncontrolled environment and meets the FCC radio frequency (RF) Exposure Guidelines in Supplement C to OET65. This equipment has very low levels of RF energy that it deemed to comply without maximum permissive exposure evaluation (MPE).
- Do not put hands near recorders during operation. Static discharge could result in rejected discs.
Cautions:
-
For continued protection against risk of fire, replace the fuse only with the same type and rating. An authorized technician should perform all service procedures.
-
Use only the supplied AC power cord, or use a safety agency approved power cord.
For applications outside North America, refer to the nearest Rimage office for assistance in selecting a locally approved power cord. -
This product is designed for an office environment.
-
The Professional 2450 contains a lithium battery. There is a risk of explosion if the battery is replaced by an incorrect battery. Dispose of the old battery according to the manufacturer’s instructions included with the battery packaging.
-
All equipment with AC line voltage, or low DC voltages, such as switches, power supplies, fuses, fans, and non-stepper motors, must be replaced with Rimageapproved components to maintain the safety approval issued by UL.
-
Allow sufficient free space for opening the printer tray. Do not touch the printer tray while it is in motion.
-
If the side cover is opened while power is supplied, the printer will stop. Do not reach into the printer while it is in operation. Do not attempt to bypass the door interlock
Country-specific Cautions and Warnings
Country-specific Cautions and Warnings for Wideband Data Transmission Systems: 13.56 MHz
Warnings!
This device complies with Industry Canada licence-exempt RSS standard(s).
Operation is subject to the following two conditions: (1) this device may not
cause interference, and (2) this device must accept any interference,
including interference that may cause undesired operation of the device.
This equipment complies with IC radiation exposure limits set forth for an uncontrolled environment and meets RSS-102 of the IC radio frequency (RF) Exposure rules. This equipment has very low levels of RF energy that it deemed to comply without maximum permissive exposure evaluation (MPE).
Canada:
This device complies with Industry Canada’s licence-exempt RSSs. Operation is
subject to the following two conditions:
- This device may not cause interference; and
- This device must accept any interference, including interference that may cause undesired operation of the device.
Taiwan: Certified by the type of low-power radio, company, firm or user are not allowed to change the frequency, increase power or change the original design features and functions without proper authorization. Use of low-power radio electrical devices shall not affect flight safety or interfere with legitimate communications; equipment should be immediately disabled if interference is found, and it may not be used again until it is improved to be non-interference. Legitimate communication refers to operation in accordance with the provisions of the Telecommunications Act of Radio Communication. Low- power radio communications must be able to stand radio interference of electrical equipment of legitimate communications and industrial, scientific and medical radio radiation.
Cautions:
- France: Do not use outdoors.
- Italy: If used outside of own premises, general authorization is required.
- Norway: This subsection does not apply for the geographical area within a radius of 20km from the center of NY-Alesund.
Compliance Information
| Product | Professional 2450 |
|---|---|
| Model | RAS36 |
| Notice for USA | NOTE: This equipment has been tested and found to |
comply with the limits for a Class A digital device, pursuant to part 15 of the FCC Rules. These limits are designed to provide reasonable protection against harmful interference when this equipment is operated in a commercial environment. This equipment generates, uses and can radiate radio frequency energy and, if not installed and used in accordance with the instruction manual, may cause harmful interference to radio communications. Operation of this equipment in a residential area is likely to cause harmful interference, in which case the user will be required to correct the interference at his own expense.
This product complies with UL 60950-1, 2nd edition.
Notice for Canada| This Class A digital apparatus complies with Canadian
ICES-003 Issue 6: 2016.
This product complies with CAN/CSA-C22.2 No. 60950-1.
Notice for Europe| This product is in conformity with the EMC Directive
(2014/30/EU) and the Low-Voltage Directive (2014/35/EU) through compliance
with the following European standards: EN 55032 Class A Limit; EN 55024; EN
61000-3-2; EN 61000-3-3; EN 60950-1. The CE mark has been affixed in
accordance with the CE Marking Directive 93/68/EEC.
Notice for Japan| This is a Class A product based on the standard of the
Voluntary Control Council for Interference by Information Technology Equipment
(VCCI-A). If this equipment is used in a domestic environment, radio
interference may occur, in which case, the user may be required to take
corrective action.
Notice for Australia| This product complies with AS/NZS CISPR 32: 2013.
Notice for Korea| It is certified that foregoing equipment has been
certificated under the Framework Act on Telecommunications and Radio Waves
Act.
Notice for Taiwan| This is class A digital device. It may cause radio-
frequency interference when used in a residential area. In this case, the
users are advised to take appropriate precautions.
For more information visit rimage.com/support
Rimage Corporation reserves the right to make improvements to the equipment and software described in this document at any time without prior notice. Rimage Corporation reserves the right to revise this publication and to make changes from time to time in the content hereof without obligation of Rimage Corporation to notify any person or organization of such revisions or changes.
This document may contain links to web sites that were current at the time of publication, but may have moved or become inactive since. This document may contain links to sites on the Internet that are owned and operated by third parties. Rimage Corporation is not responsible for the content of any such third-party site.
© 2020, Rimage Corporation
Rimage® is a registered trademark of the Rimage Corporation. Professional™ and
Everest™ are trademarks of the Rimage Corporation. Windows® is a registered
trademark of Microsoft Corporation.
All other trademarks and registered trademarks are the property of their
respective owners.
The most recent version of this document can be found at
rimage.com/support
CONTACT US
Rimage Corporation
201 General Mills Boulevard North
Golden Valley, Minnesota 55439, USA
Toll Free +1.800.445.8288
Rimage Europe GmbH
Wernher-von-Braun Straße 9
63303 Dreieich-Offenthal,
GERMANY
Tel +49 (0)6074.8521.0
Rimage Japan Co., Ltd.
4F Arai #38 Bldg.,
2-7-1 Hamamatsu-cho,
Minato-ku, Tokyo 105-0013 JAPAN
Tel +81.3.6452.8780
Rimage Taiwan
2F.-7, No. 508, Sec. 5,
Zhongxiao East Road., Xinyi Dist.,
Taipei City 110, TAIWAN
Tel +886.2.2726.0100
Rimage Information
Technology (Shanghai)
Co., Ltd.
RM # 206, 207, 2F
No.1 FuXing Zhong Road
HuangPu District
Shanghai, 200025 CHINA
Tel +86.021.5887.8905
References
Read User Manual Online (PDF format)
Read User Manual Online (PDF format) >>