CollegePlannerPro DAF__sh811M Sample Student eBook User Guide
- June 1, 2024
- CollegePlannerPro
Table of Contents
CollegePlannerPro DAF__sh811M Sample Student eBook

Why This eBook?
This eBook was created to offer tips for creating the ultimate sample student
profile. By creating a sample student, you will become more familiar with the
tools available to you within CollegePlannerPro.
Additionally, you’ll have a rich profile that you can show off to win more
prospective clients.
Keep in mind that CollegePlannerPro is a flexible toolkit. Customize the
sample profile to demonstrate the ways you and your students use the system.

Ready? Great, let’s get to it!
The key to creating a great sample student profile is populating it with realistic, relevant, and compelling information. The goal is to show off the capabilities and the value of the robust software system you will use to keep students on track.
TIP : Each subscription plan allows for one additional active student above the stated limit to be used for your marketing purposes.
STEP 1: POPULATING STUDENT INFO
To start, you’ll need to add a sample parent’s information to
CollegePlannerPro, then you can begin populating the student information by
following the tips below. Click here to learn how to add a parent (contact)
profile and student profile.
STUDENT NAME : Have fun with it! Remember, this is just a sample profile.
We’re naming ours Doogie Howser! Need help populating contact information?
You’ll find instructions here: How do I edit a student’s contact
information?
EMAIL : You’ll want to use a real email address so that you may send
sample messages to the student.
To avoid confusion, we suggest that you use unique email addresses for your
sample parent and sample student, and avoid using the email address associated
with your CollegePlannerPro account. If you don’t have personal email
addresses you can use, we recommend a service like
Mailinator.com which allows you to see how sample
emails appear in a fake email inbox without having to create multiple test
email accounts.
HIGH SCHOOL & GPA: We recommend entering a high school that is local to
you, along with a GPA that is representative of the typical student you work
with. Later on we’ll be adding colleges and assigning admissions
probabilities, so you’ll want to keep that in mind as you add the GPA.
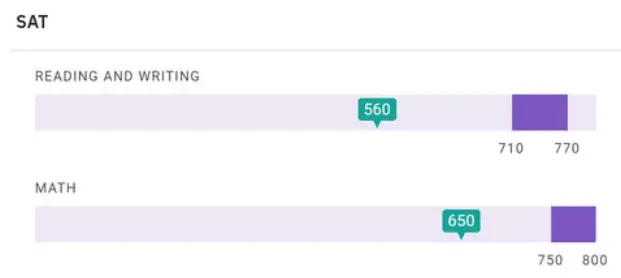
SAT/ACT TEST SCORES : Realism is key here. Enter SAT or ACT
scores that are in line
with what a student with the GPA you entered would likely score. This will be
important when you show parents college profiles and the “How do I match up?”
graphs.
STEP 2: BUILDING THE COLLEGE LIST
MY SUGGESTED COLLEGES : Add some
colleges to the My Suggested
Colleges list. Select schools that are popular with students in your region,
and align well with the persona you’re creating. Also be sure to select
colleges you are familiar with, as you’ll be assigning admissions
probabilities in a future step. APPLICATION DEADLINES : Click on a school
that you have added to your student’s suggested colleges list to select the
date your student plans to apply to each college.
TIP : If you have not already done so, you may want to import the
application deadlines to
your account.
ADMISSION PROBABILITY : Using your expertise, assign admission
probabilities for each college based on the type of student you’re
creating. You can customize the admission probability
labels in your account’s Settings &
Preferences section.
APPLICATION REQUIREMENTS : Select a couple schools from the list and add
application requirements.
You will likely only show parents a couple colleges on the Application Outline
later, so there’s no need to add requirements for all the colleges on your
list.
TIP : Core requirements will be assigned the target deadline that you
have selected for your student. Add “Other Requirements” with specific due
dates that you’ll later be able to show parents on the calendar. For example:
Art Portfolio, Campus Tour, etc.
COLLEGE PROFILE REPORT : Create a College Profile
Report for your student. As a bonus, if you
have notes saved on any of the college profiles on your suggested college
list, import them to the college profile report. When you’re done,
make sure you make the report visible to your student.

STEP 3: ADDING MORE DETAILS
STUDENT TO DOS : Add a few student To- Dos to the student profile. The To-Dos on the right are just a few examples. Customize these ToDos to represent the way you will work with your students. We also recommend grouping the due dates of these sample To-Dos together in the same month. That way you’ll be able to show parents the To-Dos on the student calendar while giving them the tour of your sample CustomCollegePlan account!
MEETINGS : Add some meetings to your student’s profile. Customize this to the type of meetings you will typically have with your student. Whether they be sessions to work on college essays, parent and student check in meetings, or workshops, name these meetings as you see fit.
FILES AND FOLDERS : Create
folders.
Customize these to how you will work with your student. Will you keep track of
your student’s SAT or ACT prep? Create a “Practice Test Results” folder and
upload a few PDF files as an example.
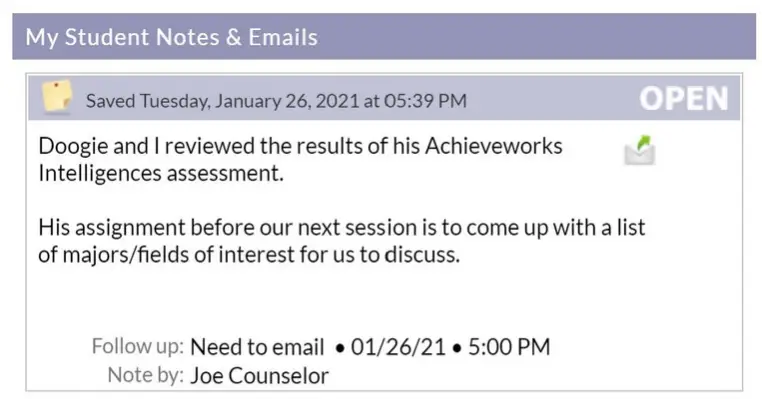
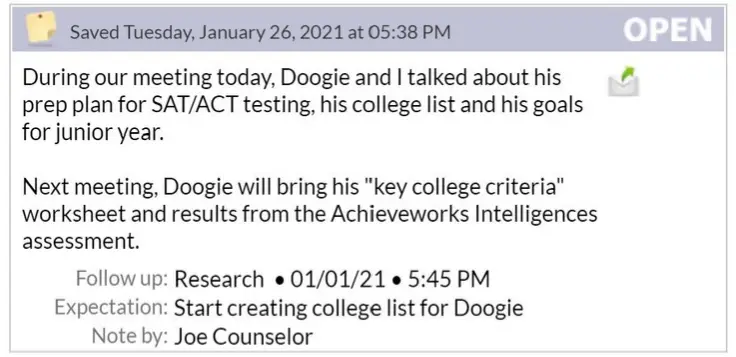
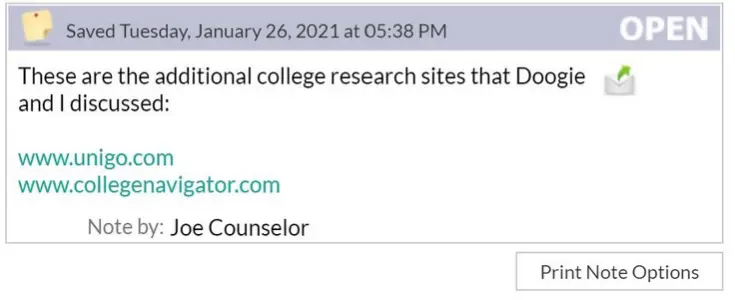
NOTES : Add notes to your student profile and email them to your sample student, and copy the sample student’s parents as well. The key here is to display the value that the system adds for the family. Some great examples would be meeting recap notes, where you are clearly keeping families in the know with what you’ve been working on with your student.
STEP 4: ROLE PLAY AS YOUR STUDENT
STUDENT ACCOUNT SETTINGS : Head over to your student’s Account Settings and make the Application Outline visible to your student.
LOG IN AS THE STUDENT : Here’s how.
ADD A PHOTO : Click the pencil icon next to the circle in the welcome
banner on the Dashboard.
This will bring you to the profile page, where you can upload a profile photo
for your student. Again, have fun with it! Match the sample name you picked
out.
UPDATE TO-DOS : Add your own To-Dos, edit the statuses of existing To- Dos, and add comments as the student. To change the status of a To-Do, you can click the item to open it in expanded view, or simply drag and drop it from one status column to another.
UPLOAD FILES : Upload files as your student. Vary the types of files including Google Docs and give the files appropriate titles.
START A CONVERSATION : Play the part! Send messages back and forth between the consultant and student using the Conversation feature.
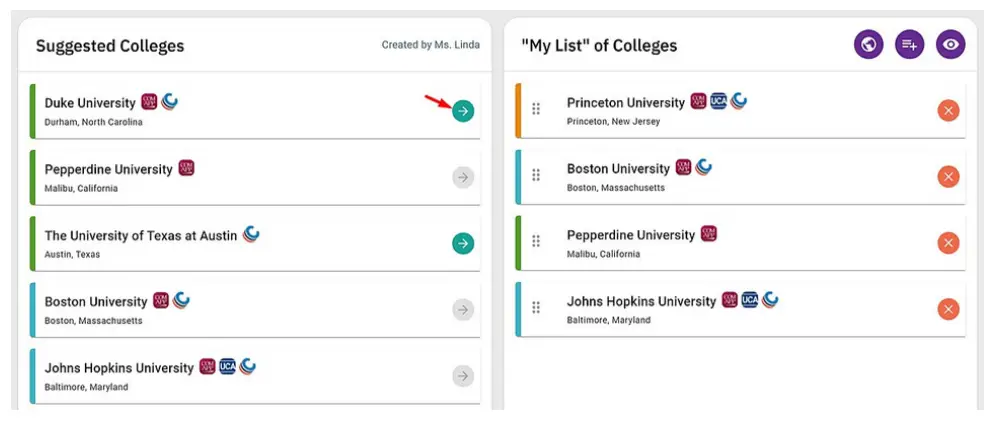
MY LIST OF COLLEGES : On the student’s Colleges tab, select a handful of
schools to move over to the student’s “My List” of Colleges. Remember to
select the colleges for which you previously entered Application Requirements.
TIP : Drag these schools to the top of the “My List” of Colleges so they
appear first on the Application Outline tab.
APPLICATION OUTLINE : Mark a few of the requirements as “Completed.”
THAT’S A WRAP
You should now have a well-rounded sample student profile, full of examples of the features and how you use them with your students! We hope this becomes a valuable addition to your initial consultations with families.
References
Read User Manual Online (PDF format)
Read User Manual Online (PDF format) >>