Ejiale Digital 2A64G-F9 Digital Full HD 1080P 4K Video Projector User Guide
- May 15, 2024
- Ejiale Digital
Table of Contents
Ejiale Digital 2A64G-F9 Digital Full HD 1080P 4K Video Projector
Thank You
Thank You for Purchasing The Projector
Before your great adventure, please read this user guide carefully and keep it
in a safe place for future reference.
Important Safety Instructions
Please read carefully the corresponding content of the marking on the product you have purchased before you install and use the product.
Warning
RISK OF ELECTRIC SHOCK DO NOT OPEN
CAUTION: DO NOT REMOVE COVER TO REDUCE RISK OF ELECTRIC SHOCK.
There are no user serviceable parts inside. Be sure to have repairs performed by qualified service personnel.
**** This symbol means that dangerously high voltage is present inside. Any form of contact with any part in side the product is dangerous.
**** This symbol reminds you of the important instructions that come with the operation and maintenance of this product.
-
Do not place this machine near or over electric heaters or radiators, or in places exposed to direct sunlight.
-
Do not place heat-generating objects (such as candles, ashtrays, incense, flammable gas or explosive substances, etc.) near the product.
-
Do not place containers filled with water on this machine as this may result in a fire or electric shock hazard.
-
Do not expose the product to oily substances or chemical agents, as this may cause corrosion of the product casing.
-
Do not expose this machine to rain or near water(e.g. near a bathtub, sink, kitchen sink, or laundry sink, in a wet basement, or near a swimming pool).
If the machine gets wet accidentally, please unplug the power cord or power adapter immediately, and then promptly contact an authorized dealer for further assistance. When cleaning the monitor, be sure to use a dry, soft cloth that does not contain volatile substances. Before cleaning, be sure to unplug the power cord or power adapter. -
Do not overload wall outlets, extension cords, or integral convenience receptacles as this may result in fire or electric shock.
-
The power cord or power adapter should be placed in a location where it will not be stepped on or squeezed by objects above or next to it, and special attention should be paid to the wires at the plug, at the integral convenience receptacles and at the outlet of the machine.
-
To better protect this machine in lightning weather or when it is left unattended or unused for a long time, please unplug its power cord or power adapter, and disconnect the antenna or cable system.
This prevents damage to the machine during a lightning storm or in the event of a power surge on the power line. -
Before connecting the AC power cord to the power adapter or monitor power interface (subject to the actual product style), please make sure that your local power supply meets the requirements of power adapter or monitor input voltage.
-
Be sure not to insert any metal objects into the holes of this machine, otherwise it may cause a danger of electric shock.
-
Do not touch the inside of this machine to prevent electric shock. Only qualified technicians are allowed to open the cover of this machine.
-
Make sure that the power cord plug or power adapter can be securely inserted into the outlet. When disconnecting the power cord, make sure to firmly grasp the power plug or power adapter and unplug it from the outlet.
-
Do not touch the power cord or power adapter with wet hands.
-
If the machine does not operate normally, especially if it emits any unusual sound or smell, unplug the power outlet immediately and contact an authorized dealer or service center for further assistance.
-
If you plan to leave the monitor unused for an extended period of time, or if you are going to be away from home (especially if there are children, the elderly, or people with disabilities left alone), be sure to unplug the power plug or power adapter from the outlet.
Accumulated dust may cause sparks and heat from the power cord or power adapter or cause the insulation of the power cord or power adapter to deteriorate, resulting in electric shock, leakage or fire. -
After the monitor is moved from a low temperature place to a warm area, it should be placed for a period of time before powering on, so that the condensation inside the monitor can be fully dissipated and dried.
-
The power supply voltage will be marked on the back of the monitor.
-
If you plan to install this product in dusty, high or low temperature, high humidity, chemical-containing environments and 24-hour use locations (such as airports or train stations, etc.), be sure to contact an authorized service center for further assistance. Otherwise, the monitor may be severely damaged.
Important Safety Instructions
-
To disconnect the power from the device, the power cord or power adapter plug must be unplugged from the machine,
so the power cord or adapter plug should be easily accessible. -
Children are prohibited from climbing on this product.
-
Keep the accessory parts out of the reach of children.
-
Do not install this product in an unstable location, such as a wobbly shelf, sloping floor, or a location subject to external vibration.
-
Do not drop the product or subject it to shock. If the product is damaged, please disconnect the power supply and contact the service center in time for further assistance.
Package Contents
-
Projector
-
User Guide
-
AC cable
-
Remote control
-
1. Please check If all items are included in your monitor set, if there are missing items;
please contact your dealer in time. -
2. Item color and shape may vary by model.
-
3. The cables provided may vary depending on the product purchased.
Product Overview
- AV
- USB
- HD
- EARPHONE OUT
- ACIN
- POWER ON/OFF
Specification
| Optimal Projection Distance | 1.0m~3.5m |
|---|---|
| Maximum Resolution | 1920*1080 |
| Tillable Angle | V:+-30° |
| Power Supply | AC 100-240V |
Remote control
| Switches the Monitor between on and standby mode
---|---
| Menu : Displays the OSD (On Screen Display) menu
| HOME : Displays the home screen.
| Navigation buttons : Cursor UP/LEFT/RIGHT/DOWN/OK.
INFO
| Callup information related to reading files
| Back: Press to move back through menus
| Inputs :Display/Select signal source options
| Connects to YouTube (internet connection required)
| Connects to NETFLIX for viewing online Monitor shows and films(internet
connection required)
| Connects to Prime video (internet connection required).
| Remote control focus, up and down key adjustment
| Mute or restore your Monitor sound
WARNING:
- replacement of a battery with an incorrect type may defeat a safeguard;
- disposal of a battery into fire or a hot oven, or mechanically crushing or cutting of a battery, may result nan explosion;
- leaving a battery in an extremely high temperature surrounding environment, such as sunshine, fire, or hot surface may result in an explosion or the leakage of flammable liquid or gas;
- a battery subjected to extremely low air pressure may result in an explosion or the leakage of flammable liquid or gas.
CAUTION
Risk of fire or explosion if the battery is replaced by an incorrect type!
OSD Setting Instructions
Installation Guide
-
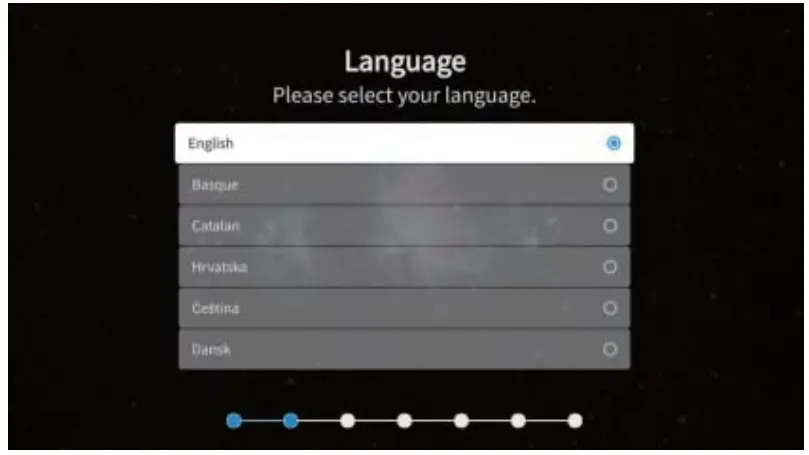
The following wizard menu is displayed when you turn on the first time.
Press to select your projection. -
Enter select your language
Press to switch the OSD Language menu language. After selecting the desired language, press OK to enter the next page. -
.Enter the search country setting page
Press the button on the remote control to select the menu option, OK to confirm the selection and go to the next setting page. button to back the previous page. -
Data Collection and Firmware Updates Notice page will appear.
Press the button on the remote control to select the menu option, OK to confirm the selection, generally select [ACCEPT]. button to back the previous page. -
Enter the network settings page
Press OK to enter wifi network, then press the button on the remote control to select the menu option, OK to confirm the selection and go to the next setting page. button to back the previous page. -
If you do not need to connect to the network, select the “Skip” option OK to confirm whether to skip the network settings page. button to back the previous page.

-
Enter Netflix setup page
Press the button on the remote control to select the menu option, OK to confirm the selection. button to back the previous page.
Following the above, all is finished. The below pops up then disappear automatically after about 5seconds.

HOME Menu
Press to display the home menu, select desired app and OK to open the focused
app.
Press key to enter the Pre-app if Netflix or Youtube is selected.
Press key to enter the parent menu then to switch between the Apps, Inputs
and Settings.
key to enter the corresponding sub-menu and key to back to its parent.
Exit key to disappear Home menu.
OSD Setting Instructions
Settings Menu
Press the button to display the main menu. Press to switch between the
options of Setup,
Picture Mode, Audio, Network,Keystone, Projection, Bluetooth,About.
Press to jump to the corresponding sub-option on the right.
Input Source
Press the button to display the Input source menu. Press to select the
desired source then press OK to confirm the switch.

USB
Insert the USB flash drive, press OK in the USB option of the Source menu or
press USB hot key to enter the Media menu.
Press buttons to select Photo, Music and Video options, then press OK to enter
the file directory.
Cleaning Method
Before cleaning, you must make sure that you have unplugged the power plug.
Do not use insecticides or other volatile chemicals on the projector or lens.
Do not use rubber or vinyl products to touch the projector. This can damage or
cause coating peel off.
Clean the Projector
Wipe with a soft dry cotton cloth. use a soft cloth dipped in a diluted
neutral detergent to wipe it, then with a dry cloth. If you use chemical fiber
cloth, please follow the precautions.
Do not use thinner, benzene or other solvents to avoid quality degradation or
peeling of the spray coating. When cleaning the dirt, you caninsert a brush in
the front of the vacuum cleaner, avoid directly use the vacuum cleaner without
any connectors or the nozzle, avoid scratches.
Dust cleaning of lens
Use the same method to clean the camera lens, use the professional hair dryer
for the camera or the cleaning paper for the glasses lens. Be careful not to
scratch the lens. Dust cleaning at suction and outlet The dus tin the air
inlet and outlet prevents ventilation, which will increase the internal
temperature and cause malfunctions. Cleaning guidelines: at least clean once
use every 10,000 hours. Turn off the projector, disconnect the power.
Clean the exterior with an electric vacuum cleaner, and install a brush head
adapter on the vacuum cleaner. Please be careful not to use a vacuum cleaner
without an adapter or brush head.
FCC Warning Statement
Changes or modifications not expressly approved by the party responsible for
compliance could void the user’s authority to operate the equipment. This
equipment has been tested and found to comply with the limits for a Class B
digital device, pursuant to Part 15 of the FCC Rules. These limits are
designed to provide reasonable protection against harmful interference in a
residential installation. This equipment generates uses and can radiate radio
frequency energy and, if not installed and used in accordance with the
instructions, may cause harmful interference to radio communications. However,
there is no guarantee that interference will not occur in a particular
installation. If this equipment does cause harmful interference to radio or
television reception, which can be determined by turning the equipment off and
on, the user is encouraged to try to correct the interference by one or more
of the following measures:
- Reorient or relocate the receiving antenna.
- Increase the separation between the equipment and receiver.
- Connect the equipment into an outlet on a circuit different from that to which the receiver is connected.
- Consult the dealer or an experienced radio/TV technician for help.
This device complies with part 15 of the FCC Rules. Operation is subject to the following two conditions:
- This device may not cause harmful interference, and
- this device must accept any interference received, including interference that may cause undesired operation.
RF Exposure Statement
To maintain compliance with FCC’s RF Exposure guidelines, This equipment
should be installed and operated with minimum distance of 20cm the radiator
your body. This device and its antenna(s) must not be co-located or operation
in conjunction with any other antenna or transmitter.
Read User Manual Online (PDF format)
Read User Manual Online (PDF format) >>