WAULKIN Z05B Walking Pad with Incline Under Desk Treadmill Instruction Manual
- May 15, 2024
- WAULKIN
Table of Contents
Fitness Equipment Manual

About the product
The names of all parts of the model are shown as follow:
Caution:
Note:
Before assembly, please refer to the assembly instructions carefully. If
assembly difficulties sill occur, please ask our customer service.
If the product fails due to improper human activities and forced assembly,
return and exchange are not accepted!
Return and replace the goods together with the main goods and accessories in
accordance with the original packaging method. If there is any human factor,
the missing parts (outer boxes or spare parts) must be compensated according
1o the original price.
In order to ensure the safety, when the machine is running, it is strictly
prohibited to move or move the machine body at will, 5o as to avoid
accidentally pinching fingers or body. We shall not be responsible for
improper use.
Safety area: 1000mm * 1000mm behind the device, S00mm on the left and right
sides of the device.
Packing list
| No. | Item | Unit | Quantity |
|---|---|---|---|
| 1 | Main Body | set | 1 |
| 2 | Oil Belt Lubrlcant | bottle | 1 |
| 3 | L- Shaped Wrench | set | 1 |
| 4 | Remote Controller | set | 1 |
| 5 | Instruction Manual | copy | 1 |
| 6 | Safty Pin | set | 2 |
Please read this manual carefully before using it.
Please keep this manual for use
The appearance, color or surfice pattern of the product shall be subject to
the actual conditions.
Our products are constantly updated and subject to change without notice.
Safety precautions and wamings
Note: please read the manual carefully before use and pay attention to the following safety precautions
- This machine is suitable to be placed indoors to avoid being affected with damp. Water cannot be splashed on the machine and no foreign matter can be placed. .
- Before exercise, please wear appropriate sportswear and sneakers. Any movement or stretching barefeet is strictly forbidden.
- The power plug must be reliably grounded, and the socket must have a special circuit to avoid sharing with other electrical equipment.
- Children should stay away from the machine to avoid accidents.
- It is necessary to avoid overload operation for a long time, otherwise motor and controller will be damaged, wear and aging of bearing, running delt and running plate will be accelerated, and regular maintenance shall be done.
- Reduce indoor dust, keep a certain humidity and avoid strong static electricity, otherwise it may interfere with the normal operation of the electronic meter and controller.
- Please tum off the power of the machine after use.
- Please keep indoor air circulation when using the product.
- Durning the movement, please clamp the safety key cable on the clothes to ensure the safe shutdown in case of emergency
- If you feel uncomfortable or abnormal during use, please stop exercising and consult your doctor.
- After the usc of silicone oil, it must be stored in a place not accessible to children to avoid serious consequences caused by ingestion.
Waming: In order to reduce accidents or injurics to others, please observe the following regulations:
- Before using the product, please check whether the clothing is properly buckled or worn and aged, and make regular maintenance.
- Don’t wear clothes that are easily hooked by the machine.
- Keep the power cord away from hot objects.
- Keep children away from the machine.
- Do not use the machine outdoors.
- Power must be cut off before moving the machine.
- Non-professionals are not allowed to disassemble the machine without authorization, otherwise serious consequences may occur.
- This machine is only used in 20 amp circuits.
- Only one person can move on the machine when the machine is started.
- If you feel dizzy, chest pain, nausea or shortness of breath during exercise, please stop exercising immediately and consult a doctor.
Warming! Attention!
- If you are under the treatment of a doctor or the following patients, please consult with a special doctor before using.
- Those who are suffering from waist pain now or those who have suffered injuries to their legs, waist and neck in the past. Numbness of legs, waist, neck and hands (chronic diseases such as disc herniation, spondylolisthesis, cervical vertebra protrusion, etc.)
- those with deformational arthritis, rhcumatism and gout.
- Abnormal osteoporosis.
- Persons with circulatory disorders (heart disease, vascular disorders, hypertension, etc.).
- respiratory organ dysfunction
- Implantable medical clectronic instruments using astificial heart rate regulators.
- Patients with malignant tumors.
- those with thrombosis or severe lipoma, blood circulation disorder or various skin infections and other symptoms.
- Persons with perceptual disorders caused by high peripheral circulation disorders such as diabetes.
- People with skin trauma.
- Persons with high fever (38 degrees or above) due to illness, etc.
- Abnormal or curved dorsal bones.
- Those who are pregnant or may be pregnant or are in menstrual period.
- Those who feel abnormal and need rest.
- Those who are obviously in poor physical condition.
- for the purpose of rehabilitation.
- In addition to the above situations, people feel abnormal in their bodies.
–May lead to accidents or poor health.
-
When you feel wast pain, numbness of legs and feet, dizziness, heartbeat and other physical pain different from ueual or abnormal sensation caused by coordination during exercise, immediately stop using it and consult a doctor.
Don’t let children use this product, and don’t let children play around this product.
– – Failure to comply may result in injury. -
Please make sure that there are no people or pets around (the rear, lower and front parts of the product) during use or when loading and taking out the product or sliding it.
Forbidden! -
Dont use it when the shell is cracked. broken or detached (interns! structure leaks out) or when the welded part is detached.
— otherwise accidents or injuries may occur. -
Don’t jump up or down during exercise.
—- injuries may result from falls. -
Do not use and keep it in damp places such as outdoors and near bathrooms and places that are prone to dnpping water.
-
Do not use or keep it in places with direct sunlight, pisces with high temperature such as around stoves, and heating appliances such as electric heating carpets.
– – -No may lead to electricity leakage and fire. -
Do not use the power cord or plug when it is damaged or the socket of the socket is loose-otherwise it may cause electric shock, shost circuit and fire.
-
Do not damage or forcibly bend or twist the power cord. At the same time, do not place heavy objects on it end do not hold the wire 1.
——Failure to do so will result in fire of electric shock. -
Do not use two or more people at the same time, and be careful not to let people around you approach during use.
—— Otherwise, accidents or injuries may occur due to fails. -
Do not use it if you cannot express your awareness or if you cannot operate it
—— Accidents of injuries may occur.
Avoid contact with water!
Do not drench the main body or operation part with water or beverage. “may cause clectric shock and fire.
Forbidden! -
Peopie who do not exercise normally should not do violent sports suddenly.
-
Do not use it after esting or when you are tired, just exercising or when your physical condition is abnormal.
——May cause damage to health. -
This product is suitable for family use, not for schools, gymnasiums and other unspecified places with a large number of people.
—— There is a risk of injury.
Do not use while eating or doing other activities. -
Do not use when you feel shiggish after drinking.
-
-May cause sccident or injury.
-
Do not use when there are hard objects in the pants pocket.
—May cause accident of injury. -
Do not use with wet hands!
-
Do not use wet hands to pull out or insert the power plug.
——Msy cause electric shock and injury. -
Pull out the power plug!
-
When not in use, pull out the power plug from the socket.
–Because dust and moisture will degrade the insulation, which will lead to leakage fire.
Grounding instructions! -
The product must be grounded. In case of malfunction of the machine, the grounding will provide the channel with the least resistance for the current, 80 as to reduce the risk of electric shock
-
The product is equipped with power supply with equipment grounding conductor and grounding plug. The plug must be inserted into a proper socket that has been installed and grounded correctly in full accordance with local laws and regulations.
DANGER! -
if the grounding conductor of the equipment is not properly connected, electric shock may be caused. If you have any questions about whether the grounding of the product is correct, please cntrust a professional electrician to check. Even if the plug attached to the product docs not match the socket, it cannot be modified. Please entrust a professional electrician to instal] 2 suitable socket.
sports suggestions and guidelines
Warm-up
50 10 minutes of warmup before cach use of the machine.
Breathing
Do not shield breathing during excrcise. Breathing and action should be
coordinated.
I breathing is t0o fast, sop the exercise immediately.
Frequency
“The same partof the muscl excrcise should be 48 hours of rest, that i, every
other day o ran the same part.
Load
‘The weight of trining is determined according o thestate of individual
physical training, and then the training is caried out according 10 the
principle of gradusl load. In the initial training, muscle ache is normal
phenomenon. As long a the raning continues,the ache can be climinated.
Diet
I order to protect the digestve system, exercise can be careid out one hour
afier meals. Aftr traning, cat st least half an hour later. Drink lss water
during excrcise,especially avoid drinking a ot of water, $0 3 1ot o increase
the burden of heart and kidney.
stretching exerct
No matter how fast you run, it’s better to stretching first. Warm muscles are
casicr to stretching because
5-10 minutes to warm up. Then stop and do five stretchinges as follows, cach
leg Do it 10 seconds or more at a time, and do it again at the end of the
workout.
-
Downward stretching
Slightly bend your knees, slowly bend down, relax your back and shoulders, and do your hands Measure and touch toes, hold for 10-15 seconds, then relax, repeat 3 times (see Figure 1) -
Hamstring stretching
Sit on a clean cushion and straighten one leg. Put the other leg in, Keep it close to the inside of the outstretchinged leg and try to touch the tocs with your hands, Hold for 10-15 scconds, then relax, repeat for 3 times on each leg (see Figure 2) -
Calf and heel tendon stretching
Stand with two hands on the wall or table, one foot behind. Keep back legs upright and heels Land, lean towards the wall or table, hold for 10-15 seconds, then Relax, repeat cach leg three times (see Figure 3) -
Head muscle stretching
Hold the balance with your right hand on the wall or table, then extend your left hand backward, grasp your left ankle and slowly pull it up to your hip until you fee! the muscle in front of your thigh is very tense, pull it up for about 10-15 seconds, then relax, and repcat for 3 times for cach leg (see Figure 4) -
Sartorius muscle(muscle inside thigh) stretching
With the feet facing each other, sit down with the knees facing out, grasp the feet with both hands and pul! them towards the ventral groove, hold the scrofula for 10-15 seconds, then relax and repeat for 3 times. (see chart 5)
Product instructions
- Window and Keys Description:
1. LED window displays the following functions:
A. speed window: 1. (XM-C2) display speed range: 1.0-6
(lll) Second. Profile = cr.a(F) 1.0-10.00
The functions of the electronic watch
Remote control
Use function of safe lock:
Place the ferromagnetic absorption part of the safety lock belt in the yellow area, use the locker patch fitting and clip it to the front of the clothes.
• With the circumstance of power on and safety lock in the night place, stop the treadmill with suddcn stop function .
(11) brief introduction
Functions of this electronic meter
• Remote control function
(lV) 1ed display descrpton
Dislay ontent on LED:
-
Speed display
-
Calorie display
-
Tim display
Window swith pesd every sconds,calrics, e, dispay:
(V) function description of remote control button
Remote keypad function key: -
Startkey /stopkey
-
spoed
-
key
-
Speed one key
(Vl) function and operation instructions of remote control button
- Start key / stop key – tum on the power switch on the treadmill and press the star key /stop key on the remote control when you hear 3 beep from the buzzer to start running, top the treadmill and press the start/ top key on the remote contrl o tur off the treadrmill.
- Speed -+ key: o speed up the treadmill when the treadsmillis running, press the speed + on the remote control 10 increase 3
- Speed key: when the treadill is running, press the speed key on the remote control 1o reduce the speed of the readimill.
(VID) app function (only for app models)
1. You need to take out your mobile phone and open the “scan” on wechat to scan the QR code and enter the small program. You can start and st0p the acceleration and decelration of the trcadill
Maintenance
-
Lubrication
Afte using the running beltfo a period of tme, it is necessary to us special Jan ol for Jian sliding.
“The recommended lubrication time is:
Lubricating once every § months for the use of less than 3 hours per week.
Lubricating once every 2 months for the use of 47 hours per week.
Lubricating once every month forthe
usc of morc than 7 hours per week.
Nole: do not add too much dose each tme. -
Check whether Iubrication i required
Grasp the running belt, and touch the back centralarea of the running bel as much s possible. I there s silcone il on the belt (o it feels a lite wet), it means no ubrication is needed. I you feelthat the running board s dry and thereis o silcone oil on your hand, you need 10 add oil and lubricae the watch
Measure the center position of th e running belt (refe 1 the right igure) and spray slicone oil on the inside of the running belt. Aflr that,run the treadmill at o speed of 1kim t evenly smear silicone oil, and lght the running bel from left o right. After about 3 minute, silcone ol wil be: absorbed by the running belt -
Blastic adjustment of running belt
Allreadmills have adjusted the running beld’s ension before they leave the factory, but after a period ofuse,the running belt willtill be loose. The specific form of expression is: unning in normal use: with a sop slip When this ‘adjust the running belt bolt left
and right synchronously according 1o the clockwise direction with halfa circle s the unit.
Note: when adjusting the running bel, it is notallowed t0 adjust the
running belt 100 tightly, which shallbe subject 0 the normal use of running
belt without slpping. If the runing belt s adjusted 100 tightly, the aging of
the running bet will be accelerated, the mtor load will be increased, and the
servicelfe
of the bearing will be shartened.
- Deviation adjustment of running belt
All readiills have adjusted the running belt deviation before they leave the factory, but after a period of use, the runming belt deviation may oceur, which may be caused by the following sitati
(1) the main part i not placed stably.
(2)the usersfeet are not in the center of the running belt when excrcising.
(3) uneven force on the usersfeet.
“The deviation caused by human fictors will sutomaticaly rctur to normal aflr several minutes of no-load operation. For some deviation» that cannot be recovered adjust the belt screw by half atum, and the specifc operation is as follows:
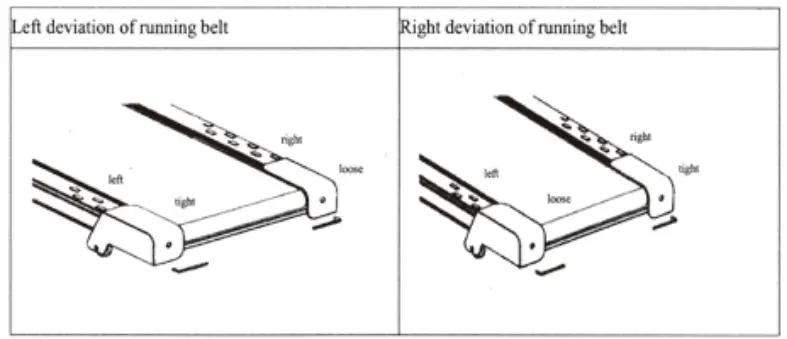
Note: Running belt devistion is not coered by warranty, and is mainly
maintained and maintained by users according to the instructions.
The deviation will seriously damaie the running belt and affect its service
life. Please adiust in time when it occurs.
Instalason Insiractions
-
Open the package, ke out the asscmbly msterals in bout, and lay the main part cm the ground:
-
Standing angle original stateis 0 degrees
-
Rotate the left and right standing angles by 90 degrees, as shown in the figure.
-
Insert the bols individually into the holes above the standing angles as shown in the figure.
-
You will be given a 5 degree incline treadmill. Plug in the power supply and use it.‘Use the remote controliér to start the machine and adjust the speed.
After-Sale Service
Our customer service is friendly and hassle- free, please feel free to contact
us if you have any issue:
1 Refund or Replacement
1 Technical Support
1 Package not in perfect condition
10rders out of Amazon Return
Please contact us in your Buyer Center by sending a message on line with order
ID.
Key functions
Start key:
‘When the treadmill is stopped, press the on/off key, the speed display will
show “1.0” and the treadmill will start. The treadmill will run for 99 minutes
and stop automatically. When the treadmill is running, press the on/off key,
all the data will be cleared to zero, the treadmill will return to manual mode
after it stops, and the treadmill will stop.
Program key:
“P” is the program key. In standby mode, press this key to cycle from manual
mode “1.0” to automatic program P1 – P10; manual mode is the default running
mode of the system, the default speed of manual mode is 1km/h, the maximum
running speed is 8km/h.
Mode key:
“M” is the mode key. In standby mode, press this key to cycle through 3
different countdown modes: H-1 for time countdown mode, H-2 for distance
countdown mode, H-3 for calorie countdown mode; when selecting various modes,
you can use the speed plus and minus keys to set up the relevant countdown
values, and press the “switch” key to start up the treadmill after the setting
is completed. After setting, press ” On/Off ” button to start the treadmill.
Display Functions
Speed display
Displays the current running speed value.
Time display
Displays the running time in manual mode or the countdown of the running time
in mode and program.
Distance Display
Displays the distance accumulated in manual and program mode or the countdown
of the running distance in mode.
Calorie Display
Displays calorie accumulation during exercise in manual and program mode or in
mode running calorie countdown.
Each setting displays the range of the data:
| TIME: 0:00 – 99 (MIN) | DISTANCE: 0.00 – 99(KM) |
|---|---|
| CALORIES: 0.0-999 (KC) | SPEED: 1.0 – 8.0(KM/H) |
Parameter settings in 3 modes
The countdown interval setting is initially 30:00 minutes, the setting range
is 5:00—99:00 minutes, step 1:00.
Countdown distance setting initial distance is 2.0 kilometers, set range is
1.0–99.0 kilometers, step 1.0.
Countdown calorie setting inital calorie is: 50 keal, setting range is 20999
keal, step 10.
‘The cycle switching sequence is: manual, time, distance, calories.
Automatic program:
The default setting of the run time is 10 minutes, s the run time afier
selecting the program, the program segment of cach program s divided into 10
segments, and the run time of cach program segment is evenly distributed.
Afier the running time is completed, the motor stops and the meter s cleared
to zero. The following s the motion diagram of 10 programs.
| Program | Run-time of Each Segment |
|---|---|
| 1 | 2 |
| P1 | SPEED |
| P2 | SPEED |
| P3 | SPEED |
| P4 | SPEED |
| P5 | SPEED |
| P6 | SPEED |
| P7 | SPEED |
| P8 | SPEED |
| P9 | SPEED |
| P10 | SPEED |
CONTACT US
We are delighted to assist you with any questions or concerns you may have
about our products. Our customer service team is dedicated to ensuring your
satisfaction and providing the information you need. Please feel free to reach
out to us at WAULKINservice@outlook.com.
We are available to answer your inquiries and provide guidance throughout your
shopping experience.
Your feedback is valuable to us, and we appreciate the opportunity to serve
you better. Don’t hesitate to contact us.
Read User Manual Online (PDF format)
Read User Manual Online (PDF format) >>