PLATINUMEDGE 02-110 Car Headlight Restoration Kit User Guide
- June 17, 2024
- PLATINUMEDGE
Table of Contents
![]()
PLATINUMEDGE 02-110 Car Headlight Restoration Kit

PREPARING THE LENS AND THE DRILL
- Clean the lens with soap and water.
- Protect trim and painted surfaces around the headlight lens with masking tape. Damage can occur if these surfaces are not protected. To reduce the amount of masking and to have better access to the headlight lens, open the hood. If you hit any painted areas while sanding, stop and add additional masking tape to protect that area.
- Dry sand the lens with 3 in sanding discs.
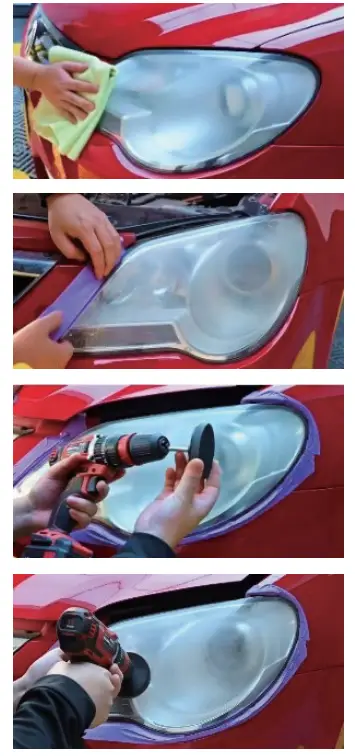
REMOVAL OF THE YELLOWED LAYER AND DEFECT
- Attach and center the P320(or P500) purple grit sanding discs abrasive disc to the buffing polish pads.
- Using medium to light pressure, begin sanding to remove the yellowing and surface defects from the lens. When the disc is clogged or no longer sanding effectively, replace with a new P320(or P500) purple grit sanding discs.
- Wipe off the lens and inspect to ensure all the yellowing and defects have been completely removed. If yellowing, defects, or portions of the surface coating still exist, continue sanding with P320(or P500) purple grit sanding discs until they are completely removed.
REDUCING SAND SCRATCHES
-
Remove the P320(or P500) purple grit sanding discs. Attach and center a P600(or P800) purple grit sanding discs abrasive disc to the buffing polish pads.
-
Using medium to light pressure, begin sanding to reduce the sand scratches from a P320(or P500) to a P600(or P800) grit scratch.
-
Wipe the lens, notice the scratches are finer. If any coarse scratches are visible, continue sanding that area with the P600(or P800) purple grit sanding discs until the coarse scratches are reduced.
-
Remove the P600(or P800) purple grit sanding discs. Attach and center a P1000(or P2000 P3000) orange grit high-precision waterproof sanding disc abrasive disc to the buffing polish pads.
-
Using medium to light pressure, begin sanding to reduce the sand scratches from a P600(or P800) to a P1000(or P2000, P3000) grit scratch.
-
Wipe the lens, you will notice the scratches are much finer and the lens appears somewhat clear. If any coarse scratches are visible, continue sanding with the P3000 disc.
POLISHING THE LENS
- Remove the P3000 disc. Attach and center the orange buffing sponge pad.
- Dispense a quarter-sized amount of Rubbing Compound onto the orange pad as pictured. Smear the compound around the surface of the headlight lens.
- Completely remove the P3000 sanding scratches using with a 3 inch foam compounding pad and a polishing tool.
- Remove the masking tape and Wipe the headlight lens with a clean microfiber cloth.
Product direction video on Amazon
Documents / Resources
|
PLATINUMEDGE 02-110 Car Headlight Restoration
Kit
[pdf] User Guide
02-110, 02-110 Car Headlight Restoration Kit, Car Headlight Restoration Kit,
Headlight Restoration Kit, Restoration Kit, Kit
---|---
Read User Manual Online (PDF format)
Read User Manual Online (PDF format) >>