Groudchat 2BEO6U2 u2 Visual Online Camera User Guide
- June 16, 2024
- Groudchat
Table of Contents
2BEO6U2 u2 Visual Online Camera
User Guide
2BEO6U2 u2 Visual Online Camera
Welcome to our camera!
Please read the following manual carefully before use to ensure proper
operation and product safety.
https://a.app.qq.com/o/simple.jsp?pkgname=com.macrovideo.v380pro
Scan the QR code below to download the V380Pro APP
Way of wearing
One-piece installation on the right side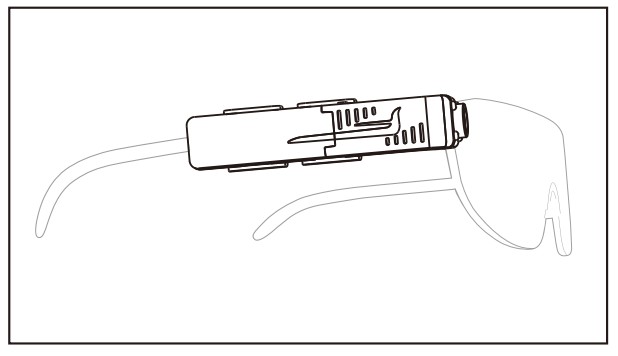 The battery and the
device can be worn on either side
The battery and the
device can be worn on either side
Introduction to devices of Online Camera

| 1 | Ventilation |
|---|---|
| 2 | Lens |
| 3 | Night Version Light |
| 4 | Reset hole |
| 5 | Eyeglass clip |
| 6 | Battery |
| 7 | One-click Call |
| 8 | TF Card Slot |
| 9 | Type-C Port |
| 10 | Reset Pin |
| 11 | Type-c extension cable |
**Instructions of download the application
**
As shown in the picture, scan the QR code below with your phone to download the app. Install and V380 Pro register. Network Connection and Usage Tutorial
Connecting the battery to the camera port, you will hear the prompt “Device is
starting, please wait.” When you hear “Please scan the QR code on the device
using your phone,” the device is ready to power on, and you can proceed to the
next step for connection.
AP Hotspot Mode (Short-range mode)
In “Nearby Mode”, the product can be used without an internet connection,
allowing users to view the footage captured by the recorder in real-time. It
also enables video recording and photo capture functions.
Connect the battery to the camera, the device will automatically power on when
plugged in. Please wait until you hear “Please scan the QR code on the device
using your phone.” The Nearby Mode startup will be successful. Open your
phone’s Wi-Fi list,Connect to the Wi-Fi signal starting with “HSC_*,” for
example, “HSC_74205422.” Make sure that your phone’s location services are
turned on. Open the V380 Pro APP application, on the
device list interface, pull down to refresh, and the prompt “Discover Device”
will appear. Click on “Add Device.” Alternatively, click on “Add Device” and
enter the device ID to add it.
Open the V380 Pro APP application, on the
device list interface, pull down to refresh, and the prompt “Discover Device”
will appear. Click on “Add Device.” Alternatively, click on “Add Device” and
enter the device ID to add it. If the pull-down refresh does
not trigger a dialogue box, please check if the network has automatically
switched to another Wi-Fi signal. After switching back to the device signal,
refresh again and wait for 10 to 30 seconds.
If the pull-down refresh does
not trigger a dialogue box, please check if the network has automatically
switched to another Wi-Fi signal. After switching back to the device signal,
refresh again and wait for 10 to 30 seconds.
After adding the device, you will be prompted to use the local network
connection mode. Click “OK” to confirm. The interface will switch to entering
the security password. The security password is located beneath the QR code on
the back of the device. Please pay attention to differentiate between uppercase
and lowercase letters. Set a new password according to the prompt, and the AP
hotspot mode installation will be successful. WiFi Router Mode (Remote
Mode)
In Remote Mode, you can easily share with multiple users, enabling remote
synchronized viewing and intercom functions. You can also view the camera’s
footage in real-time and utilize video recording and photo capture features.
After the device has successfully powered on, open the V380pro APP, click on
the top-right corner on the “+” icon, then click on “Add Device.” Scan the QR
code on the device to enter the network configuration page. If you don’t hear
the scanning prompt, long-press the reset hole for 3-5 seconds until you hear
“Reset successful.” Wait for a few seconds, then, when you hear “Please scan
the QR code on the device using your phone,” proceed with the operation again.
After scanning the QR code, enter the network configuration page. Input the Wi-
Fi network name and password you want to use.You can also enter the mobile
phone’s own hotspot account and password.and once you’ve confirmed the input is
correct, click on “Confirm” or “OK.” Use the product to scan the QR code on the
phone’s screen. When you hear ‘You can start using it now,’ click ‘I hear the
success prompt sound. Wait for the device to connect to the network. During
this period, avoid clicking “Back” or performing other operations, as it may
result in a failed connection.
Once the connection is successful, the page will automatically redirect to the
app’s home screen. Click the central play button to start viewing the footage
captured by the camera. Note on Network Connection Failure: If the connection
fails, try long pressing the reset button on the camera and attempt to connect
again.
Ensure your phone and Wi-Fi network are functioning properly.
Verify that the entered password is correct.
If the connection times out, double-check the Wi-Fi account and password for accuracy.
When the Wi-Fi environment changes, it is necessary to reset and restart.
Afterward, follow the steps above to reconnect.
Team collaboration mode(Remote Mode)**
This mode enables remote operation guidance functionality, using the mobile
hotspot s a WiFi router in remote mode.
 Leader’s phone could pair and connect with multiple cameras.
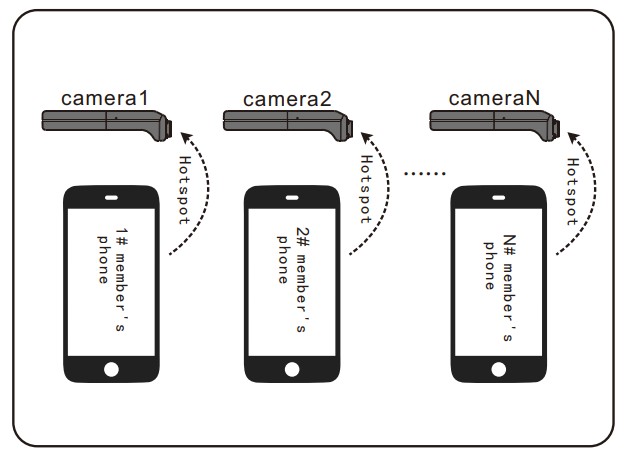 Team members bring cameras when going
out.
Team members bring cameras when going
out. Just the leader’s mobile phone can view
the scenes captured by each team member’s camera,but the member’s phone can’t
see the viewing by their own mobile phone.
Just the leader’s mobile phone can view
the scenes captured by each team member’s camera,but the member’s phone can’t
see the viewing by their own mobile phone. Leader’s mobile
phone share the member’s camera viewing to their mobile phones separately ,and
let them to see it.
Leader’s mobile
phone share the member’s camera viewing to their mobile phones separately ,and
let them to see it.
Other Features
One-click call.
Press the one-touch call button on the camera to send a notification to the
leader’s phone. Share Device
Both the main phone and the shared phone need to be registered with an account
in V380 pro Click the menu button , then select ‘Share.’ Enter the friend’s
account and proceed to add the sharing . Remove Device Click the menu button ,
then select ‘Delete’ to remove the device or reinstall if necessary.
Settings
The specific settings for the camera, such as changing password, recording,
alarm, language, IP, etc. Memory Card
When inserting the memor y card, ensure the gold contacts are facing down and
insert it into the card slot.When installing or removing the TF card, make
sure to disconnect the camera’s power first. Please use a TF card produced by
a reputable manufacturer, with a minimum read/write speed of U1/Class 10.
While it is possible to use the camera without a TF card, it won’t save
videos, and the playback feature will be disabled. It is recommended to
install a TF card for optimal usage. The playback funct ion requ i res d i
sconnecting and reconnecting the power for the first use to display.
Cloud Storage Binding
A cloud storage plan can only be linked to one camera device.
Fault Diagnosis
Video Lag/Network Connection Failure
The remote monitoring is not smooth. Check the current network status and
select the appropriate resolution based on the current network environment.
Ensure that the network is normal in the installation environment, especially
outdoors. Check whether the Wi-Fi coverage is adequate, place the device close
to the Wi-Fi router, and verify the correctness of the Wi-Fi account and
password.
If forget password
If you accidentally forget the password, please longpress the device reset
hole to restore factory settings and reinstall the login password.
Temperature Instructions:
The On-line camera will emit heat during use, which is normal and will not
affect the functionality.
Installation Instructions:
Please read the user manual for installation guidance carefully. If you are
not sure, feel free to contact with our customer service.
Other Notes:
Due to iterative updates, differences in packaging appearance and operational
features in the manual are considered normal.
Disclaimer
- Any accidents and resulting losses caused using the product are not the responsibility of our company, and we do not assume any legal liability for such incidents.
- This product is strictly prohibited from being illegally modified and should not be used for shooting, producing, copying, publishing, disseminating, or engaging in any illegal content with reactionary, pornographic, violent, obscene, voyeuristic, or similar nature. If you violate the law i n th i s regard, our company declares no lega l responsibility for such actions.
- This product solely provides a platform for image display and communication. We are not responsible for the accuracy, authenticity, legitimacy, or legality of its content, and we do not assume any legal responsibility.
- Any organization or individual who believes that the use of this product may infringe upon their image rights, our company assumes no legal responsibility for such claims.
- This product is intended solely for normal operation, device maintenance, and similar auxiliary uses. We disclaim any responsibility for any illegal activities and assume no legal liability.
Specifications
| Product model | U2 |
|---|---|
| Size | 95mm18mm14mm |
| Weight | 27g(Excluding clip) |
FPS (Frames
per second)| (1280*720P) : 25FPS
Streaming| H.264
Recording Field of View (Horizontal)| 72°
Effective night vision distance| 3-5meters
Number of Night Version Lights| 4pcs F3 940nm Infrared Lights
WIFI Fixed Frequency| 2.4G
Loop Recording
Function| Available
Daytime Vision Recording Power Consumption| z-;21 OmAh at 5V
NightVision Recording Power Consumption| z310mAh at 5V
Audio Pickup Distance| 3-5meters
Speaker| Available
Wi-Fi Connection Range| Within 30 meters (open with out interference or
obstruction)
Point-to-Point Distance| Within 30 meters (open with out interference or
obstruction)
Video Format| AVI
Brand| Groudchat
Visual online camera
Machine Body QR Code and Password
Very Important! Please Keep!
FCC warning:
1. This device should be installed and operated with minimum distance 20cm
between the radiator&your body.
2. This device complies with part 15 of the FCC Rules. Operation is subject
to the following two conditions:
- This device may not cause harmful interference, and
- This device must accept any interference received, including interference that may cause undesired operation.
- Changes or modifications not expressly approved by the party responsible for compliance could void the user’s authority to operate the equipment.
- This equipment has been tested and found to comply with the limits for a Class B digital device, pursuant to part 15 of the FCC Rules. These limits are designed to provide reasonable protection against harmful interference in a residential installation. This equipment generates, uses and can radiate radio frequency energy and, if not installed and used in accordance with the instructions, may cause harmful interference to radio communications. However, there is no guarantee that interference will not occur in a particular installation. If this equipment does cause harmful interference to radio or television reception, which can be determined by turning the equipment off and on, the user is
- Reorient or relocate the receiving antenna.
- Increase the separation between the equipment and receiver.
- Connect the equipment into an outlet on a circuit different from that to which the receiver is connected.
- Consult the dealer or an experienced radio/TV technician for help.
Read User Manual Online (PDF format)
Read User Manual Online (PDF format) >>