XFARM xSense Pro Temperature Weather Station User Guide
- June 14, 2024
- XFARM
Table of Contents
XFARM xSense Pro Temperature Weather Station User Guide

Box contents


Fixing kit
A) 15 X Bird deterrents
B) 4 X Fixing screws
C) 1 X Rod fixing kit
D) 2 X Threaded U
E) 1 X Bracket
F) 2 X Bolt set
G) 2 X Short plastic tie
H) 1 X Long plastic tie

I) Allen Wrench
Assembly and installation guide: assembly steps

Place all components of xSense Pro on a flat surface and start assembling.
The first thing to do is to insert the rod into the bracket as shown.
Fasten the rod to the bracket using fastening kit C) and a screwdriver

Secure the cable to the bracket as shown.
Lean the anemometer blades against their seat and, using the supplied Allen
screw I), fasten it to the axle, ensuring that it turns freely without
friction.

Insert the bird deterrent needles into the respective holes on the
circumference of the cone, if necessary use a small hammer

At this point we are ready to go into the field and install the xSense Pro.
To do this, we need:
-
Metal pole of approximately 3 metres with a diameter of 30 – 44 mm (40 mm recommended)
-
Auger 10-15 cm in diameter and at least 50 cm long
-
Rubber gavel

-
Spanner 11
-
Compass, to orient the xSense sensor assembly correctly (e.g. mobile phone app)
-
Spirit level (mobile app can be used)
-
Screwdriver
Assembly and installation guide: field installation
Choice of Installation Site.
It is advisable to install xSense in an area that is representative of the
farm from a morphological and environmental point of view.
- Install xSense as far as possible from buildings, artefacts, hedges, trees, watercourses or other topographical elements that may influence/disturb the correct collection of data.
- Install xSense away from obstacles that exceed its height; having taller obstacles nearby could distort anemometric and rainfall data.
- x Sense must be installed out of the way of agricultural vehicles in order to avoid possible damage.
- x Sense should be installed between 1.5 and 3.0 metres above the ground (preferably grass).
- x Sense should be installed in a place where there is good cellular network coverage.
After identifying the right place, we drill the hole with the drill in order
to firmly fix the metal pole.
It is important that the pole is positioned perfectly level in order to not
receive incorrect data
To attach it to the pole, the collector cone must first be removed.
To do this, the base cone of the station must be turned anti-clockwise.
Note: When new, the cone fits tightly to the base and may require
additional pressure.

After having positioned the pole perfectly level, we move on to fixing the x
Sense Pro.
We then use the supplied fixing kit.

As with the pole, it is important that the x Sense Pro is also fixed perfectly
level, and the level inside the sensor can be used to do this.

When fastening also make sure that the xSense has the photovoltaic panel
facing south and the pole facing north.
Finally, secure the anemometer wire to the pole using the clamps provided.
After attaching xSense to the pole, we can close it by placing the collector
cone in the appropriate slot and turning it clockwise to lock it.

Assembly and installation guide: accessories
xCam
In the case of xSense installation with xCam, the latter will arrive already
connected to the Gateway, so simply fix it to the same pole using the vertical
bracket and choose the framing that best suits the crop.
After switching on the xSense for the first time the xCam will take a picture
to determine the correct framing.

When selecting the xSense Pro sensor + accessories in the xFarm app, during
installation, if the xCam is factory connected to the Gateway it will be
automatically recognised so it will not be present in the list combined with
the xSense Mini.
xLeaf (foliar wetting sensor)
In case of xSense installation with xLeafs it will be necessary to fix it to
the pole with the bracket and clamps provided.

Install sensor and wire at a minimum of 1 metre from the ground with the tip
pointing North and the raised part upwards.
Cleaning and Maintenance
The sensor must be cleaned periodically using a cloth moistened with just water.
If the sensor is used in extremely sunny areas with unusually high radiation loads, the application of McNett UV protection is recommended.
To apply McNett UV Technology:
- Clean the sensor with water and a clean, soft cloth.
- Spray a soft cloth with UV Tech spray.
- Wipe both sides of the sensor surface with a damp cloth to apply protection
Download the xFarm app to create your account and connect xSense

Or scan the QR code from
your smartphone
After fixing xSense Pro you will need to enter it into the xFarm App.
There are 2 ways to do this:
METHOD 1 – QR Code
Scan the QR code located under and inside the connection box.

METHOD 2 – Serial Number
Enter the serial number found under and inside the connection box manually in
the app.

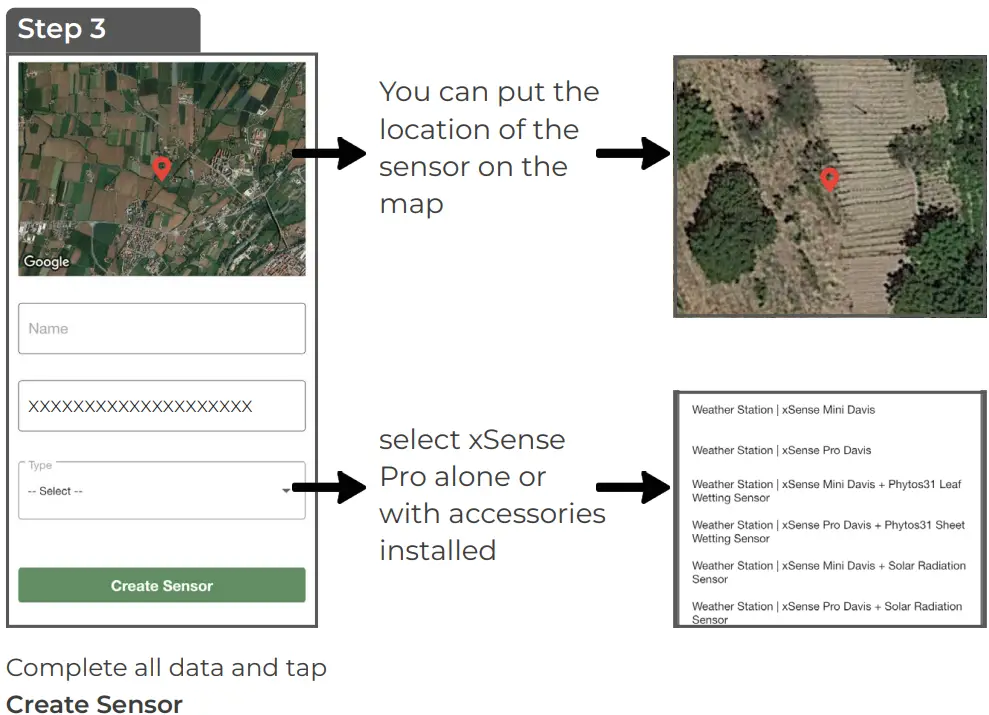
Assembly and installation guide: field configuration
-
Scanning the QR code (recommended)

In the menu select Sensors

From the button select New Sensor
-
Writing the Serial Number by hand

In the menu select Sensors

From the button select New Sensor

Powering up the xSense

To switch on xSense Pro we need to open the connection box panel then
proceed as follows:
-
lift up the tab at the base of the cover
-
slide the cover upwards, matching the alignment indicators on the side of the box
-
pull the cover towards you to lift it out of the box.
-
with the connection board in front connect the battery cable where the arrow points to power up the xSense Pro

-
press the RESET button
-
the LED will start flashing quickly and after a maximum of 5 minutes
it will switch off.
Assembly and installation guide: cleaning xSense Pro
Cleaning xSense Pro
It may happen that the rain gauge returns abnormal data, in which case one
possible cause is dirt and debris in the cone or on the rain gauge which is
located under the collector cone.
To clean it, therefore, proceed as follows:
-
remove and clean the filter located at the end of the cone
-
clean the water inlet hole at the base of the cone

-
Open xSense by pressing counterclockwise on the collector cone and clean the rain gauge spoon.
-
Close xSense by pressing the manifold cone clockwise and screwing the rain gauge filter back down.

**xFarm Support**
Email: info@xfarm.ag
Live chat in app
Tel IT: +39 0142 276 433
Tel ES: +34 9100 32
Read User Manual Online (PDF format)
Read User Manual Online (PDF format) >>