TenoTacSoft P42-STG-0002 Tissue Fixation System User Guide
- June 13, 2024
- TenoTacSoft
Table of Contents
- PRODUCT DESCRIPTION
- IMPLANT FEATURES
- INSTRUMENTATION
- K-WIRE PLACEMENT
- INCISION/EXPOSURE
- DRILLING/COUNTERSINKING
- PLANTAR TACK IMPLANT INSERTION
- DORSAL SLEEVE IMPLANT INSERTION
- DORSAL SLEEVE IMPLANT INSERTION
- CONFIRMATION OF IMPLANT POSITION
- CLOSURE
- TENOTAC® SOFT TISSUE FIXATION SYSTEM CADDY
- INDICATIONS FOR USE
- CUSTOMER SUPORT
- References
- Read User Manual Online (PDF format)
- Download This Manual (PDF format)
TenoTacSoft P42-STG-0002 Tissue Fixation System

PRODUCT DESCRIPTION
The Paragon 28® TenoTac® Soft Tissue Fixation System was developed to provide
surgeons an alternative
fixation option for flexible hammertoes, mallet toes or claw toes.
Additionally, the TenoTac® System was
designed to supplement fixation of rigid hammertoes and plantar plate repair
by providing stabilization of the
metatarsophalangeal (MTP) joint in the sagittal and transverse planes. The
system allows the surgeon to select
whether only the flexor digit rum brevis (FDB) tendon, flexor digit rum longus
(FDL) tendon or both are “tacked” down against the proximal phalanx, depending
on deformity. Medial and lateral tendon tensioning can be performed to correct
transverse plane deformity prior to securing the implant.
Examples of use include:
-
Replacement for Girdle stone-Taylor procedure for flexible hammertoes

-
Used in conjunction with proximal interphalangeal joint (PIPJ) arthroplasty to stabilize the metatarsophalangeal joint

-
Used in conjunction with PIPJ arthrodesis to stabilize the metatarsophalangeal joint

-
Combined with plantar plate repair to bolster the repair and correct the digital deformity

-
Used as a sole implant to correct flexible claw toe

-
Used as a sole implant to correct flexible mallet toe

IMPLANT FEATURES
Dorsal Sleeve:

INSTRUMENTATION
TenoTac® Standard Sterile Packed Kit (Standard Kit Specific Instruments)
 Ø0.9 mm K-wire
 Ø1.1 mm K-wire
 Ø2.8 mm Cannulated Drill/Standard Countersink with Handle
 Plantar Tack Inserter
Dorsal Sleeve Driver
 Dorsal Sleeve Standard Length Gauge
K-WIRE PLACEMENT
The procedure shown demonstrates repair of a flexible hammertoe deformity,
with “tacking” down of the
medial and lateral slips of the FDB tendon and a portion of the central FDL
tendon, using a sterile standard caddy configuration.

INCISION/EXPOSURE
Make a small, dorsal incision at the entry point of the K-wire, approximately 5-7 mm in length, to allow exposure of the extensor tendons. Perform blunt dissection to bone, to allow for Drill penetration and Dorsal Sleeve placement.
A longitudinal plantar incision is made on either side of the K-wire, allowing for adequate access to the flexor tendons and the plantar surface of the base of the proximal phalanx.
Continue plantar dissection around the K-wire to expose the FDL and FDB tendons. The FDL tendon can be retracted medially or laterally, or split longitudinally at its median raphe (shown) to allow for retraction of the FDL and FDB tendons medially and laterally, exposing the base of the proximal phalanx.
DRILLING/COUNTERSINKING
Connect the provided Drill/Countersink to the AO Handle. Insert from the
plantar aspect of the foot and rotate the Drill clockwise, by hand, bi-
cortically through the proximal phalanx.
The Drill portion will exit the dorsal incision.

Rotate the Drill/Countersink approximately 3 times once the Countersink contacts the bone to allow for adequate countersinking of the proximal phalanx. Remove the Drill/Countersink from the plantar incision. A hemostat can be placed dorsally to hold the K-wire in the drill hole and subsequently guide the Plantar Tack insertion.
Optional : To maintain extension of the interphalangeal joints and tension of the flexor tendons during insertion of the TenoTac, insert a Ø1.1 mm or larger provisional K-wire from the distal portion of the distal phalanx through the middle phalanx and halfway into the proximal phalanx to hold the proximal interphalangeal joint (PIPJ) in the corrected position while performing the subsequent steps of implant insertion.

OPTIONAL: PROVISIONAL SUTURE TENSIONING OF FLEXOR TENDONS
NOTE: This optional approach brings the slips together and allows for
tensioning of the tendons distally before tightening the implant.
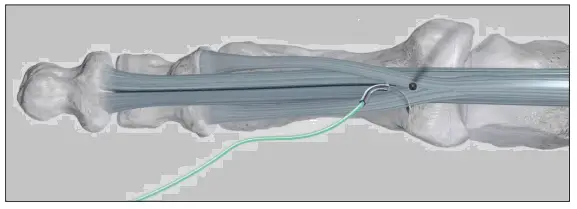
Pass the suture needle through the flexor tendons distal to the position of the K-wire/drill hole and from the plantar to dorsal aspect.

Wrap the suture around the flexor tendons.

Pass the suture needle through the flexor tendons from the dorsal to plantar aspect.

NOTE: Ensure both suture ends are similar in length.
For the suture, refer to the manufacturer’s labeling for proper use and
handling.

To secure the flexor tendons, pull both suture ends tightly.

During placement of the TenoTac, pull the suture strands distally and place the Plantar Tack proximally to the suture loop.

PLANTAR TACK IMPLANT INSERTION
Remove retraction of the tendons.
The Plantar Tack comes pre-loaded on the Plantar Tack Inserter with the Thread
Sleeve placed over the Plantar Tack.
Insert the wire of the Plantar Tack Inserter through the bone tunnel, using
the K-wire as a guide. Remove K-wire while inserting Plantar Tack.

As the Plantar Tack portion of the implant nears the bone, the surgeon should ensure that the desired tendons to be “tacked” down to the proximal phalanx are between the Plantar Tack implant and the proximal phalanx.

Once the Plantar Tack has been inserted, remove the Threaded Sleeve dorsally using a hemostat.

DORSAL SLEEVE IMPLANT INSERTION
Place the Dorsal Sleeve Length Gauge over the wire of the Plantar Tack Inserter until contact is made with the dorsal proximal phalanx. Read the wire length on the Dorsal Sleeve Length Gauge to determine Dorsal Sleeve size. If Length Gauge lands on the line between two sizes, select the smaller of the two sizes.

Select the measured Dorsal Sleeve size. Place the Dorsal Sleeve over the wire of the Plantar Tack Inserter and push the Dorsal Sleeve Driver from dorsal to plantar until the Dorsal Sleeve enters the bone.

NOTE: Dorsal component needs to be inserted in line with the hole and manual axial pressure is needed to push it into the dorsal bone.
Relax plantar pressure on the Plantar Tack against the proximal phalanx to allow for entry of the Dorsal Sleeve , if necessary
DORSAL SLEEVE IMPLANT INSERTION
The non-dominant hand should hold the toe in the corrected position. The corrected position typically requires plantarflexion at the MTP joint to correct extension, when present at the joint. While ensuring that the desired flexor tendons are captured, push the Plantar Tack dorsally such that the tendons are captured between the Plantar Tack and the proximal phalanx.
Hold the Dorsal Sleeve Driver so that the ring handle is in plane with the long axis of the toe, confirming the Dorsal Sleeve is aligned with the longitudinal axis of the proximal phalanx.

Perform clockwise rotation of the Plantar Tack until the flat portion of the Dorsal Sleeve is contacting the dorsal surface of the proximal phalanx with the flexor tendons captured against the proximal phalanx by the Plantar Tack.
NOTE: If using provisional suture tensioning of the tendons, the suture should be pulled distally, in line with the toe, while the plantar tack is tightened. This allows for maximum correction and tensioning of the flexor tendons.
CONFIRMATION OF IMPLANT POSITION
Confirm under fluoroscopy that the plantar Tack is tight to the plantar aspect of the phalanx and that the Dorsal Sleeve is tight to the dorsal ridge. If the teeth are not engaged in bone, continue to tighten the implants until both implants are fully seated.
If appropriate tensioning and the toe position is not achieved, insert the
Plantar Tack Inserter planarly into the Plantar Tack. Insert the Dorsal Sleeve
Driver into the Dorsal Sleeve and rotate the Plantar Tack inserter
counterclockwise to loosen the grip on the flexor tendons. Reposition the
tendons under the Plantar Tack at the appropriate tension, and re-tighten the
implant by rotating the Plantar Tack Inserter in a clockwise manner.
Remove the K-wire from across the PIPJ, if used. Trim/remove suture, if used.
CLOSURE
Proceed to incision closure or concomitant procedures at this time.
IMPLANT REMOVAL
Retrieve the Plantar Tack Inserter and insert it through the Plantar Tack until the Driver portion engages the head of the Plantar Tack. Retrieve the Dorsal Sleeve Driver. Engage the Dorsal Sleeve Driver into the head of the Dorsal Sleeve, and while stabilizing the Dorsal Sleeve with the Dorsal Sleeve Driver, rotate the Plantar Tack Inserter counterclockwise until the Dorsal Sleeve implant is disengaged from the Plantar Tack.

Remove the implant and pass from the operative field. Confirm complete removal of the implant using fluoroscopy.
TENOTAC® SOFT TISSUE FIXATION SYSTEM CADDY
The TenoTac® System is available as a sterile packed kit. The sterile packed kit contains the Plantar Tack implant while the Dorsal Sleeves are provided separately in individual sterile packages.
TenoTac® Standard Sterile Packed Kit
The sterile packed kit contains the standard plantar implant pre-loaded on the
Inserter with the necessary instrumentation for insertion.
*The two Dorsal Sleeve implants are offered in individual sterile packages in Short and Long. Additional Plantar Tack implants are offered in individual sterile packages.
INDICATIONS FOR USE
The TenoTac® Soft Tissue Fixation System is intended to be used for soft tissue to bone fixation
Specific indications for the TenoTac® include:
- Foot & Ankle: Medial/lateral repair and reconstruction, mid and forefoot repair, hallux valgus repair, hallux malleus repair and reconstruction, metatarsal ligament/tendon repair and reconstruction including plantar plate attenuation and tear, and the correction of hammer toe, claw toe, mallet toe, crossover toe, floating toe, and any other lesser toe deformities, correction of metatarsophalangeal joint instability due to shortening from interphalangeal fusion, correction of metatarsophalangeal joint instability due to shortening from Weil osteotomy, Achilles tendon repair.
- Hand & Wrist: Collateral ligament repair, Scapholunate ligament reconstruction, tendon transfers in phalanx, Volar plate reconstruction.
CONTRAINDICATIONS
The Paragon 28® TenoTac® Soft Tissue Fixation System implants are not designed or sold for any use except as indicated. Use of the TenoTac® Soft Tissue Fixation System is contraindicated in the following situations:
- Active, suspected or latent infection in the affected area
- Patients who are physiologically or psychologically inadequate
- Patients previously sensitized to titanium
- Insufficient quantity or quality of bone or soft tissue to permit stabilization, conditions that retard healing (not including pathological fractures) and conditions causing poor blood supply
- In patients where there is a possibility for conservative treatment
- Indications not included in the INDICATIONS FOR USE
POTENTIAL COMPLICATIONS AND ADVERSE REACTIONS
In any surgical procedure, the potential for complications and adverse reactions exist. The risks and complications with these implants include:
- Loosening, deformation or fracture of the implant
- Acute post-operative infections and late infections with possible sepsis
- Migration, subluxation of the implant with resulting reduction in range of movement
- Fractures resulting from unilateral joint loading
- Thrombosis and embolism
- Wound hematoma and delayed wound healing
- Temporary and protracted functional neurological perturbation
- Tissue reactions as a result of allergy or foreign body reaction to dislodged particles
- Corrosion with localized reaction and pain
- Pain, a feeling of malaise or abnormal sensations due to the implant used
- Bone loss due to stress shielding
All possible complications listed here are not typical of Paragon 28®, Inc. products but are in principle observed with any implant. Promptly inform Paragon 28®, Inc. as soon as complications occur in connection with the implants or surgical instruments used. In the event of premature failure of an implant in which a causal relationship with its geometry, surface quality or mechanical stability is suspected, please provide Paragon 28®, Inc. with the explant(s) in a cleaned, disinfected and sterile condition. Paragon 28®, Inc. cannot accept any other returns of used implants. The surgeon is held liable for complications associated with inadequate asepsis, inadequate preparation of the osseous implant bed in the case of implants, incorrect indication or surgical technique or incorrect patient information and consequent incorrect patient behavior.
WARNINGS AND PRECAUTIONS
-
Re-operation to remove or replace implants may be required at any time due to medical reasons or device failure. If corrective action is not taken, complications may occur.
-
Use of an undersized implant in areas of high functional stresses
may lead to implant fracture and failure. • Implants, wires, or other appliances of dissimilar metals should not be used together in or near the implant site. -
The implants and K-wires are intended for single use only.
-
Instruments and implants are to be treated as sharps.
-
Do not use other manufacturer’s instruments or implants in conjunction with the TenoTac® Soft Tissue Fixation System.
-
Do not desterilize the sterile packaged TenoTac® Soft Tissue Fixation System implants and instruments. The sterile packaged implants and instruments are intended for single’s only.
MR SAFETY INFORMATION
The TenoTac® Soft Tissue Fixation System has not been evaluated for safety and
compatibility in the MR environment. It has not been tested for heating,
migration, or image artifact in the MR environment.
The safety of the TenoTac® Soft Tissue Fixation System in the MR environment
is unknown. Scanning a patient who has this device may result in patient
injury.
CUSTOMER SUPORT
P42-STG-0002 Reva [2022-05-15] ™Trademarks and ®Registered Marks of Paragon
28®, Inc.
© Copyright 2022 Paragon 28®, Inc. All rights reserved.
Patents: www.paragon28.com/patents
Paragon 28, Inc.
14445 Grasslands Dr.
Englewood, CO 80112 USA
855-786-2828
DISCLAIMER
The purpose of the TenoTac® Soft Tissue Fixation System Surgical Technique
Guide is to demonstrate the optionality and functionality of the TenoTac®
implants and instrumentation. Although variations in placement and use of the
TenoTac® implants can be performed, the fixation options demonstrated in this
technique were chosen to demonstrate the functionality of the system and for
simplicity of explanation. Other uses for the TenoTac® screws can be employed,
appropriate for the size of the device.

References
Read User Manual Online (PDF format)
Read User Manual Online (PDF format) >>