LITE THE NITE LiteMountA LiteTouch PRO Wall Mount Instruction Manual
- June 13, 2024
- LITE THE NITE
Table of Contents
LITE THE NITE LiteMountA LiteTouch PRO Wall Mount

Thank you!
Thank you for choosing the Lite Touch and Lite Touch Pro wall mount for your display panel installation.
The mount can be configured in landscape or portrait orientation.
To install your panel in landscape orientation, complete steps 1 thru 8 of this manual.
To install your panel in portrait orientation, complete steps 10 thru 15.
Features
| | |
---|---|---|---
Installation Overview
- Assemble the wall bracket for a landscape or portrait installation
- Mount the wall bracket at the desired mounting location
- Attach the panel brackets to the display panel
- Lift the panel onto the top rail of the wall bracket
- Snap the bottom of the panel onto the wall bracket
- Level the display panel using the lateral adjustment screws
Package Content


Installation Instruction
Landscape Installation
Below is an example of the assembled wall mount bracket configured for a
landscape installation
VESA MAX 800X600
Assemble The Wall Mount Bracket
Attach the center wall mount bracket to the left wall mount bracket and right
wall mount bracket using washers (D) and nuts as shown.

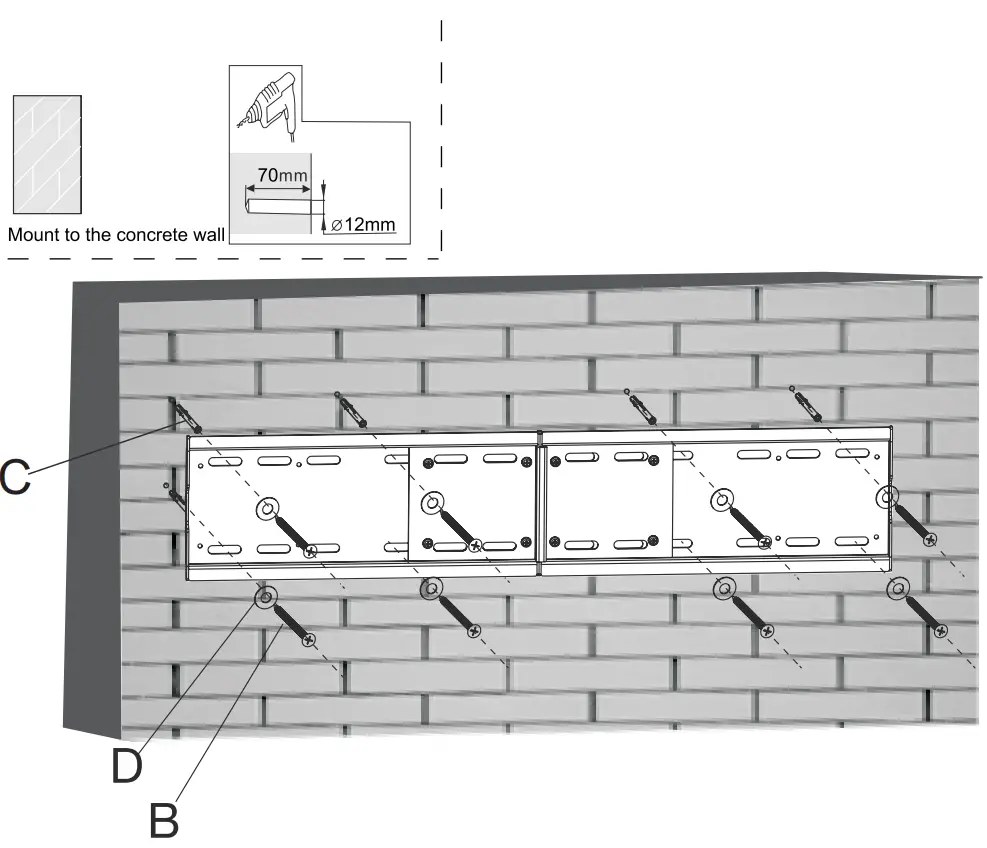
Solid Brick and Concrete Block Landscape Mounting
A. Drill a 15/32″ hole 2 3/4″ deep at each of the mounting locations and
insert the plastic anchors (C)
B. Attach the wall mount bracket to the wall using screws(B) and
washers(D)
NOTE:
Attach the wall mount bracket using at least 8 screws.
Wood Stud Landscape Mounting
A. Locate the wood studs in the wall and mark the stud centers. Be sure
to attach wall mount to at least 2 studs
B. Drill a 3/16″ pilot hole at each of the mounting locations in the
center of the stud
C. Attach the wall mount bracket to the wall using screws(B) and
washers(D)

Attach The Panel Brackets To The Display Panel
A. Install the panel brackets to the Correct Incorrect rear of the display
panel with the “hook” up as shown below using screws (A) and washers(D).
Tighten screws (A) with allen wrench(E)
NOTE:
Install spacers(G) if your display panel has a recessed back. Be sure the
mount is attached as shown.


Attach The Display To The Wall Mount
NOTE:
This step should be completed with 2 people due to the weight of the display
panel
A. Lift the display panel above the wall mount and lower the panel
bracket hooks onto the top of the wall mount
B. Push the bottom of the display toward the wall mount until it “snaps”
into place
C. If the quick release strings are hanging beneath the display panel,
place the magnetic knobs on the mount to keep the strings out of sight.

Level The Display Panel
Level the display panel using a long phillips screwdriver to turn the lateral
adjustment screws in the top of panel brackets as shown below
Tip:
Raise the low side of the display panel first.

Adjust Display Panel Tilt
Adjust the display panel tilt from -5 degrees to +10 degrees as desired. Grasp
the display panel at the top and bottom and move it to the desired angle.
Tighten or loosen the Tilt Adjustment Knobs as needed.

Congratulations! Your wall mount installation is complete.
How To Remove The Display panel From The Wall Mount Bracket
NOTE:
This should be completed with 2 people due to the weight of the display panel.
A. Pull down on both display panel quick release cables simultaneously
while pulling the bottom of the display panel away from the mounting bracket.
B. Pickup the display panel until it is free from the wall mount.

Portrait Installation
Below is an example of the assembled wall mount bracket configured for a
portrait installation using the left wall mount bracket.

Solid Brick and Concrete Block Portrait Mounting
A. Drill a 15/32″ hole 2 3/4″ deep at each of the mounting locations and
insert the plastic anchors(C)
B. Attach the wall mount bracket to the wall using screws(B)and
washers(D)

Wood Stud Portrait Mounting
A. Locate the wood studs in the wall and mark the stud centers. Be sure
to attach wall mount to at least 2 stud
B. Drill a 3/16″ pilot hole at each of the mounting locations in the
center of the stud
C. Attach the wall mount bracket to the wall using screws(B) and
washers(D)

A. Install the panel brackets to the rear of the display panel with the
“hook” up as shown below using screws(A),washers(D)and allen wrench(E)
B. Install spacers (G) if your display panel has a recessed back Be sure
the mount is attached as shown


Attach The Display To The Wall Mount
NOTE:
This step should be completed with 2 people due to the weight of the display
panel
A . Lift the display panel above the wall mount and lower the panel
bracket hooks onto the top of the wall mount
B. Push the bottom of the display toward the wall mount until it “snaps”
into place C. If the quick release strings are hanging beneath the display
panel, place the magnetic knobs on the mount to keep the strings out of sight.
Level The Display Panel
Level the display panel using a long phillips screwdriver to turn the lateral
adjustment screws in the top of panel brackets as shown below
Tip: Raise the low side of the display panel first.

Congratulations! Your wall mount installation is complete

Documents / Resources
| LITE
THE NITE LiteMountA LiteTouch PRO Wall
Mount
[pdf] Instruction Manual
55-110, 139-278cm, LiteMountA, LiteMountA LiteTouch PRO Wall Mount, LiteTouch
PRO Wall Mount, Wall Mount
---|---
Read User Manual Online (PDF format)
Read User Manual Online (PDF format) >>