WEDOLNNOV Daisy Chain Wireless Microphone User Manual
- June 10, 2024
- WEDOLNNOV
Table of Contents
- WEDOLNNOV Daisy Chain Wireless Microphone User Manual
- Product List
- Product Spec.
- Product Structure :
- Operating Instruction
- Power on/Power off:
- Reconnection between the wireless speakerphone and USB Dongle
- Dongle wirelessly connects with many wireless microphones
- Connect with USB cable
- Mute the microphone
- Mute the speaker
- Volume adjustment
- Resetting
- Charging and battery indicator
- Important Safety Information
- Read More About This Manual & Download PDF:
- Read User Manual Online (PDF format)
- Download This Manual (PDF format)
WEDOLNNOV Daisy Chain Wireless Microphone User Manual

Note: Please read the user manual carefully before using the product and keep it properly. And the pictures are for your reference only.
Product List
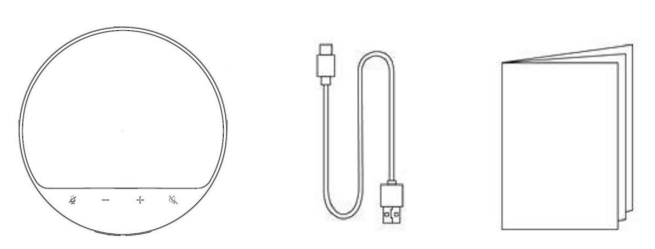
Conference Omnidirectional Wireless Conference(With Dongle)x1
USB-C Cable x1 User Manual x1
Product Spec.
| Wireless type | 2.4GHz | Speaker diameter | 40mm |
|---|
Effective
distance
| 15M(No barrier)| Speaker sensitivity| 87dB
Call distance| 3M(No barrier)| Speaker Impedance| 4Ω
Play time| About 6H| Horn rated power| 3W
Call time| About 6H| Horn frequency
response
| 20 Hz ~ 20KHz
Charge time| About 2H| Distortion| ≤5%
Capacity| 1500mAh| Algorithm| AEC/AGC/ANC
Rated input| 5V-1.5A| Microphone
direction
| Omnidirection
Transmission Power| <10 dBm| Max Qty of Daisy Chain Microphone|
3pcs(wireless
connection)
Product Structure :

- Mic mute
- Volume —
- Power indicator
- Power button
- Volume +
- Speaker mute
Operating Instruction
- Connection indicator
- Connection button
- LED indicator
- Mic(4pcs)
- USB-C port
- USB Dongle
Power on/Power off:
- Power on: Press and hold the power button on the side for 2 seconds, you’ll hear the voice “Power ON”, and all the button indicators simultaneously light up like breathing: the blue bar indicator is on like breathing then it is always on; The pairing white indicator flashes like
- Power off: Press and hold the power button on the side for 2 seconds, you’ll hear the voice “Power off”, and all lights are off like breathing.
- Automatic shutdown: When the wireless microphone is in the wireless connection state, if there is no music playing or calls for 30 minutes, it will automatically power off; if the wireless connection is disconnected or there is no pairing connection for 5 minutes, it will automatically shut
Reconnection between the wireless speakerphone and USB Dongle

- The Dongle is plugged into the computer, and the pairing indicator of the Dongle and the wireless microphone blinks in white after the wireless microphone is turned The reconnection time is 5 minutes. If there is no reconnection for more than 5 minutes, the wireless microphone will automatically power off.
- When the Dongle and the wireless microphone are not paired well: both the Dongle and the wireless microphone need to enter the pairing mode
- Dongle pairing mode:
Insert the Dongle into the computer Four times. When the Dongle is inserted into the computer for the third time, the Dongle enters the pairing state, the white indicator of the Dongle flashes quickly during pairing, and the pairing time is 5 minutes. (It can also be reconnected in the pairing state. After being reconnected, the white light of the dongle is always on, but it is still in the pairing state until it stops pairing after 5 minutes. A dongle can be connected with maximum 3pcs wireless microphones)
- The wireless microphone pairing mode:
- When the wireless microphone has a pairing record:
After the wireless microphone is turned on, press and hold the pairing button for 4 seconds, it enters the pairing mode with the voice “Ready to pair”, the pairing white indicator flashes rapidly, the pairing time is 5 minutes. If it is not paired successfully after 5 minutes, it will automatically power off.
- After the resetting of wireless microphone:
It will automatically enter the pairing mode when it is turned on, and the white indicator will flashes quickly. If it is not paired successfully after 5 minutes, it will automatically power off.
- Dongle and wireless microphone paired
The white indicator of the Dongle is always on, and the pairing indicator of the wireless microphone is always on, and the pairing is successful.
Dongle wirelessly connects with many wireless microphones
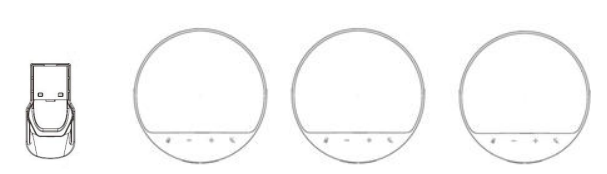
Dongle can be wirelessly connected with 2 or 3 wireless microphones to meet the needs of online conferences in larger conference rooms with multiple people. Please follow the above point 2 to connect
Connect with USB cable

- When the wireless microphone is turned on (whether it is connected to the Dongle or not), insert the USB data cable and do not connect the computer UAC, the USB data cable will only charge the wireless microphone, and the wireless radio frequency status of the wireless microphone will not be affected at this time. For example, if it is connected to Dongle, it will keep the normal
- If you enter the UAC connection state(A single wireless microphone is wired to connect to the computer), press the pairing button twice to enter the UAC connection state, it will comes with the voice “USB Mode”, and the wireless microphone stops the radio frequency related functions (such as reconnection, connection, etc.), perform the functions in the USB state. After the UAC connection is completed, the top light strip blinks once and then the blue light stays
- In the normal connection state of UAC, press the pairing button twice to exit UAC mode, it will comes with the voice “Wireless Mode” to turn on the radio frequency, and enter reconnection mode (if there was a pairing record) or pairing mode (if there is no pairing record).
- When the wireless microphone is turned off, use the USB data cable to connect it and the computer, the wireless microphone is charged only(the power red indicator indicates the charging state). Press and hold the power button for 2s to power on, if you want to enter the UAC state, you can press the pairing button.
Note:
- Connect the wireless microphone and the computer with a USB data No matter whether the wireless microphone is turned on or not, if the pairing button of the wireless microphone is not pressed twice, the USB data cable only charges it, and do not transmit data between the wirelss microphone and the computer. At this time, the wireless connection and operation of Dongle and wireless microphone will not be affected.
- When the wireless microphone is connected to the USB data cable (not charging state), if you unplug the USB cable, and the wireless microphone will automatically power
- When the wireless microphone is connected with the USB data cable, long press the wireless microphone power button for 2 seconds, it will be turned off and enter the charging
Mute the microphone
- Mute the microphone: During a call, click the wireless microphone mute button of any wireless microphone, the red light strip on the top of the wireless microphone is always on, the microphone is disabled, the other party cannot hear the sound, and the voice prompts “click”.
- Unmute the microphone: in the mute state (when the red indicator of the light strip is always on), click the wireless microphone mute button, the blue light strip is always on, the voice prompts “click”.
Mute the speaker
- Mute the speaker: in the playback state, click the speaker button, and the top light strip will turn into a steady blue light. If the microphone is muted, press the speaker mute button, the microphone and speaker will be muted at the same time, and the red light strip at the top will blink as
- Speaker mute release: When the speaker is muted, click the speaker mute button, and the top light strip will turn into a steady blue
Volume adjustment
- Volume increase: Press the volume + button of any wireless microphone to increase the call volume or music volume. If multiple wireless microphones are connected, the volume of all connected wireless microphones will increase at the same
- Volume reduction: Press the volume – button of any wireless microphone to reduce the call volume or music If multiple wireless microphones are connected, the volume of all connected wireless microphones will be reduced at the same time.
- A “Click” sound will appear when the volume is at maximum or
Resetting
When the wireless microphone is turned on and the computer data is not connected through USB, press and hold the speaker mute button and the microphone mute button for 5 seconds at the same time, the wireless microphone is reset, the pairing record is cleared, and the voice prompts “Reset completed”, “Ready to pair”, automatically Enter the pairing state, the top blue light is always on, and the side pairing white indicator light flashes.
Charging and battery indicator
- Charging: Connect the USB cable to the wireless microphone and the 5V charger (need to purchase the charger separately). When charging, the red light of the power indicator is always on; when it is fully charged, the white light is always When charging, it can be wirelessly connected to the computer through the Dongle and can be used normally.
- Battery display:
Battery remaining 70%-100%: the power indicator light is always on white; 10%-70%: the white light is always on for 30s every 200ms; Below 10%: the red light flashes once every 2 seconds with the voice “Battery Low” every five minutes; It will automatically power off when the battery power is too low.
Important Safety Information
- Avoid
- Do not
- Avoid extreme high or low
- Do not immerse in
- Do not expose this product to dripping or splashing
- Do not expose this product to excessive heat such as sunlight, fire, or the
- Use original or certified
- Clean with a dry, soft, lint-free Do not use aggressive cleaners or oils.
- Do not use this product outdoors during
- Keep away from children, the included small parts may cause choking
Read More About This Manual & Download PDF:
Read User Manual Online (PDF format)
Read User Manual Online (PDF format) >>