Car Media System VN1061-MA-4G Smart Naviceiver Mobile Internet Ready Owner’s Manual
- June 9, 2024
- Car Media System
Table of Contents
VN1061-MA-4G
SMART NAVICEIVER
MOBILE INTERNET READY
VISION ANDROID™ SERIES
Owner’s Manual
VN1061-MA-4G Smart Naviceiver Mobile Internet Ready
Always follow the instructions in this manual before using the device. Please keep this manual easily accessible in the vehicle for future reference.
IMPORTANT NOTES
DISCLAIMER
Dear customer,
The Android operating system is an open platform that allows you to
personalize your device according to your wishes. You can download apps from
the Google Play Store after registering and using them on your device. Audio
Design has no influence on the content or function of these apps. For this
reason, we can not assume any liability for the functionality, operation or
damage resulting from the download and / or use of apps. Audio Design can not
provide service for the apps installed or installed on the device.
Use is always at your own risk. If you have any questions, especially about
content or how it works, please contact the developer of the app.
To ensure the safety of the driver, the occupants and other road users, it is
essential that the driver always focuses on the traffic.
ATTENTION: Your ESX device has an internal memory with a limited
capacity. By downloading apps, pictures and music you fill up this memory.
When the memory is full, there is a possibility that apps may stop working or
be of limited use. If so, you’ll need to delete apps or content to restore the
feature. You are responsible for the management of the store.
INTENDED USE OF THE DEVICE
This device is only suitable for use in a vehicle with an on-board voltage of
12 volts with negative ground. In the event of misuse, incorrect installation
or modification, the operating license and the warranty become void.
SPECIFICATIONS / RADIO TYPE
Function| Band Information| Frequency Range| Max. emitted
power
---|---|---|---
GPS| GLONASS| 1.575 MHz / 1.602 MHz| —
AM Radio| Medium wave| 520 – 1.700 Hz| —
FM Radio| Band II| 87,5 – 108 MHz| —
DAB Radio| Band III (5A— 13F)| 174,9 – 239,2 MHz| —
4G / LTE| FDD (Band 1 / 3 / 5 / 7 / 8 / 20) TDD (Band 38 / 39 / 40 / 41)| 800
– 2.100 MHz 1.900 – 2.600 MHz| 21,9 dBm
21,7 dBm
3G| WCDMA (Band 1 / 5 / 8)| 900 – 2.100 MHz| 22.8 dBm
Bluetooth| Version 5.0| 2.400 MHz – 2.484 MHz| 8.5 dBm
WiFi / WLAN| IEEE802.11b/g/n| 2.400 MHz| 16,0 dBm
DECLARATION OF CONFORMITY
Distribution:
Audio Design Lautsprecher Vertriebs GmbH
Am Breilingsweg 3, DE-76709 Kronau/Germany
The Audio Design Lautsprecher Vertriebs GmbH hereby declares that the radio
system type VN1061-MA-4G complies with Directive 2014/53/EU. The full text of
the EU declaration of conformity is available at the following Internet
address: www.esxnavi.de/ce
LEGAL NOTICE
- ESX or Audio Design GmbH are in no way affiliated with the car manufacturer or any of its subsidiaries or affiliated companies connected to, or is acting on its behalf or with its authorization.
- All registered product names, trade marks and brands are the property of their respective owners.
- This owner‘s manual was made with the utmost care. Technical changes and errors reserved.
- Due to the ongoing development of this device, it is possible that the information in this manual is incomplete or is not matching to the delivery status.
- Due to further developments on the part of the automobile manufacturers, it is possible that some functions are not supported that were not available when this device was developed.
- Please visit periodically www.esxnavi.de on the internet, to check if additional information and updates are available.
DISPOSAL
If you have to dispose the device, please note that no electronic devices may
be disposed in the household waste. Dispose the device in a suitable recycling
facility in accordance with local waste regulations. If necessary, consult
your local authority or your dealer.
CUSTOMER SERVICE
In general, the assembly and installation of the device should be made by a
trained and technically skilled specialists. If you have any problems with
operating the device, contact your specialist dealer or the Audio Design
Service Department under Tel. +49 7253 – 94 65 95 or navi@esxaudio.de.
CARE & MAINTENANCE
This device is equipped with high precision and sensitive technique and should
always be treated with caution. Please note the following tips to avoid
endangering the warranty and extend the life of the appliance.
- Children under 12 should not operate the device. Keep the device and all accessories away from small children.
- Keep the device and its components dry. The effects of water, liquid or moisture can cause damage to the vehicle, the device itself or injury.
- Keep the device and its components away from excessive heat. High temperatures may shorten the life of appliance of the electrical components.
- Keep the device and its components away from excessive cold. Extreme temperature changes and moisture inside the device may cause the breaking of certain components. Do not to drop the device and avoid violent shocks or excessive shaking.
- Do not use strong chemical cleaners, solvents or water to clean the device. Use a slightly moistened cotton cloth with soft surface.
- Replace a blown fuse only with a new one with the same values . However, before you replace a defective fuse, check at first what is the cause of the short circuit.
Start with the power supply cable.
If the fuse blows again, a malfunction consists inside the device. In this case you should contact your authorized dealer.
SAFETY INFORMATION
-
Note any time the traffic regulations of the country in which the device is operated.
-
Please ensure, that with the engine turned off the vehicle‘s battery does not discharge fully. The de-vice is another electrical consumer which must be operated with the engine running, other-wise the vehicle‘s battery will be discharged and the vehicle can not be started.
-
Set the volume of the device only as loud, that you are still be able to hear warning signals (e.g. police sirens) and traffic noise inside the vehicle.
-
Operate the device as driver only if it‘s absolutely necessary and in the driving safety is not compromised.
The same stands for looking at the screen. If necessary, better park your vehicle at a safe and appropriate location. -
The traffic rules of the EU prohibit to view moving pictures or movies while driving, if the screen of the device is installed within sight of the driver, as he may be distracted. View the screen as driver only for the navigation function, and then only briefly that you will not be distracted. Note at any time the local traffic regulations. In an accident, regress claims could be made by the car insurance company.
-
This device is not a substitute for your personal judgment or perception. All suggested routes from the navigation system should never be taken as a reason to disregard the local traffic rules. Your personal assessment of traffic or your knowledge of safe driving practices is paramount. Always match your driving with the current traffic situation.
-
Do not follow the suggested routes, if the navigation system instructs you to take an unsafe or illegal way, puts you in an unsafe situation, or directs you into an area which you consider unsafe.
-
If problems occur while driving, park the vehicle in a safe and appropriate place to continue before you operate.
-
Please use only the included original accessories. Ensure a sufficient mounting of the device by using the included installation accessories, as in the event of an accident enormous accelerations may occur. Poorly installed devices and equipment in accidents could represent a severe risk to the driver and the other passengers of the vehicle.
-
Note under all circumstances the regulations and advice of the vehicle manufacturer and do not make any modifications to the vehicle, which could interfere with safe driving. Please treat all parts of the device and the components of your vehicle always with caution.
-
Please avoid short circuits and make sure that no metal objects can get inside the device. Also make sure that all connections are properly connected and avoid the interchanging of the polarity of all connections. Complete the installation only while the ignition is turned off.
-
In the event of a defect or malfunction, do not attempt to repair it by yourself or open the device, this is dangerous and could cause injury or damage to the equipment or vehicle. A repair should be done by trained and authorized personnel only. The device uses a Class 1 laser to read the disk. Eye contact with a laser is very dangerous to the human eye.
-
If you connect an external device, you should first read the instruction manual of the external device and make sure that it is compatible. Avoid connecting an incompatible external device.
-
If you install external applications onto the operating system of the device or operate files, make sure that they are „virus free“ and compatible with Android™. Otherwise there is a risk that the operating system no longer works properly and must be reinstalled.
-
Do not damage or scratch the screen with sharp objects. Do not operate the screen with hard objects.
OPERATION
1.1 SD CARD SLOT FOR NAVIGATION SOFTWARE

Here you can insert the MicroSD card of the navigation software. Please only use the upper MicroSD card slot. The lower MicroSD card slot is only suitable for media.
1.2 RESET BUTTON
If the device no longer reacts to inputs, the system is overloaded or has
crashed. Then restart the system by pressing the reset button (RST) on the
front panel.
Use a suitable object, such as a paper clip or ballpoint pen.
After pressing the reset button, the system restarts without losing the
settings you have already made.
1.3 FUNCTION KEYS
| Number | Function | Description |
|---|---|---|
| 1 | Turn on or off with or without ignition |
Mute
Volume| Press and hold the button for more than 3 seconds to turn the device
on or off without ignition.
Briefly press the button during operation to switch the mute function on or
off.
Turn the controller to adjust the volume.
2| Main menu| Press here to open the main menu.
3| Navigation| Press here to start the linked navigation application.
4| Freely assignable| The ESX button can be assigned to any function. Simply
hold the button down until the symbols of the compatible functions / apps
appear on the left. Then tap on the desired symbol to assign the ESX key.
5| Radio FM/AM| Press here to start the radio application.
6| Phone| Press here to open the phone menu.
7| Camera direct button| Press here to open the rear view camera view. If you
have connected an additional camera, press again to open its view. Press again
to exit.
Skip forward or backward| Turn the controller to skip forwards or backwards
within the media playback or to set the radio frequency.
1.4 STATUS BAR

| Symbol | Function | Description |
|---|---|---|
| Back | Tap here to open the previous menu. | |
| Main menu | Tap here to open the main menu. | |
| Recently used | Tap here to view recently used applications. The split screen |
function can also be started here.
| USB| A USB storage medium is connected.
| SD card| An SD card is connected.
| Bluetooth®| A smartphone is connected to the ESX device via Bluetooth®.
| GPS| The ESX device has GPS connection.
| 4G| The ESX device is connected to mobile internet via 4G/LTE.
| WiFi/WLAN| The ESX device is connected via WiFi/WLAN or to the hotspot of a
smartphone or via a network.
| Time| Current time display.
1.5 TOUCHSCREEN
You can operate the touchscreen of the ESX device with the following gestures:
| Touch the screen briefly
---|---
| Touch the screen longer
| Hold and swipe
The ESX device has two freely assignable main menus that you can access with a
swipe to the right or left.| The “Apps” control panel at the bottom takes you
to the app menus, which you can access with a swipe to the right or left. All
installed apps can be found there in alphabetical order. Briefly tap on an
icon to start the respective application. Briefly tap on an icon to start the
respective application.
---|---

Slowly slide your finger down from the top to view the latest messages or
activity. This function is available in every view.| In this view you can
continue swiping down to display additional control panels. This function is
available in every view.

Note: Depending on the apps or optional accessories used, this view may vary as shown here!
1.6 MAIN MENUS
The ESX device has two main menus in which the seven basic apps with the most
important functions which are located below.| In the first main menu you will
find the widget “Time” in the upper control field on the right. You can
position other apps on the other free fields on
the control panel.
---|---

Press and hold an app icon and swipe it forward onto one of the main menus.|
There you can place the app on one of the free positions. You can then move
further apps forward as you wish. The apps can still be found in the app
menus in alphabetical order.

In the widget menu, for example, you can drag the “Music” widget to the front
of the main menu.| There you can place the widget in the free position.

You can also swap the positions of the two widgets.| To remove an app or a
widget from the main menu, simply move it to the trash can that appears above.

The second main menu is initially empty in the upper control panel.| You can
also equip this with apps and widgets as you wish.

1.7 SPLIT SCREEN
At the top of the status bar, tap on .
All currently used or recently used apps can be seen in this view.| Hold the
desired app briefly until the gray fields appear on the side. Then slide the
app window all the way to the left until it clicks into place.
---|---

The primary app is now always displayed on the left. Now select an app for the
right side (e.g. radio).| The secondary app on the right can be changed by
starting another app in the main menu.

If you want to dissolve the split screen again, drag the black frame in the
center of the picture to the left or right.| 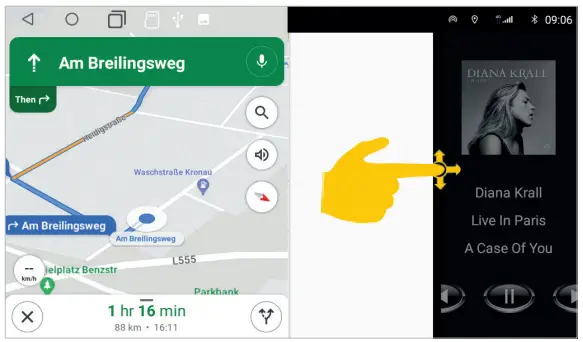
Note: Some apps are not suitable for display in split screen mode.
1.8 CAMERA VIEW
When you engage reverse gear, you can see the reversing camera with guide
lines, which was connected to “R-CAM”.| If you want to change the camera
settings, tap on the screen and then on the gear symbol that appears at the
top right.
---|---

You can make further settings in the app menu under “Settings” and then under
“Reverse”.| If you want to open the camera view without having engaged reverse
gear, press the direct camera button on the front of the device. The first
view shows the rear view camera.

If you have connected an additional camera to “F-CAM”, press the camera direct
button on the front of the device again to open its view| To exit the camera
view and return to the main menu, press again .

SETTINGS
2.1 INTERNET CONNECTION VIA WiFi / HOTSPOT
In order to be able to fully use the Android operating system of the ESX
device, e.g. Google Maps, it is necessary to connect the device to the
Internet via WLAN. To do this, you need a smartphone with a mobile internet
connection and the so-called hotspot function. You can also use a fixed WiFi
network for this. First activate the hotspot function in your smartphone
App menu > Settings
Network & Internet
Wi-Fi
Tap on the name of your smartphone on which you set up the hotspot or on the
local WiFi network.| To display the keyboard for entering the password, tap
the field above the green line.
---|---

Then enter the password of the network and press “CONNECT”.
After a successful entry, the ESX device should be connected to the Internet
after a few seconds.
The symbol then appears at the top right of the status bar.| If you tap on the
network name again in the “Connected” status, you will receive some
information about the currently active Internet connection.
If you want to interrupt the connection to your smartphone, tap on “FORGET”.

Important note: Depending on the type of smartphone, you may have to restart
the hotspot function if the connection to the ESX device is interrupted. It is
therefore advisable to keep the hotspot function permanently activated in your
smartphone. The next time you switch it on, check whether the internet
connection is active.
Please also note that using some apps on the mobile Internet may result in
high data volume consumption.
2.2 INTERNET CONNECTION VIA 4G / LTE
To connect the device to the Internet via an optionally connected 4G/LTE
dongle, please proceed as follows:
Turn off the device and have your PIN code ready to unlock your SIM card
Then connect the 4G/LTE dongle with antennas to the device
Put your SIM card in the SIM card slot of the dongle
Turn the device on again
- Refer to the enclosed Installation Guide
After the device has started, enter your 4-digit PIN code of the SIM card
here. Confirm the entry with the tick.| After successful entry, the SIM card
is unlocked.
---|---

If the device is successfully connected to the mobile Internet, the symbol
appears in the status bar at the top right.| If the device is switched off,
you have to enter the PIN code of the SIM card again after each restart, just
like with a smartphone.

Important note: You can also deactivate the request for the PIN code of your SIM card so that you do not have to enter it again after each device start. To do this, insert the SIM card into a smartphone and deactivate the request for the PIN code in accordance with the instructions of the mobile network operator or the smartphone manufacturer.
2.3 DATE & TIME
This ESX device has the function of automatically determining the date and
time via active GPS reception or the Internet. You can also set the date, time
zone and format manually.
App menu > Settings
System
Languages, time
Date & time

2.4 LANGUAGE
App menu > Settings
System
Languages, time
Languages & input

Important note: In order for the operating system to display your preferred language, it must be in the first position. If certain menus and functions are not available in the selected language, the next language is always used.
2.5 GOOGLE ACCOUNT
App menu > Settings
Accounts
Tap on “Add account” to connect the ESX device to your Google account. Then
enter your login details.| Your Google account has now been set up and linked
to the ESX device. You can also add other accounts. Tap your account name to
open the account menu.
---|---

Here you can delete the linked account with “Remove account”. Under “Google
Account” you can make general settings for your account.| Tap in the settings
on„Google“

In this menu you can adjust the services of your Google account on the ESX
device.| Via “Play Store” in the app menu you can now select other compatible
apps and install them on the ESX device.

2.6 SCREEN BRIGHTNESS
In one of the menus, drag the status bar down.
The status menu opens. Then keep swiping down.| Here you can change the
brightness of the screen.
---|---

2.7 WALLPAPER
Here you can change the background image of the menus.
Press and hold on an empty space in the main menu.| Tap “Overview” or
“QuickPic” to select a new background image.
---|---

Swipe through the selection, then tap „Set wallpaper“ to choose the wallpaper
you want.| Under “QuickPic” you can select your own photo as a background
image. In the image view, tap „Set As“.

2.8 STEERING WHEEL REMOTE CONTROL
| In the app menu, tap on “Setting wheel”. | First tap on “START”. |
|---|

First select a function on the control panel that you want to teach in.| Now
press the corresponding button or controller on the steering wheel remote
control. The corresponding function is then highlighted in blue.

Repeat the two previous steps until you have learned all the functions.|
Complete the teaching with „END“ and exit the menu.

Important note: If the ESX device does not receive any signals from the
steering wheel remote control, check whether it is correctly connected to the
device. Some vehicles are not compatible.
The ESX device is CAN bus compatible, but for this you need a corresponding
vehicle-specific CAN bus adapter or CAN bus module. Then teaching in the
steering wheel remote control is not necessary.
2.9 SOUND SETTINGS
In the app menu, tap on „DSP“ to make sound settings.
Under „EQ“ you will find a 16-band equalizer with 8 different presets. Tap on
one of the presets on the left or use the sliders to set the equalizer
yourself.| Under “Surround Sound” you can set the acoustic center of the
stage. Tap on one of the presets or use the yellow dot to set the acoustic
center of the stage yourself.
---|---

Under „Bass Boost“ you can set the bass boost separately for the front and
rear. This function is only available when the preamp outputs are used.| Under
„Zone“ you can define the settings for the subwoofer output. This function is
only available when the subwoofer output is used.

Under „Bass Filter“ you can set the crossover frequency for low frequencies
for the front and rear. This function is only available when the
preamp outputs are used.| 
2.10 NAVIGATION
Select a suitable navigation application in order to link it with the “NAVI”
button on the device and the “Navigation” app in the main menu.
| In the app menu, tap on „Settings“. | Tap on “General”. |
|---|
Now select a suitable app such as „iGo Navigation*“ or „Maps“.| Under „Sound“
you can make certain settings for navigation.

Important note: The iGO Navigation is optional and, depending on the
equipment, already installed on your ESX device. In this case, please refer to
the enclosed separate owner‘s manual.
2.11 KEY ILLUMINATION
Under „General“ you can switch on the key illumination of the device
permanently. Otherwise, it will only turn on when the vehicle‘s headlights are
on.
Tap on „Panel light setting“ to change the setting.
-
depending on equipment Under „Color“ in the app menu, you can freely choose the color of the key illumination. 
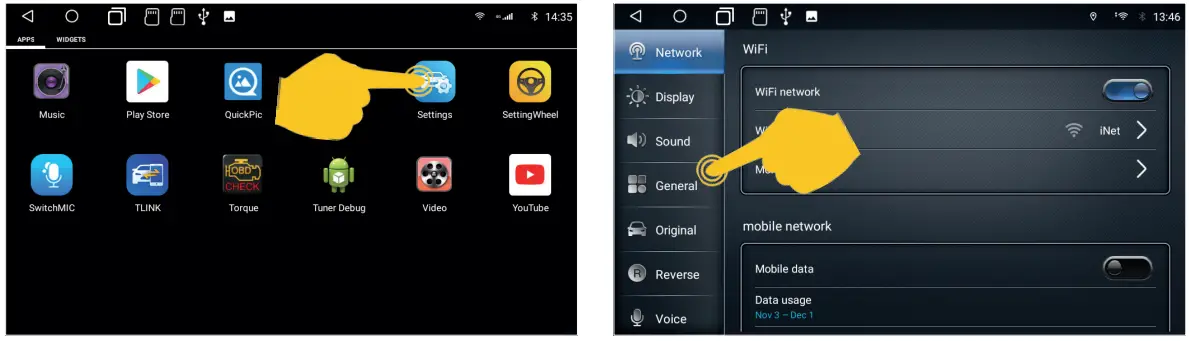
2.12 MORE SETTINGS
In the app menu, tap on “Settings”.
In this menu you will find various submenus in which you can make further
settings such as e.g. under “Network”.| Under “Display” you can make optical
settings for menu and the user interface.
---|---

For example, you will find various audio settings under “Sound”.| Settings for
the connected reversing camera and for reversing can be made in the “Reverse”
menu.

2.13 MICROPHONE SELECTION
If you use an optionally available external microphone such as VNA-MIC-AND
from ESX instead of the internal microphone on the front panel, you must
activate this in the device.
In the app menu tap on „SwitchMIC“.| Then select “REAR MIC” on the right-hand
side
and confirm your entry.
---|---

Now the input for the microphone is switched to the external microphone
connected to the rear.| 
BASIC FUNCTIONS
3.1 RADIO (FM/AM)
In the main menu, tap on „Radio“ or on the „RADIO“ button on the device.
| Symbol | Function |
|---|---|
| Tap here to automatically search for all radio stations in the reception |
area.
Fine tuning of the radio frequency downwards.
Fine tuning of the radio frequency upwards.
Tap here to switch to the next station preset to the left.
Tap here to switch to the next station preset to the right.
With the controller below you can choose between the station presets directly
| The PTY function is a classification of radio stations in different
categories. Every program on a radio station is categorized. After you have
selected a category, the ESX device automatically searches for suitable radio
stations.
| Tap TA to activate the TA function. This function enables the interruption
of media playback (e.g. audio player) for traffic announcements.
After the announcement, the previous media playback starts again.
| TP indicates the active traffic information of a radio station.
| Tap here to switch between mono and stereo operation. With weak stations,
the reception quality usually improves in mono mode.
| Tap here to switch between FM (ultra-short wave) and AM (long wave).
| Tap on the heart icon in the box to mark the station as a favorite.
| Tap on AF to activate the AF function. This function enables automatic
switching when leaving the reception area of a radio station. The ESX device
automatically switches to another frequency if the same program is also
available in a different reception area.
3.1 RADIO (FM/AM)

Important note: If only a few or no stations are displayed, deactivate the AF function or set PTY to “None” in order to be able to receive more stations.
3.2 DIGITAL RADIO (DAB+)
In the app menu, tap on “DAB-Z” to start the digital radio. When using the
device for the first time, you must first start the station search as
requested. This process can take several minutes. All DAB + stations displayed
in the current broadcast area will then be displayed.
| Symbol | Function | Decription |
|---|---|---|
| Next station down | Tap here to search for the next strong and clear station |
frequency band downwards.
| Next station up| Tap here to search for the next strong and clear station
frequency band upwards.
| Favorites list /Channel list| Tap here to switch between the favorites list
and the channel list.
| Settings| Tap here to open the settings.
To save a station in the favorites, press and hold the station name in the
list for one second and then tap on the star symbol. To delete the station
from the favorites list, select the recycle bin.| In the settings you can
restart the station search for all stations that can be received in the
reception area under station list. You can also make further settings in this
menu.
---|---

3.3 PHONE
To enable wireless phone calls, you need to connect the device to a compatible
Bluetooth® smartphone.
Therefore, first activate the Bluetooth® function on your smartphone. Make
absolutely sure that the synchronization for your contacts in the smartphone
is enabled accordingly.
Then tap on “Bluetooth” in the main menu or push the “PHONE” button on the
device to open the phone menu.
In the delivery state, the Bluetooth® function is already activated on the ESX
device.
Pairing the devices
Tap on , to start pairing the devices. The device will now search for
Bluetooth® devices in your area.
Select the desired Bluetooth® device in the search results to start the
pairing. A PIN code must then be entered on your smartphone.| After successful
pairing, a Bluetooth® icon is visible in the upper status bar and a red link
symbol appears next to the device name.
---|---

The delivery PIN code is 0000.
| Symbol | Function |
|---|---|
| Tap here to view the saved cell phone connections. |
Tap here to search for other cell phones in your area.
Tap here to disconnect the current mobile phone connection.
Tap here to delete the selected connection from the memory.
Important note: Do not start the initial pairing while driving.
Phone book
Tap on , to open the phone book. The phone book is initially empty.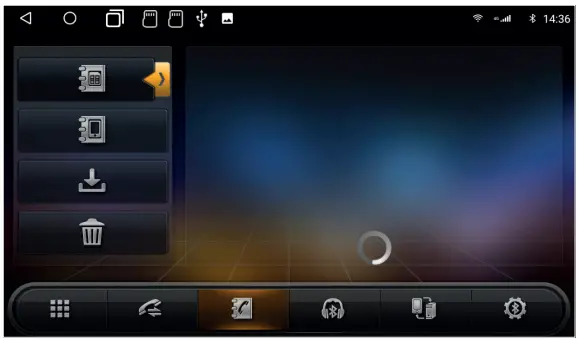
Tap on , to load or synchronize your contacts.

| Symbol | Function |
|---|---|
| Tap here to search for contacts from your smartphone. |
Tap here to search for contacts from your SIM card.
Tap here to import all phone books.
Tap here to delete an imported phone book.
Important note: Make absolutely sure that the synchronization for your contacts in the smartphone is enabled accordingly in the Bluetooth® settings.
Numeric keypad
Tap on , to open the numeric keypad.

| Symbol | Function |
|---|---|
| Tap here to delete the last entry. |
Tap here to start the call after entering the number.
Tap here to end a call.
Tap here to forward the current call to the mobile phone.
Important note: The function keys in the lower area are not available during the call. They will return when the call ends.
Call lists
Tap here , to view the call list with the outgoing, incoming or missed calls
from your mobile phone.
Important note: This only applies to calls made via the naviceiver.
Audio streaming
Tap on , to open the audio streaming menu.
Use the play / pause and skip buttons to play audio files from your mobile
phone through the device.
Important note: Some cell phones require their music player to be started in order to use this function.
Settings
Under you will find the settings, for example to change the device name or the
PIN code.
3.4 AUDIO PLAYER
In the main menu tap on „Music“ to start the audio player.
Compatible formats: MP3 / AAC / FLAC / WAV / AMR / M4A / OGG
The audio player accesses all files that can be found either on the internal
device memory (iNand) or on optionally connected storage media (USB or SD
card). Select the storage location in the top right in the bar.
| Symbol | Function |
|---|---|
| Tap here to start random playback. |
Tap here to play the previous track.
Tap here to start or pause playback.
Tap here to play the next track.
Tap to repeat the track or playlist.
Tap here to open the audio settings.
3.5 VIDEO PLAYER
In the main menu tap on „Video“ to start the audio player.
Compatible formats: MP4 / AVI / WMV / 3GP / FLV / SAF / MOV / MKV / MPG
The video player accesses all files that can be found either on the internal
device memory (iNand) or on optionally connected storage media (USB or SD
card).
| Symbol | Function |
|---|---|
| Tap here to go to the main menu. |
Tap here to play to the previous track.
Tap here to start or pause playback.
Tap here to play the next track.
Tap here to start fast searching backwards.
Tap here to start the fast forward search.
Tap here to view the playback in full screen mode.
Tap here to go to the previous menu.
Important note: While driving, the image signal of a video is not displayed for safety reasons.
3.6 MEDIA CONNECT iOS (WIRELESS)
If you have an iOS smartphone, you can connect it wirelessly to the ESX
device. In the settings of the iOS smartphone you have to grant the necessary
approvals under CarPlay. In the app menu tap on „TLINK“.
Tap on “Settings”.| Here you can make settings in advance. At the top left you
come back to the connection menu.
---|---

The WiFi/WLAN function must first be activated on the smartphone. Then connect
your smartphone to the ESX device via Bluetooth if there is no active
Bluetooth connection yet. The connection will then be established
automatically. Please note the information on page 14 and 26.| After
successfully pairing the devices, the CarPlay menu appears. You can exit this
menu with „Car“.
If you have not changed any of the settings, the devices will pair again if
they are within range and both are switched on.

Important note: Please note that a mobile internet connection is required when using some apps and that this may result in high data volume consumption.
3.7 MEDIA CONNECT ANDROID (ONLY WITH CHARGING CABLE)
If you have an Android smartphone, you can connect it to the ESX device with
its charging cable via USB port. You may have to first download the Android
Auto app from the Play Store to your smartphone and grant the required
approvals in its settings under Android Auto. Then tap on „TLINK“ in the app
menu.
Connect the smartphone with its charging cable to one of the USB ports. The
connection will then be established automatically.| The process may take a
while. The WLAN function and the Bluetooth connection in the ESX device are
deactivated and the smartphone is charged via the USB connection.
---|---

After successfully pairing the devices, the Android Auto menu appears. You can
exit this again with „Exit“.
Depending on the smartphone, you may need a music player to listen to music.
If you have not changed any of the settings, the devices pair again if you
connect the smartphone to the ESX device via the charging cable and both
devices are switched on.| 
Important note: Please note that a mobile internet connection is required when using some apps and that this may result in high data volume consumption.
3.8 FILE MANAGER
In the app menu tap on „File Manager“.
Here you can see which files have been saved in which location.| In the file
manager, files can then be copied, moved or deleted as required on another
storage medium.
---|---

3.9 AUX
If you have connected an external audio or video source at the AUX IN inputs
of the device, tap on “AUX“ in the app menu. Then you need to start the
playback on the external audio or video source.

Important note: While driving, the image signal of a video is not displayed for safety reasons.
UPDATES
4.1 MCU UPDATE
After you have decompressed the downloaded MCU update, copy the files to your
SD card or USB stick.
Insert the SD card or USB stick into the device.
Apps > Settings
System
MCU upgrade

Mark the circle symbol and then confirm the entry.
Important note: Please do not switch off the device during the update
process. Wait for the update to finish. The device‘s system will automatically
restart afterwards.
4.2 SYSTEM UPGRADE
After decompressing the downloaded system upgrade, copy the files to your SD
card or USB stick.
Insert the SD card or USB stick into the device.
Apps > Settings
System
System update

Mark the circle symbol and then confirm the entry.
Important note: Please do not switch off the device during the update process.
Wait for the update to finish. The device‘s system will automatically restart
afterwards.
Visit www.esxnavi.de regularly or ask your specialist
dealer whether update files are available for your device. Then follow the
instructions that come with the update.
ESX Car Media Systems · Audio Design GmbH
Am Breilingsweg 3 · D-76709 Kronau/Germany
Tel. +49 7253 – 9465-0 · Fax +49 7253 – 946510
www.esxnavi.de –
www.audiodesign.de
© All rights reserved, technical changes and errors reserved
References
Read User Manual Online (PDF format)
Read User Manual Online (PDF format) >>