UNIT4 Time Reporting for Sub Consultants User Guide
- July 12, 2024
- UNIT4
Table of Contents
![]()
UNIT4 Time Reporting for Sub Consultants
Product Information
- Version: 1.0
- Product Name: Tidrapportering
- System: UBW
Product Usage Instructions
Login to the System
A prerequisite to log in is having a UPN (User Principal Name) from Knowit.
Follow these steps:
- Go to UBW Login Page
- Choose Identity Services Auth
- Authenticate through Knowit ID if prompted
Time Reporting
Period for Time Reporting:
When opening timesheets, select ‘Open current period’ to access the current
week.
Selecting Different Periods:
- Click the calendar symbol to choose a different period.
- If earlier periods are pending, access them from the list of outstanding periods.
Adding Time to Projects/Work Orders
Project/Work Order Selection:
- Search for the desired project/work order.
- Use the type-ahead field for suggestions as you write.
- Select project/work order and click ‘Add to timesheet’.
Registering Hours:
Add a new row/work task for each unique project/work order.
Managing Timesheets
Delete/Copy Rows:
Delete a row in editing mode by clicking the X-symbol on the right.
Registering Hours other than Normal Time (Time Codes):
- Modify time for overtime or standby time by changing the Time code field on each row.
- Save the timesheet as a draft during the week for future editing. Complete the timesheet before sending it for approval.
Sending Timesheet for Approval:
Once the timesheet is complete, select ‘Send for approval’.
FAQ
Q: What should I do if I experience issues logging in?
A: If you encounter login problems, try opening the web browser in
incognito/private mode and attempt to log in again using the provided link.
Time reporting-UBW
Login to the system
A prerequisite to being able to log in to UBW is that you have gotten a login to Knowit, what we call a UPN (User Principal Name).
- Log in by using this link:https://ubw.unit4cloud.com/se_kno_prod_web/
- The system is set up with a Single Sign-on login. Choose ”Identity Services Auth”:
- When choosing this you might get the question to authenticate through your Knowit ID by logging in to Office365.

- The first time you log in to your account you will be asked to allow UBW to log in with your account. Tick both the check boxes “Use your profile information” and “Use your user identifier” and click Allow.

- When this is done, choose Identity Services Authentication again, and this time you will be logged in to UBW.
If problems occur
If you experience issues with logging in, try to open the web browser in
incognito/private mode, and try to log in again:
https://ubw.unit4cloud.com/se_kno_prod_web/.
Time reporting
Open the timesheet from Your employment – Timesheets.

Period for time reporting
When opening timesheets, choose “Open current period” which will take you to
the current week.

To choose a different period you may click on the calendar symbol as shown in the picture.

If earlier periods have not been submitted, then you may open them from the list with outstanding periods.

Note that if the month ends in the middle of a week, then the time report might contain more than one week
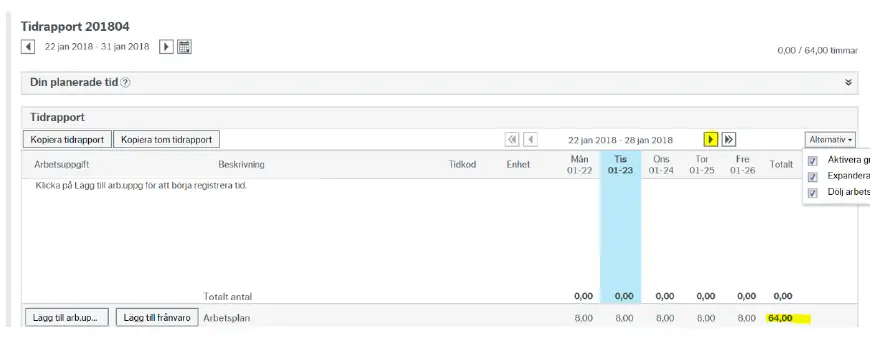
An indication of more than seven days in the week is that the work schedule for the given period will state that you should report more than 40/37,5 hours pr week. In this example, 64 hours. To see the rest of the days you should register time for, click the arrow to the right of the dates. Remember to save before you move between weeks.
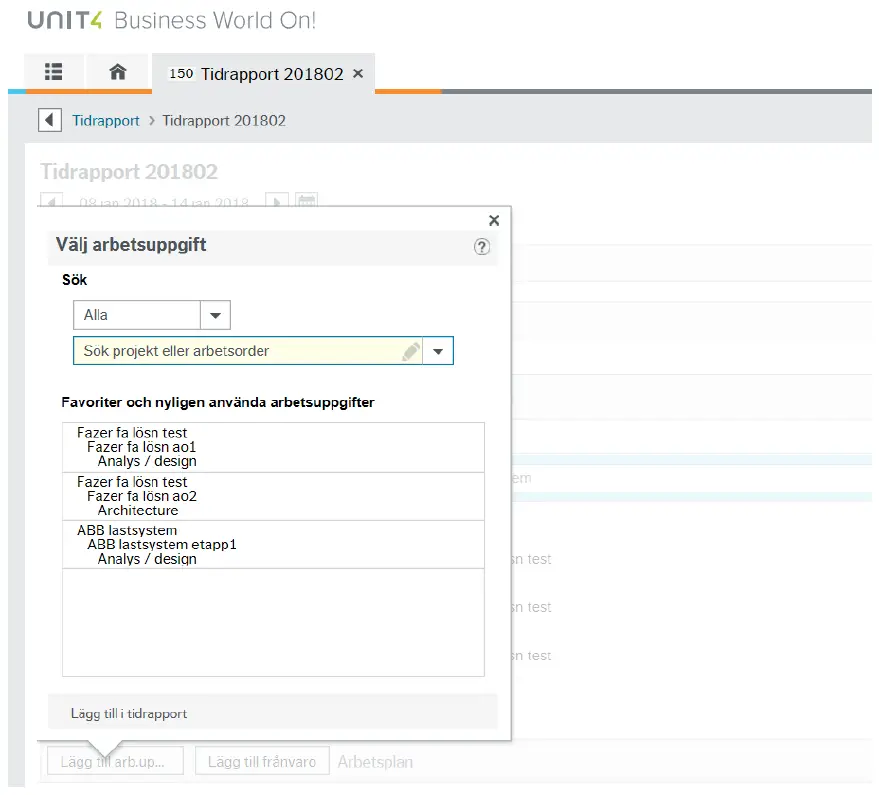
Register time – add a work task
Choose ”Add work task”

Search for the project/work order you want to add time to. Ask your project manager or team manager if you cannot find it.

The field i set up with “type ahead” and will give you suggestions as you write.
Choose project and work order (if activity should also be used for the project, then that will also show as an option). When you have marked your choices click Add to timesheet.

Register hours per day

Add a new row/work task for each unique project/work order.

- When a work task has been added earlier it will show under Favourites and recent work tasks.
- Further down we explain how to add a favourite task.
Delete/Copy rows
A row can be deleted when it is in editing mode by clicking the X-symbol to
the right of the row.

Under the little menu symbol to the right of the X, you have the following options:
- Copy row – Copy the row including the registered time
- Add favorite – Add the work task as a favorite under “Favourites and recent work tasks” for easy access later
- Change work task – Make changes to the work task e.g., change the activity

Register hours other than ”normal time”: Time codes
This shows how you register time that is e.g. overtime or standby time. You
make the change on each row in the field Time code and enter the number of
hours for this specific time code.

Save the timesheet as a draft
Save the timesheet as a draft throughout the week to be able to edit it again.
OBS: Do not send for approval until the timesheet is complete.

Send the complete timesheet for approval
When the timesheet is complete for the given period, choose Send for approval.

You get a confirmation that the timesheet has been sent.
Warning – if the number of hours reported is less than your normal work
schedule
If you have registered less time than expected for the period, you will get a
pop-up warning when you try to send it for approval. If the time reported is
correct, click Save and continue to send it for approval.

Copy timesheet
To copy the timesheet from the previous week, click “Copy timesheet” if you
want to copy the project/work order including the reported hours. If you do
not want to copy the reported hours, choose “Copy empty timesheet”
instead.
Correct rejected timesheet
- If the approver rejects your timesheet, you will get a task in UBW, seen as an orange symbol in the right corner of the screen.
- In the example in the picture, the resource has two rows in his/her timesheet for week 2 in 2018 rejected.

Click on the task to open the rejected timesheet. Rejected rows will show up with a comment from the approver about what is wrong.

If several rows have been rejected, click the work task under the approver’s comment to show the given row for correction in the timesheet.

- Correct the errors and choose “Send for approval” again.
- When the timesheet is opened from the menu, you should also be able to see periods with rejected rows in it. Note that this does not always work, so to make sure you have nothing rejected you should note if you have the orange symbol which indicates tasks.

References
Read User Manual Online (PDF format)
Read User Manual Online (PDF format) >>