Kisag Whipper Classic Instruction Manual
- June 6, 2024
- Kisag
Table of Contents


KISAG WHIPPER CLASSIC
INSTRUCTIONS FOR USE
0,5 L
INSTRUCTIONS FOR USE


1. 2. 3.


4. 5.


6. 7. 8.
CLEANING

1. 2. 3.

4.

5.
INTERIM CLEANING

1.

2.


3. 4. 5.
SPARE PARTS
 2306
2306  2310
2310
 2210
2210
 2365
2365
 2234
2234  2205
2205 2236
2236
Thank you for choosing a Kisag device.
Please read the instruction manual carefully before first use.
Kisag AG
Bahnhofstrasse 3
4512 Bellach
Switzerland
Tel. +41 32 617 32 60
Fax +41 32 617 32 70
kisag@kisag.ch
www.kisag.ch
If you have any questions, please contact
kisag@kisag.ch
GUARANTEED QUALITY.
Every Kisag device is checked thoroughly before it leaves the factory. Kisag provides a 2-year warranty on materials and processing, as long as defects are not due to improper use. The warranty is valid from the date of the purchase receipt.
DEVICE DATA.
| Max. operating pressure PS | 30 bar |
|---|---|
| Min. operating temperature | 0.5 L: 1°C |
| Max. operating temperature | 0.5 L: 24°C |
| Max. filling volume | 0.5 L |
| Max. number of chargers to be used | 1 Kisag dispenser charger (0.5 L) |
| Use | Approved for commercial use. |
For fresh and pure cream & desserts.
Only for cold applications.
MATERIALS LIST.
| Designation | Materials |
|---|---|
| Bottle | Stainless steel |
| Device head | POM, silicone, stainless steel, nickel-plated brass, PU |
| Head gasket | TPE |
| Decorator tip | PP, stainless steel |
| Charger holder | Silicone, stainless steel |
| Dispensing valve | POM, NBR, stainless steel |
Technical data is subject to change without prior notification.
SAFETY INSTRUCTIONS.
Failure to observe the safety instructions or any recommendations for the handling and maintenance of Kisag products can result in system malfunctions, as well as injuries and/or material damage.
- The Kisag device is approved exclusively for use in accordance with the device data!
- To avoid usage errors, carefully read and retain the instruction manual!
- Do not use force!
- Keep Kisag devices out of reach of children!
- Never store or use Kisag devices outside of the min. and max. operating temperatures!
- Only operate a filled device!
- No cryogenic use permitted, such as with liquid nitrogen!
- Only combine a device head with a bottle of the same device type!
- Never combine third-party products with Kisag parts!
- Never screw on the device head at an angle!
- Only use original Kisag dispenser chargers!
- Do not bend over the device when inserting the charger!
- The device is a pressure vessel! Falls or damage (such as cracks or deformations) can make the device dangerous to use. Do not put it into operation in this case! Have the device checked by the Kisag service center!
- Never unscrew the device head when the device is under pressure!
- Never use the lever as carrying handle!
- Proper cleaning is essential to avoid clogging of the device. Before each use, check that the Kisag device has been properly cleaned!
- Dismantle the Kisag device for cleaning only in accordance with the illustration!
- Before cleaning, check the material compatibility of the cleaning and disinfection solutions used!
- Do not make any modifications to the Kisag device. This will void the warranty, resulting in the exclusion of liability!
- Never use more chargers than indicated or overfill the device! This ensures that the maximum specified operating pressure is not exceeded!
- If the pressure cannot be relieved, please contact Kisag or your service center!
NOTE: Before using the Kisag device for the first time, remove the transport lock from the dispensing valve. Clean the device as shown in the cleaning illustration.
NOTE: To avoid lumps, completely dissolve powdery ingredients such as sugar in liquid before filling. Do not use ingredients with fruit pulp or seeds!
INSTRUCTION MANUAL.
NOTE: Please note the illustration in the instruction manual!
Fill with cool cream/cream-based desserts.
Dispense cream/cream-based desserts from the device as close to consumption time as possible.
PREPARING THE DEVICE
1. Insert the head gasket into the device head.
2. Insert the dispensing valve into the device head.
3. Gently screw the decorator tip onto the dispensing valve-not too
tightly-as far as possible.
4. Fill the bottle with the ingredients.
NOTE: Observe the outer filling line and the marking on the bottom of the bottle. Do not overfill! The remaining empty space is necessary for an optimal whipping result. Use a measuring cup!
CHARGING THE DEVICE
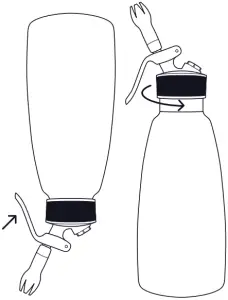
5. Screw the device head onto the bottle straight and hand-tight.
6. Insert the Kisag dispenser charger into the charger holder. Press the
charger into the filling valve until the flow of the charger contents can be
heard.
NOTE: Never puncture the charger if no decorator tip is screwed onto the dispensing valve.
CAUTION: The device is now under pressure!
7. Shake the device vigorously at least 4 times.
NOTE: A quiet hissing when unscrewing the charger holder is a system characteristic.
USING THE DEVICE
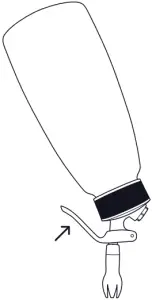
8. For dispensing, the device must be held upside down (with the decorator tip pointing straight down!) and the lever must be pressed gently.
NOTE: Check the consistency of the dispensed ingredients when using the device for the first time. If the consistency is still too liquid, shake the device again.
CLEANING.
MAIN CLEANING
NOTE: Please note the illustration for cleaning!
- Depress the lever until the device is completely empty and depressurized. Unscrew the device head from the bottle.
- Unscrew the decorator tip. To do this, hold the dispensing valve by the plastic part on the inside of the head. Then pull the dispensing valve out of the head.
- Remove the head gasket for basic cleaning.
- Pre-rinse the product components by hand with warm tap water and commercially available cleaning agent and clean the dispensing valve and the decorator tip with a cleaning brush. Remove fat and protein residues completely!
- Clean all parts in the dishwasher afterwards as required.
NOTE: Do not use any special stainless steel agents, scouring agents, or scratchy or abrasive sponges/ brushes.
NOTE: For machine and manual cleaning, ensure that the correct dosage of cleaning solution or combined disinfectant/cleaning solution is used. The exposure time and the selected temperature are important for the cleaning result.
INTERIM CLEANING
Clean the decorator tip at regular intervals (every 1-2 hours) during use. To do this, unscrew the decorator tip or rinse it with tap water while it is attached to the device.
QUICK CLEANING
- Depress the lever until the device is completely empty and depressurized. Unscrew the device head from the bottle.
- Fill the device with 0.5 l of warm water.
- Use the device with 1 Kisag dispenser charger in accordance with steps 5-8 under “Charging the device”.
- Press the lever as far as it will go and empty the Kisag device completely (hold it upside down) until the device is depressurized.
- Then carry out a main cleaning as described under “Main cleaning.”
NOTE: Quick cleaning does not replace thorough cleaning.
DISINFECTION
All product parts coming into contact with the fill ingredients can be cleaned as usual and then disinfected. The corresponding instructions for use for commercially available cleaning and disinfecting agents must be observed.
STORAGE.
If the Kisag device is not immediately refilled, let the components air-dry in a clean place and store the Kisag device in its dismantled state.
NOTE: Observe applicable food hygiene regulations.
TROUBLESHOOTING.
RELIEVING THE PRESSURE
Place the device upright, hold a cloth over the decorator nozzle, and then gently press the lever until there is no more pressure in the Kisag device. Only unscrew the device head from the bottle after this.
If the pressure cannot be relieved, please contact Kisag or your service center.
THE CONTENTS CANNOT BE REMOVED OR THE KISAG DEVICE SPRAYS.
-
Blockage due to undissolved ingredients such as sugar
• Relieve the pressure as described under “Relieving the pressure” and then carry out a main cleaning as described under “Main cleaning”.
• Ensure that powdery ingredients are completely dissolved. -
The cream or the preparation containing cream has become too stiff
• Reduce the shaking intensity and frequency the next time the device is charged.
• Observe the information on shaking frequency: www.kisag.com/faq -
The contents are too solid due to excessive cooling
• Leave the device at room temperature for about 5-10 minutes.
• Observe the operating temperature of the Kisag device. -
Incorrect pressure conditions in the device
• Only use original Kisag dispenser chargers.
• Do not reuse empty chargers and return them for recycling.
• Only operate the device upside down with the decorator nozzle pointed straight down or pressure loss will ensue.
• Note the maximum number of chargers to be used listed in the device data.
• The device head was not screwed onto the bottle by hand as far as possible
• The head gasket has not been inserted. Relieve the pressure as described under “Relieving the pressure” and charge the device again.
• The decorator nozzle was not screwed on. Relieve the pressure as described under “Relieving the pressure” and start up again.
• The bottle neck has been damaged. Relieve the pressure as described under “Relieving the pressure”. Send the device to Kisag or your service center.
THE DISPENSED CONTENTS ARE TOO LIQUID.
-
The device was overfilled
• Relieve the pressure as described under “Relieving the pressure”, pour out the excess contents and charge the device again.
• Observe the maximum filling quantity. -
The device was shaken too little or not at all
• Observe the information on shaking frequency: www.kisag.com/faq -
The contents are not cold enough.
• Put the filled and ready-to-use Kisag device in the refrigerator for 1-2 hours.
• Keep the filled Kisag device refrigerated between use. -
Too few chargers or an unsuitable charger was used
• Note the maximum number of chargers to be used listed in the device data.
• Only use original Kisag dispenser chargers.
THE CHARGER HOLDER IS DIFFICULT TO SCREW ON.
- The charger used is unsuitable
• Only use original Kisag dispenser chargers.
THE DISPENSER CHARGER IS NOT PUNCTURED.
-
The charger used is not suitable
• Only use original Kisag dispenser chargers. -
The charger was inserted upside down
• Insert the charger correctly (see the illustration in the instruction manual). -
The piercing unit has been damaged
• Send the device to Kisag or the service center.
THE DECORATOR TIP CAN NO LONGER BE UNSCREWED.
-
The decorator tip was screwed on too tightly
• Do not screw on the decorator tip too tightly, only screw it on gently as far as it will go.
• Relieve the pressure as described under “Relieving the pressure”. If the decorator tip still cannot be unscrewed, contact Kisag or the service center. -
Intermediate cleaning has not been carried out regularly
• Intermediate cleaning must be carried out every 1-2 hours.
• Hold the bottle with the tip under tap water and clean the tip with warm running water.
DURING CHARGING, GAS ESCAPES THROUGH THE DISPENSING VALVE OR THE DECORATOR TIP.
-
The device was charged without the tip screwed on
• Before screwing in the charger, make sure that the decorator tip is screwed onto the dispensing valve.
• Relieve the pressure as described under “Relieving the pressure” and charge the device again. -
The gasket in the dispensing valve has been damaged
• The dispensing valve must be replaced and is available as an original Kisag spare part.
GAS ESCAPES BETWEEN THE BOTTLE AND THE HEAD DURING CHARGING.
-
The head gasket is missing
• Relieve the pressure as described under “Relieving the pressure” and then insert the head gasket into the head. -
The head gasket is damaged
• Relieve the pressure as described under “Relieving the pressure”. The head gasket must be replaced and is available as an original Kisag spare part. -
The head was not screwed on tight enough
• Screw the head onto the bottle hand-tight in accordance with the instruction manual. -
The bottle body has been damaged at the upper edge
• Relieve the pressure as described under “Relieving the pressure” and send the device to Kisag or the service center.
SERVICE.
Spare parts are available individually and at low cost.
For spare parts orders, please contact your specialist dealer. In Switzerland, spare parts are also available from kisag@kisag.ch
Only send in the complete device for repairs.
Spare parts can be identified via the exploded drawing.
Kisag AG
Bahnhofstrasse 3
4512 Bellach
Schweiz
Tel. +41 32 617 32 60
Fax +41 32 617 32 70
kisag@kisag.ch
www.kisag.ch
947002000
Read User Manual Online (PDF format)
Read User Manual Online (PDF format) >>