MIOPS V2 Splash Water Drop Kit User Manual
- June 5, 2024
- MIOPS
Table of Contents
- MIOPS V2 Splash Water Drop Kit User Manual
- 1. Content of the Package
- 2. Power and Operation
- 3. First Use
- 4. Camera and Flash Connection
- 5. Mobile Application
- 6. Connecting to MIOPS Splash
- 7. Firmware Upgrade
- 8. Using the Mobile Application
- 9. Adjusting Parameters
- 9.1. 1st Drop:
- 9.2. 2nd Drop:
- 9.3. Trigger:
- 9.4. Auto Adjustment:
- 10. Example Setup:
- 11. Settings Screen:
- 12. Valve Cleaning:
- 13. Troubleshooting:
- Read More About This Manual & Download PDF:
- References
- Read User Manual Online (PDF format)
- Download This Manual (PDF format)
MIOPS V2 Splash Water Drop Kit User Manual
1. Content of the Package
When you purchase a NEW MIOPS Splash Water Drop Kit, it will be delivered with
the following items.
1 x MIOPS Splash
1 x MIOPS Splash Holder(11” articulating arm)
1 x USB Power Cable 1 x Flash Cable (3.5mm to PC SYNC)
2. Power and Operation
Your MIOPS Splash comes with Micro USB power cable so you can attach it to any USB power source to turn it on. When you attach your MIOPS Splash to any USB power source, the LED will blink with short intervals which means it is waiting for pairing with Miops Mobile app.
3. First Use
Your MIOPS Splash may not be delivered with the latest firmware. If a new
firmware has been released, before you have used it for the first time,
you should update the firmware first. To get detailed information about the
firmware upgrade, see the Firmware Upgrade Section.
4. Camera and Flash Connection
The MIOPS Splash uses connection cables to trigger your camera or flash unit. It can trigger both of them but MIOPS Splash will be shipped with a flash cable only. If you need to trigger your camera, you should purchase a camera connection cable which is compatible with your camera brand and model. The MIOPS Splash is a versatile device, which is compatible with many brand and models. You can use the same device with many different cameras by just changing the camera connection cable. The MIOPS Splash has separate outputs for the camera and flash cables. The Camera output is a 2.5 mm stereo female jack. The camera cables have the male 2.5 mm stereo jack on one end. This end is plugged into the camera output. The other end changes depending on the camera make and model. This end is plugged in the shutter release port of your camera. The Flash output is a 3.5 mm stereo female jack. PC Sync Flash cable has a 3.5 mm male jack on one end. This end is plugged into the Flash output. The other end of the cable is a standard PC Sync port. This end is connected to the PC Sync port of the flash unit. If your flash does not have a PC Sync port, you can use an hot shoe adapter with a PC Sync port. The camera and flash cables are designed to trigger the cameras and flash units only. Do not use them for any other purpose. Doing so may damage the cable or the device.
5. Mobile Application
MIOPS Splash requires a mobile app which has been designed as an interface to configure and control your device easily. The communication between the smartphone and MIOPS Splash is done over Bluetooth connection. So, your smartphone has to be compatible with Bluetooth 4.0. MIOPS MOBILE app is available on iOS and Android platforms. Search for MIOPS MOBILE in your app store, or use the following buttons to download the app.
6. Connecting to MIOPS Splash
After opening the MIOPS Mobile app, it will search for available MIOPS products. If you powered on your MIOPS Splash, you will see it on the app screen as below.
Just touch the orange button at the right bottom corner to complete the pairing. Once pairing is completed, MIOPS Splash setup screen will appear on the screen.
Warning: Please make sure that your Bluetooth is turned ON in the connection preferences of your smartphone or tablet. Please also enable Google Location permission for Android operating system (Android needs this permission for Bluetooth devices and Miops Mobile doesn’t use any location data).
7. Firmware Upgrade
MIOPS Splash has the capability of updating its firmware without needing any cable connection to a computer. You can use the MIOPS Mobile app to check for new firmware version and then update the device with a single click. When you connect your device through MIOPS MOBILE app, it automatically checks your device’s firmware version and prompts a pop-up message if a new firmware is available. You can also use the “Check Firmware Updates” option in the Settings menu to check manually if there is a new firmware available by clicking Settings icon at the top right corner. When you click this icon, you will see the following screen.
If your device has the latest firmware version, you will see a message on the screen like “Your device is up to date”. If there is an available firmware version, you can start the upgrade process using this screen.
8. Using the Mobile Application
The MIOPS Mobile app has a main screen to change the settings of your water drop setup. You can see all of the parameters on this screen. When you connect your MIOPS Splash through the MIOPS MOBILE app, your device will stop blinking. This shows that you connected your device successfully.
9. Adjusting Parameters
The following screen is used to set parameters for your water drop photography setup
9.1. 1st Drop:
This screen is used to set the first drop. It has a single parameter. Drop Size: This parameter is used to set the size of the drop. The unit is in milliseconds. So if you set the drop size to 50, the valve will be open for 50 milliseconds. Drop size cannot be zero for the first drop as a single drop is a minimum requirement for the water drop photography.
You can also use Auto Adjustment button do find the proper drop size automatically. You can visit Auto Adjustment section for details. You can also Save this setting by clicking Save icon at the left bottom corner.
Once you click this icon, you will be asked for a Preset name. Just enter your setup name and click Save. You can recall your Preset by touching the field in the following screenshot

9.2. 2nd Drop:
This screen is used to set the second drop if needed. It has two parameters. Drop Size: This parameter is used to set the size of the drop. The unit is in milliseconds. For example, if you set the drop size to 50, the valve will be open for 50 milliseconds. Delay: This parameter is used to define the delay between the second drop and the first drop. The unit is in milliseconds. For example, if you set the delay to 120, the second drop will be released 120 milliseconds later than the first drop. You can set the drop size to zero if you don’t want to drip the second drop. 3rd and 4th Drop settings are same with 2nd Drop setting screen.
Camera Triggering: In this setup, you set the last parameter in the app to Camera. Connect the camera cable between the Splash and the Camera. And there is no connection between Splash and the Flash. With this setup, Splash drips the drops and then triggers your camera through the camera connection cable. However, you may be challenged with the shutter lag of your camera in this mode. If you would like to continue with triggering your camera, you can try to use your camera at Mirror Lockup. It will decresae the camera’s shutter lag shutter lag. This will prevent the consistency issues and help to create more consistent drops. Flash Triggering: In this setup, you set the last parameter in the app to Flash. Connect the sync cable between the Splash and the Flash. And you may or may not connect your Splash to your Camera. The Camera is set to long exposure (3-4 seconds) and it is used in a dark room. If you connect the camera and the Splash together with a cable, Splash opens the shutter of the camera first, then drips the drops and finally triggers the flash. Once the flash is triggered, the camera catches only this moment, since the room is dark. If you don’t connect the camera and the Splash together, you should press the shutter button manually before pressing the Start button on the app.
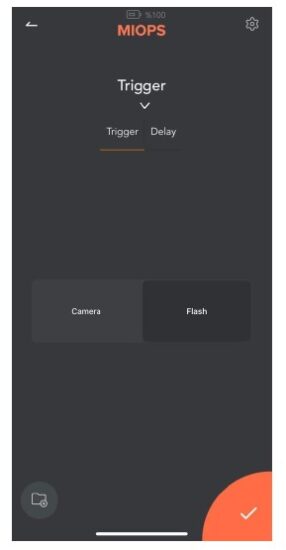
9.3. Trigger:
This screen is used to set the output behavior of your device. It has 2 parameters: Delay: This parameter is used to define the delay between the last drop and triggering of the flash or the camera. The unit is in milliseconds. For example, if you set the delay to 100, the flash or camera will be triggered 100 milliseconds later than the last drop. Trigger Mode: This parameter is used to define which output will be triggered after the last drop. You can select one of the two possible modes. The modes are the “Flash” and the “Camera”. In the “Camera” mode, it will trigger the camera after dripping the drop(s). In the “Flash” mode, it will trigger the camera to start the long exposure before releasing the drop(s) and trigger the flash after releasing the drop(s).
Camera Triggering: In this setup, you set the last parameter in the app to Camera. Connect the camera cable between the Splash and the Camera. And there is no connection between Splash and the Flash. With this setup, Splash drips the drops and then triggers your camera through the camera connection cable. However, you may be challenged with the shutter lag of your camera in this mode. If you would like to continue with triggering your camera, you can try to use your camera at Mirror Lockup. It will decresae the camera’s shutter lag shutter lag. This will prevent the consistency issues and help to create more consistent drops. Flash Triggering: In this setup, you set the last parameter in the app to Flash. Connect the sync cable between the Splash and the Flash. And you may or may not connect your Splash to your Camera. The Camera is set to long exposure (3-4 seconds) and it is used in a dark room. If you connect the camera and the Splash together with a cable, Splash opens the shutter of the camera first, then drips the drops and finally triggers the flash. Once the flash is triggered, the camera catches only this moment, since the room is dark. If you don’t connect the camera and the Splash together, you should press the shutter button manually before pressing the Start button on the app.
9.4. Auto Adjustment:
Auto Adjustment is just used for incrementing a parameter periodically to find the best setting. You can use Auto Adjusment function to find proper Drop Size and Delay parameters according to your setup. Once you entered Auto Adjusment Mode, you will see the following screen.
Drop Start Time (MS): This is inital drop size value for Auto Adjustment Step (MS): Drop Size increment value on each iteration Interval (SEC): The interval value between each iteration Once you entered these values and click the Play button on the screen, your Miops Splash will start to create drops and increase the drop size using Step value in each iteration. So you can these drops in your photos and wait until to see the best drop. Once you got the best result, you can stop the Auto Adjustment and use this drop setting. The parameters and setting of them are similar for Delay parameter.
10. Example Setup:
You can find an example setup for 2 drop water collision below.
1st Drop: Duration: 50ms 2nd Drop: Duration:50ms – Delay:100ms Trigger: Mode:
Flash Delay:200ms Height: 25 cm (from the water surface to the dripper)

11. Settings Screen:
You can use the Settings menu to change application related or device related settings or to get information. You can see the serial number of your device on this screen. Pulse Length: This parameter is used to determine the pulse length of each trigger signal for the camera and the flash. Shutter Lag: Camera shutter lag value. You can enter the proper value to this field according to your camera brand and model. Language: This parameter is used to change the language of the mobile application. Buy Now: This button is used to visit the store for purchasing the product. Feedback: This screen is used to give feedback about the mobile application to the developers.
Check Firmware Updates: This button is used to check if there is a firmware available. User Manual: You can reach the Support page of Miops Splash Send Debug Data: This button is used collect all parameters of your app and Miops Splash to share with us for debugging purposes.
12. Valve Cleaning:
With the new design of MIOPS Splash, it is now easier to clean the valve. Just remove the following screw by turning it counter clockwise and valve will be removed from the enclosure. Clean the valve part and assemble it to its place and then turn the valve screw clockwise to fix the valve to its place.
13. Troubleshooting:
– My Splash is leaking, what can I do?
If the leakage comes from the transparent tube, it may not fit the place well.
Please disassemble the transparent tube.
Splash doesn’t trigger my camera. What can I do?
If you cannot trigger your camera using your Splash, please check the
following items.
- If you have purchased a camera connection cable, please connect your Splash to your camera and set the last parameter (Trigger) on the app to Camera. In this case, the Splash will trigger your camera after dropping water.
- Set your lens to Manual Focus
- Set your camera to MF instead of AF 4
- Visit the Setting section in the app and try longer Pulse Length values
I can see the MIOPS Splash in available Bluetooth devices in my phone but
MIOPS Mobile app cannot find the device. What can I do?
Actually if smartphone sees Miops in available Bluetooth devices, Miops Mobile
app should find it also. Sometimes, location permission prevent this so please
check if Google Location services are enabled
Read More About This Manual & Download PDF:
References
- appgallery.huawei.com/#/app/C102600971
- MIOPS MOBILE on the App Store
- MIOPS MOBILE - Apps on Google Play
Read User Manual Online (PDF format)
Read User Manual Online (PDF format) >>