Yinyun FL200 Corner Floor Lamp User Manual
- June 2, 2024
- Yinyun
Table of Contents
- Yinyun FL200 Corner Floor Lamp
- Product Diagram
- Product List
- Product Installation Steps
- Instructions for Controller
- Instructions for Remote Control
- APP Download and Bluetooth Connection
- App Instructions
- Switch to the Color and Brightness Interface
- Switch to the Mode Interface
- Switch to the Music Rhythm Interface
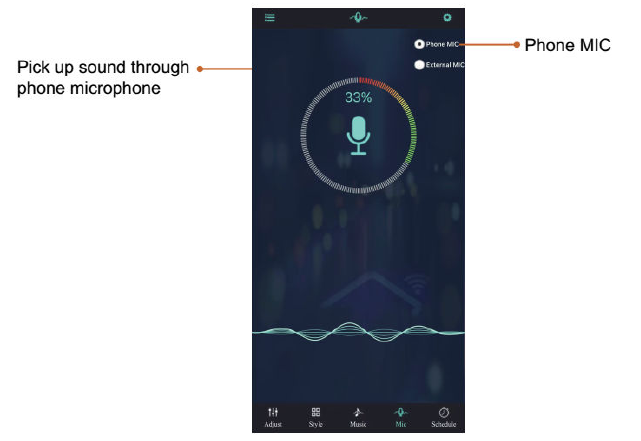
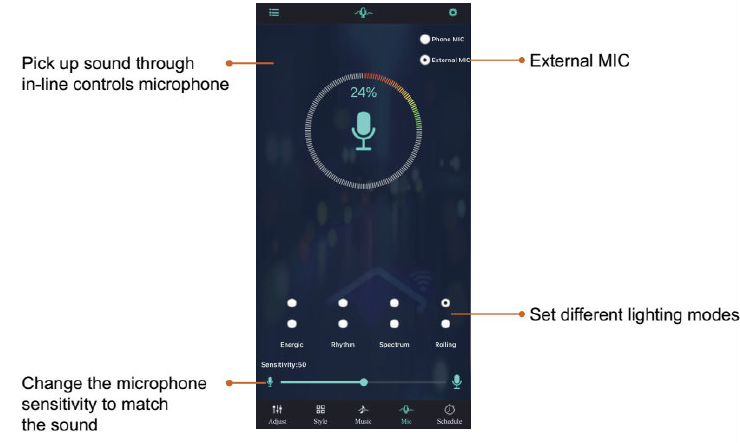
- Switch to the Microphone Rhythm Interface
- Switch to the Timing Interface
- Switch to the Timing Interface
- Switch to the Setting Interface
- Common Problems
- FCC Warnning:
- ISED Statement
- Product Specifications:
- Frequently Asked Questions (FAQ):
- Read User Manual Online (PDF format)
- Download This Manual (PDF format)
Yinyun FL200 Corner Floor Lamp
USER MANUAL
Thank you for choosing our product.
To provide an excellent user experience, please install it according to these instructions and then give the instructions to the appropriate person for retention and future reference.
Product Diagram
Product List

(1)(2)(3). Light-1 -2 -3
(4). Counterweight bracket
(5). Controller
(6). Nut
(7). User manual
(8). Remote control
(9). Screwdriver
(10). Screw-fixed counterweight bracket “4pcs
(11). Used to lock the base screws ( You can adjust the direction of the
light. )
(12). Long screw
Product Installation Steps
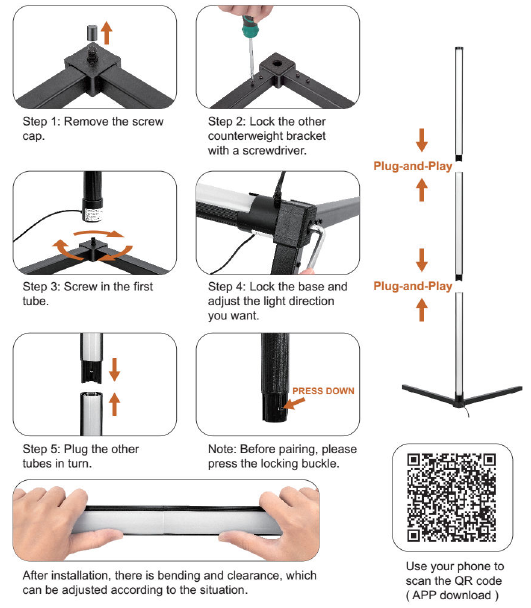
Instructions for Controller
- Working temperature: -2D’C:-50f:
- Input Volt.: 5V/1A-2A
- Remote control distance: about 1 O meters
- Remote control: Advanced 2.4G technology
Instructions for Remote Control
The remote control has 24 buttons.
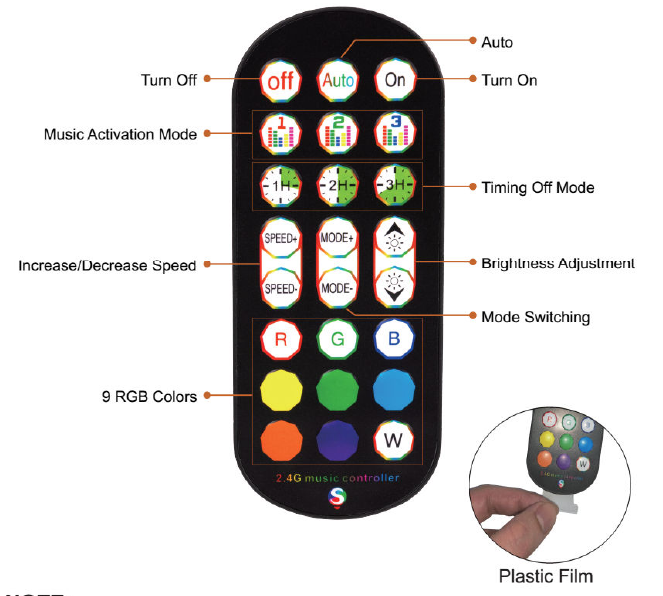
1.lf the remote control is out of control, please check whether it is locked
or check its battery.
2.Remove the plastic film before use.
APP Download and Bluetooth Connection
Android and iOS systems can download the APP by scanning the QR code. Open the browser or other tools with” scan QR code” function, scan the QR code as below.
Scan the QR code to download the duoCo StripX APP
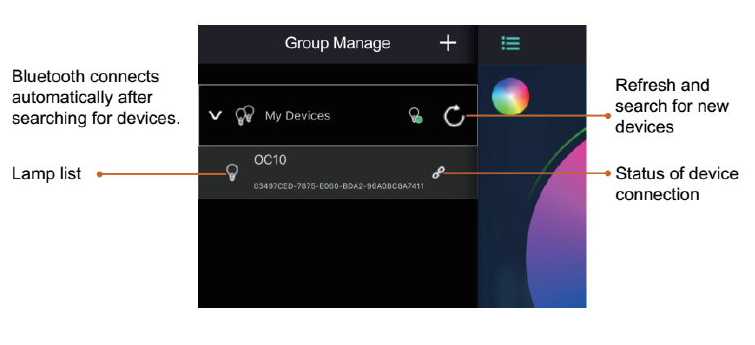
Bluetooth Connection
1.Connect the floor lamp to the power supply.
2.Turn on Bluetooth function on cellphone, then click duoCo StripX icon to enter the APP.
3.For 10S system device: After entering the APP, the cellphone will automatically pop up whether lo enable the Bluetooth function of this device, please click “ OK “.
For Android system device: After entering the APP, and then the cellphone will pop up to whether allow to find and connect nearby devices, please click “Allow”.
NOTE:
This product uses USB 5V/1A-2A cable and it can be conveniently, safely, and
stably connected to any USB port power supply.
App Instructions
Enter the APP interface and open the upper right corner Settings to view
Guide. You’ll have all the instructions here.
Click to show the lamp list, then view the lamp list.
Switch to the Color and Brightness Interface

CIiek to enter RGB manual adjustment view
Switch to the Mode Interface
Switch to the Music Rhythm Interface
Switch to the Microphone Rhythm Interface
Switch to the Timing Interface
Switch to the Timing Interface

Switch to the Setting Interface
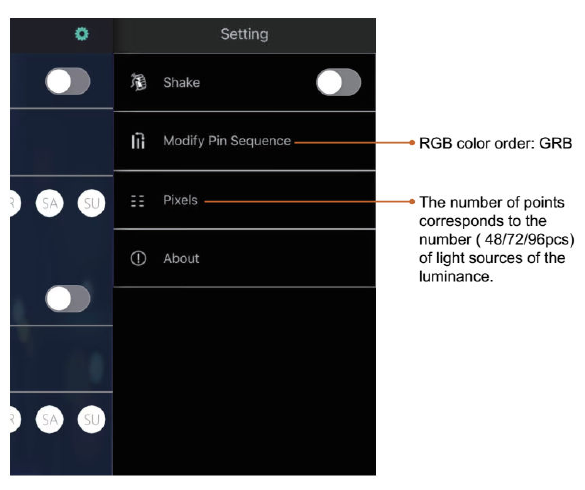
*Do not change the settings at will.
1.Please do not change the “Modify Pin Sequence”, otherwise the corresponding
color will be changed. For example, choosing blue shows red.
2.The change of the number of points will affect the dynamic effect of the
light.
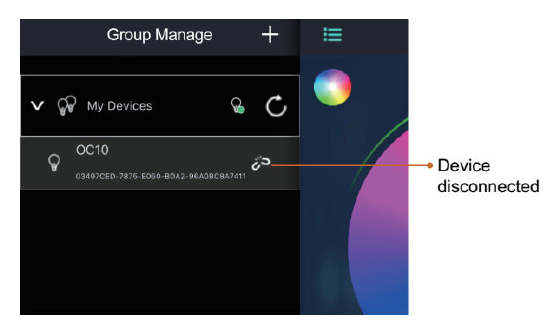
Common Problems
APP cannot connect to the Bluetooth.
–‘Check whether the power supply is normal.
–‘Check whether the Bluetooth is turned on.
–,Check whether there are other cellphones connected, only support one to one
connections, not many to many.
–!Please check the APP Bluetooth setting if the cellphone is connected to the
device. If connect, exit the APP and reopen it, the APP will automatically
connect.
-Normal operation but can not connect, please exit the APP and reopen.
–E, xit the APP, restart the cellphone, power on the strip light, reopen the
APP, then it will automatically connect.
WARNING
“DO NOT IMMERSE IT IN FIRE, ‘CHILDREN UNDER THE AGE OF 16 SHOULD USE THIS PRODUCT UNDER ADULT SUPERVISION.
FCC Warnning:
This equipment has been tested and found to comply with the limits for a Class B digital device, pursuan t to part 15 of the FCC Rules. These limits are designed to provide reasonable protection againstharmful interference in a residential installation. This equipment generates, uses and can radiateradio frequency energy and, if not installed and used in accordance with the instructions, maycause harmful interference to radio communications. However, there is no guarantee thatinterference will not occur in a particular installation. If this equipment does cause harmfulinterferenc e to radio or television reception, which can be determined by turning the equipmentoff and on, the user is encouraged to try to correct the interference by one or more of thefollowing measures:
- Reorient or reloca te the receiving antenna.
- Increase the separation between the equi pment and receiver.
- Connect the equipment into an outlet on a circuit different f rom that to which the receiver is c onnected.
- Consult the dealer or an experienced radio/TV technician for help.
Caution: Any changes or modifications to this device not explicitly approved by manufacturer could void your authority to operate this equipment.
This device complies with part 15 of the FCC Rules. Operation is subject to the following two conditions:
(1)This device may not cause harmful interference, and (2) this device must accept any interference r eceived, including interference that may cause undesired operation.
This equipment complies with FCC radiation exposure limits set forth for an uncontrolled environment. This equipment should be installed and operated with minimum distance 0cm between the radiator and your body.
ISED Statement
This device complies with Industry Canada license-exempt RSS standard(s). Operation is subject to the following two conditions: (1) This device may not cause interference, a nd (2) This device must accept any interference, including interference that may cause undesired operation of the device.
The digital apparatus complies with Canadian CAN ICES-3 (B)/NMB-3(B).
This equipment complies with Canada radiation exposure limits set forth for an
uncontrolled environment.
This equipment should be installed and operated with minimum distance 0cm
between the radiator & your body.
Product Specifications:
- Manufacturer: [Manufacturer Name]
- Model: [Model Number]
- Compliance: FCC Part 15, Industry Canada license-exempt RSS standard(s)
- Radiation Exposure Limits: FCC and Canada compliant
- Distance Requirement: Minimum distance of 0cm between radiator and body
Frequently Asked Questions (FAQ):
Q: What should I do if the device is not powering on?
A: Check the power source connection and ensure it is plugged in correctly. If the issue persists, contact customer support for assistance.
Q: Can I modify the device for additional features?
A: Any modifications not approved by the manufacturer can void the warranty and may affect the device’s performance. It is recommended to use the device as intended.
Read User Manual Online (PDF format)
Read User Manual Online (PDF format) >>