ioHOMES Spiro Rustic Reversible Ladder Twin Over Full Size Bunk Bedroom Instruction Manual
- June 16, 2024
- ioHOMES
Table of Contents
- ASSEMBLY INSTRUCTIONS
- CHECK BEFORE STARTING
- PRE ASSEMBLY INTRODUCTION
- ASSEMBLY AND CARE ADVICE
- PARTS
- HARDWARE
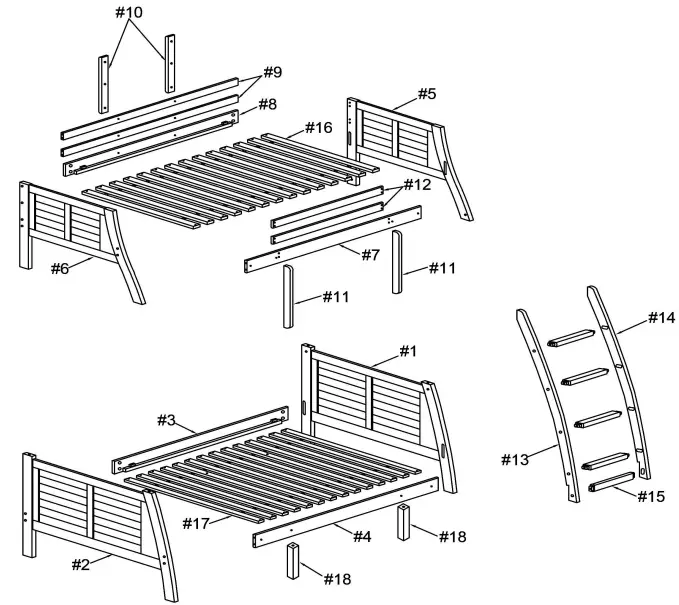
- Exploded View
- packed in 3 cases
- _
- DIelgnation
- Part
- Hardware
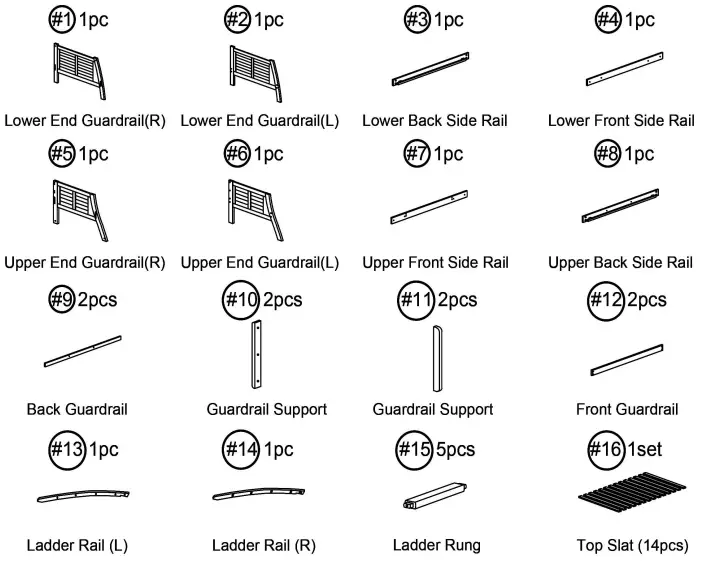
- Lower End Guardrail(R)
- .1
- Lower End Guardrail(L)
- 42
- Upper End Guardrail(R)
- 45
- Upper End Guardrai(L)
- 46
- Lower Back Side Rail
- 43
- evz .
- CM-BK963-2 op ie . 41**
- Lower Front Side Rail
- I
- 4:1 ■ 151
- Upper Front Side Rail
- 47
- — IC • Ilect ® se . A.. **10
- Upper Back Side Rail
- 18
- ****
- IC ION! .. •
- li ■ If • 24in
- Bath Guardrail
- its
- ****
- a= It be ll ■ IR • fIc• 1— n **•
- Guardrail Support
- #10
- ****
- Guardrail Support
- #11 __ **®—
- **
- **
- Front Guardrail
- #12
- ****
- Ladder Rail (L)
- an
- Ladder Rail (R)
- #14
- **
- Ladder Rung
- #16
- ****
- Support Leg
- ma
- ASSEMBLY INSTRUCTIONS
- ASSEMBLY INSTRUCTIONS
- ASSEMBLY INSTRUCTIONS
- ASSEMBLY COMPLETED
- Safety Warnings for Bunk Beds
- WARNING: STRANGULATION HAZARD
- Read User Manual Online (PDF format)
- Download This Manual (PDF format)
ioHOMES Spiro Rustic Reversible Ladder Twin Over Full Size Bunk Bedroom
Instruction Manual

ASSEMBLY INSTRUCTIONS
Allen Wrench
(Included)
Phillips Screwdriver
(Not Included)
3 – People Recommended
ASSEMBLY RATING
The Assembly Rating is a 5-point system showing the level of effort needed to assemble a specific product
CHECK BEFORE STARTING
Are you missing anything?
Double-check all parts, hardware and accessories listed on Page 6 are
accounted for.
Check out our Quick Tips!
We recommend reviewing the pre-assembly handouts. Even experts need a
refresher now and then!
Should we send any replacements?
Are there any irregularities or flaws in the parts? We can send replacements!
Prep Time!
Please review the assembly instructions and all diagrams prior to assembling.
Arrange parts as recommended on Page 7 and group identical hardware together
to make assembling easier
PRE ASSEMBLY INTRODUCTION
We understand building ready-to-assemble furniture can be a challenging experience for some. To help avoid confusion, we have provided some helpful tips that may speed up the process.
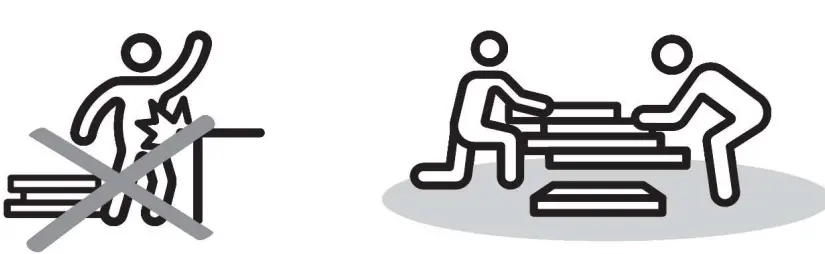
Teamwork
ALWAYS have at least two people to help with transporting and assembling the
product to avoid potential injury and/or damage.

Suitable Location
Assembling near the area of the intended location is highly recommended.
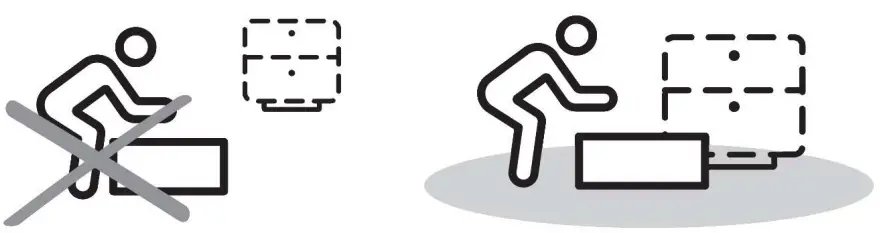
Sufficient Space
Make sure you have enough space to move around during the assembly.
Avoid Scratches
Use cardboard, blankets or a carpeted area while assembling furniture to
prevent scratches.

Flat Surface
Make sure the furniture rests on a fiat and level surface with each leg evenly
touching the floor.

ASSEMBLY AND CARE ADVICE
FAILURE TO FOLLOW THE GUIDELINES BELOW MAY RESULT IN INJURY AND/OR PROPERTY DAMAGE.
-
Position each part correctly and insert screws or bolts into their respective holes.
-
Turn clockwise to tighten and only tighten when step is completed or when instructed to do so.
-
Use the appropriate hand tools or power tools for assembly. Select steps, such as tightening screws
-
and/or bolts, may require hand tools to avoid causing damage during assembl
-
Save the instructions and store any supplied tools for later maintenance
-
After two weeks, check and tighten any loose hardware and repeat again every six months thereafter.

IT IS THE USER’S RESPONSIBILITY TO MAINTAIN THE FURNITURE. THE HARDWARE MAY LOOSEN OVER TIME AND MAY CAUSE THE FURNITURE TO BE WOBBLY AND UNABLE TO SUPPORT ITS INTENDED WEIGHT CAPACITY. THIS MAY LEAD TO COLLAPSE AND MAY CAUSE SERIOUS INJURY.
PARTS
HARDWARE

Exploded View
packed in 3 cases
_
|
DIelgnation
|
Part
|
Hardware
|
---|---|---|---|---
|
Lower End Guardrail(R)
|
.1
| | |
Lower End Guardrail(L)
|
42
|
Upper End Guardrail(R)
|
45
|
Upper End Guardrai(L)
|
46
|
|
Lower Back Side Rail
|
43
|
evz .
|
CM-BK963-2 op ie . 41**
|
Lower Front Side Rail
|
I
|
4:1 ■ 151
Upper Front Side Rail
|
47
| |
— IC • Ilect ® se . A.. **10
I'” On •**
|
Upper Back Side Rail
|
18
|
****
IC ION! .. •
|
li ■ If • 24in
|
Bath Guardrail
|
its
|
****
|
a= It be ll ■ IR • fIc• 1— n **•
Coce li 1 PI**
|
Guardrail Support
|
#10
|
****
Guardrail Support
|
#11 __ **®—
**
|
**
**
|
**
 **
**
Front Guardrail
|
#12
|
****
Ladder Rail (L)
|
an
|

Ladder Rail (R)
|
#14
|
**
 **
**
Ladder Rung
|
#16
|
****
|
Support Leg
|
ma
|

| |
Top Slat (14pes)| ale| 
Bottom Slat (14pes)| #17|
ASSEMBLY INSTRUCTIONS
Part x1pc
Part 2 x1pc
Part 3 x1pc
Part #4 x1pc
Hardware #B x8pcs
Hardware #C x8pcs
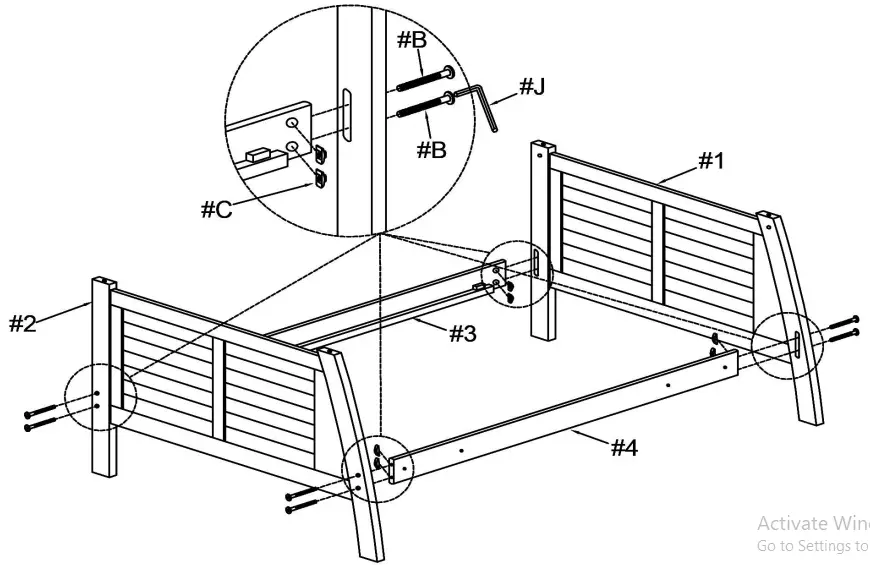
Align lower end guardrails (#1,2) to the lower front and back side rails (#3,4), then secure by using bolts (#B) onto hanger nuts (#C).
Hardware #G x4pcs
Hardware #H x4pcs

Align connection nuts (#G) to end guardrails (#1,2) , then secure by using bolts (#Н).
ASSEMBLY INSTRUCTIONS
Part #5 x1pc
Part 6 x1pc
Part # x1pc
Part #8 x1pc
Part 9 x2pcs
Hardware #A x4pcs
Hardware #8 x8pcs
Hardware#Cx8pcs
Hardware #D x4pcs

Insert dowels (#A) to upper end guardrails (#5,6) , then secure back guardrails (#9) to upper end guardrails (#5,6) by using screws (#D).
Part #11 x2pcs
Hardware #F x4pcs
Align guardrail supports (#11) to front side rail, then secure by using bolts (#F).
ASSEMBLY INSTRUCTIONS
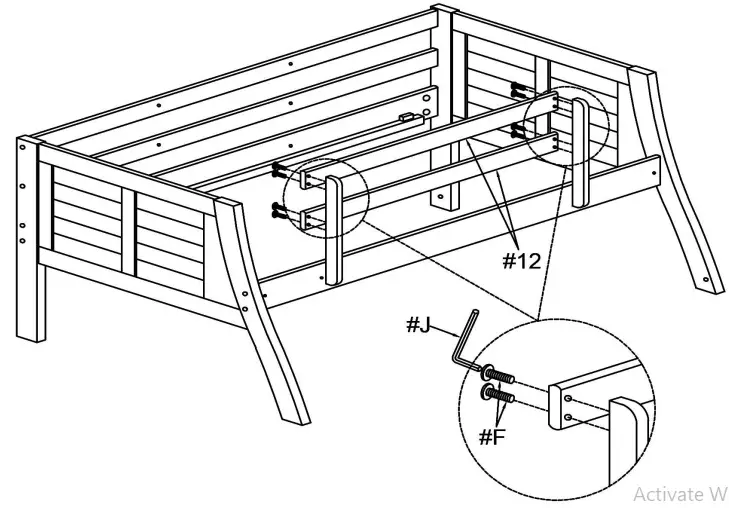
Part #12 x2pcs
Hardware #Fx8pcs

Align front guardrails (#12) to the support, then secure by using bolts
(#F).
Part 10 x2pcs
Hardware #F x6pcs
 Align supports (#10) to the
back rails, then secure by using bolts (#F)..
Align supports (#10) to the
back rails, then secure by using bolts (#F)..
Hardware #H x4pcs
Align upper bunk to lower bunk, then secure by using bolts (#H). #5

Hardware/Fx4pcs
 Align ladder in either
side of the bunk bed, then secure by using bolts (#F).
Align ladder in either
side of the bunk bed, then secure by using bolts (#F).
Part #16 x1set
Part #17 x1sel
Hardware#1 x56pcs
 Align slat kits (#16,17) to the
bunk bed, then secure by using screws (#1).
Align slat kits (#16,17) to the
bunk bed, then secure by using screws (#1).
Part10 x2pcs
Hardware #F x 2pcs Align support leg (#18) to the
slat kit (#17). then secure by using bolts (#F)
Align support leg (#18) to the
slat kit (#17). then secure by using bolts (#F)
ASSEMBLY COMPLETED
Please ensure the furniture rests on an even and flat surface. If the product
wobbles or feels loose, double-check all bolts and/or screws are properly
tightened and secured. Keep this handy!
Please retain this instruction manual and any order-related Information for
future reference.
Lift, don’t drag!
To avoid damage to product please always LIFT the product when transporting of
adjusting the placement.
Safety Warnings for Bunk Beds
- Read and follow the information on the WARNINGS shown on the end structure of the upper bunk and on the carton.
- Do not remove warning label from the bed. Keep these instructions for future reference.
- IMPORTANT: Must use Bunkie mattress or Bunkie board. The proper sizes for the UPPER/LOWER TWIN-SIZE Bunkie mattress or Bunkie board should be 74″ long and 37½” – 38½” wide with no more than 6″ thickness and for the UPPER/LOWER FULL-SIZE should be 74″ long and 53″54″ wide with no more than 6″ thickness.
- Surface of mattress must be at least 5 inches (127 mm) BELOW the upper edge of guardrails.
- The MAXIMUM weight capacity for the upper bunk is not to exceed 175 lbs. Do not allow children under 6 years of age to use the upper bunk.
- Periodically check and ensure that the guardrails, ladder, handle and other components are in their proper position, free from damage, and that all connectors are tightened and secured.
- DO NOT allow horseplay, rough playing or jumping on the beds and do not allow playing or hiding under the beds.
- Always use the ladder for entering or leaving the upper bunk.
- Do not use substitute parts. Contact the manufacturer or dealer for replacement parts.
- Use of a nightlight may provide added safety precaution for a person using the upper bunk.
- Always use the guardrails on both sides of the upper bunk.
- If the bunk bed will be placed next to a wall, the guardrail that runs the full length of the bed should be placed against the wall to prevent entrapment between the bed and the wall.
- The use of water or sleep flotation mattresses is prohibited.
- No more than one person is allowed on the upper bunk at all times.
WARNING: STRANGULATION HAZARD
Never attach or hang objects to any part of the bunk bed that are not designed for use with the bed. Objects such as hanger, hook, belt, bag, rope, string, etc. should not be used on or around the bunk bed.
Read User Manual Online (PDF format)
Read User Manual Online (PDF format) >>