Drexma Type UDG Non Programmable Instruction Manual
- June 14, 2024
- Drexma
Table of Contents
- Type UDG Non Programmable
- Introduction
- First Time Settings
- Ground Fault Circuit Interrupter (GFCI)
- Active Display
- Exit Menu
- 4-Event Program
- Quick Set Temperature
- Adaptive Function
- Manual Mode
- Temporary Override
- Child Lock
- Temperature Unit
- Setting Time
- Setting Day
- Offset Temperature
- Display
- Factory Reset
- References
- Read User Manual Online (PDF format)
- Download This Manual (PDF format)
USER MANUAL
Type UDG Non Programmable
XXXXX 12/22 (KJE)
© 2022 OJ Electronics A/S
Introduction
The thermostat can switch on your heating system at predetermined times on
different days of the week. For each day of the week, you can set individual
temperatures for 4 periods, called events. The thermostat comes with a default
schedule suitable for most installations. Unless you change the settings, the
thermostat will operate in compliance with the default schedule. Lowering the
temperature when the home is unoccupied will reduce your energy costs without
reducing comfort.
Furthermore, the thermostat features an adaptive function that automatically
changes heating period start times so as to ensure that the required
temperature is reached at the required time.
After three days the adaptive function has learned when the heating must be
switched on.
First Time Settings
The first time you turn on the thermostat, time and day must be set. The time flashes. Set the current time using the Up or Down buttons. Then press the OK button to confirm the time. The day of the week will then flash. Select the current day using the Up and Down buttons. Press the OK button. The thermostat is now ready for use and will control your heating according to the pre- programmed 4-event schedule (see Factory Settings for Automatic 5:2 Program).
Ground Fault Circuit Interrupter (GFCI)
The thermostat has a built-in GFCI that ensures personal safety in case of
ground faults.
It is important that the GFCI is checked monthly.
Checking the GFCI
Testing can only be performed while the thermostat is calling for
heat.
Adjust the setpoint until the heating symbol ( ) appears. Use the Up button to
increase the heating demand and then press the OK button
Wait 10 seconds to allow the thermostat to adjust to the new setpoint.
Then press the TEST button on the top of the thermostat.
The test is successful if the red light in the TEST button lights up and
GROUND FAULT is shown on the display. If this does not occur, check the
installation/contact your electrical installer.
Press the Standby/Reset button to reset the GFCI.
The red light should go out and the display returns to normal appearance.
Press the Down button to return to the original temperature setting.
If the test fails, check the heating cable and thermostat.
If during normal operation the GFCI trips without the TEST button being
pressed, there could be a ground fault! To check whether it is a ground fault
or nuisance tripping, press Standby/Reset.
If this causes the red light to go off and stay off, it was nuisance tripping
and the system is operating correctly. If this does not occur, there is a
ground fault! Contact your electrical installer.
Active Display
After 1 minute without user activity the display will go into idle mode (the display backlight will turn off). Press any key to activate the display.
Exit Menu
I want to exit a menu.
To do so, you must use the EXIT option:
The various menus and submenus contain an EXIT option.
- Press the Up or Down buttons until EXIT flashes.
- Press the OK button. You may have to repeat steps 1 and 2 to return to the final EXIT option.
Please note: When you activate a menu, the menu item last selected will begin
flashing. This allows you to view the latest setting. If, for example, you
activate the MODE menu, MAN. MODE will flash if you used MAN. MODE the last
time.
This principle also applies to current temperature/time settings. When you
enter the various menus, they always display the value that was last selected.
This allows you to check the current settings.
Should you enter a menu by mistake, you can exit it again without changing the
setting by simply confirming the current setting, i.e. by clicking the OK
button.
4-Event Program
I want the temperature to be controlled automatically in accordance with a program of individual temperature settings for four separate events during a day:
- when I wake up in the morning,
- when I am away at work,
- when I come home,
- and at night.
To do so, you must perform the following 3 steps:
Step 1: Select automatic temperature control.
- With Active Display (backlight on) press OK to activate the menu.
- Press the Up or Down buttons until the MODE option flashes.
- Press the OK button.
- Press the Up or Down buttons until the AUTO options flashes in the upper part of the display.
- Press the OK button.
Factory setting: Auto mode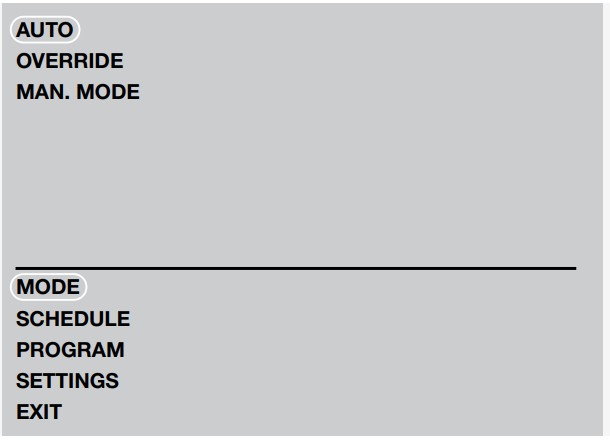 Step 2: Choosing the weekly schedule for your
program.
Step 2: Choosing the weekly schedule for your
program.
You have the following options:
5:2 will give you 5 days (Monday to Friday) with the same four events
(Morning, Out, Home, Night) and 2 days (Saturday and Sunday) with the same two
events (Morning and Night).
6:1 will give you 6 days (Monday to Saturday) with the same four events
(Morning, Out, Home, Night) and 1 day (Sunday) with the same two events (Day
and Night).
7:0 will give you individual settings for each day from Monday to Sunday.
- With Active Display (backlight on) press OK to activate the menu.
- Press the Up or Down buttons until the SCHEDULE option flashes.
- Press the OK button.
- Press the Up or Down buttons until the required program (5:2, 6:1 or 7:0) flashes in the lower part of the display.
- Press the OK button.
 Step
3: Select the time and temperature settings for each event in the program of
days selected in the previous step.
Step
3: Select the time and temperature settings for each event in the program of
days selected in the previous step.
- Press the Up or Down buttons until the PROGRAM option flashes.
- Press the OK button.
- Press the Up or Down buttons until the day(s) that you wish to program flash in the lower part of the display, e.g. MON TUE WED THU FRI.
- Press the OK button. The symbol for the first event (e.g. morning) will now flash.
- Press the OK button. The time will flash, allowing you to set the time at which you want the period to begin. The time can be set in an interval of 15 minuttes.
- Press the Up or Down buttons until the required time is displayed.
- Press the OK button. The temperature setting will now flash in the upper part of the display.
 Please note: The following description illustrates an example in which settings are made for the daily events in a 5:2 program.
 - Press the Up or Down buttons to set the required temperature.
- Press the OK button. The symbol for the next event (e.g. at work) will now flash, allowing you to set the time and temperature for this period of the day by repeating steps 5-9.
- Once time and temperature have been set for the four events applicable for the 5-day period Monday to Friday, the first event symbol for the next 2 says, SAT SUN, will then flash. Please note that now only two events (Day and Night) are displayed.
- Set the time and temperature for this event, and for the following event, by repeating steps 5-9.
- Once time and temperature have been set for the two events applicable for the 2-day periode Saturday and Sunday, the setup will return to the main menu with PROGRAM flashing.

Quick Set Temperature
I want to permanently change the temperature for the event currently active in the automatic program.
To do so, you must:
- Press the Up or Down buttons to set the required temperature for the event currently active.
- Press the OK button.
The new temperature setting will then be saved and used for this event in the
future.
Example: If you change the temperature on a Tuesday morning while the
thermostat is running a 5:2 program, the new temperature will apply to all
mornings from Monday to Friday.
Adaptive Function
I want to ensure that the required temperature has already been reached when I
get up in the morning or come home from work.
To do so, you must activate the adaptive function:
- With Active Display (backlight on) press OK to activate the menu.
- Press the Up or Down buttons until the SETTINGS option flashes.
- Press the OK button.
- Press the Up or Down buttons until the ADAPTIVE option flashes.
- Press the OK button. ON or OFF will now flash in the upper part of the display.
- Press the Up or Down buttons until ON flashes.
- Press the OK button.
- Follow the Exit Menu procedure to exit the menu.
Please note: The adaptive function is only related to the 4-event program and
only works in connection with going from one event to another where the
temperature is going to be raised.
The adaptive function calculates when the thermostat must start the heating
system to ensure that the required temperature is reached at the set time.
Three days after the adaptive function has been activated, ithas learned when
the heating must be switched on to attain the required temperature.
Factory setting: ON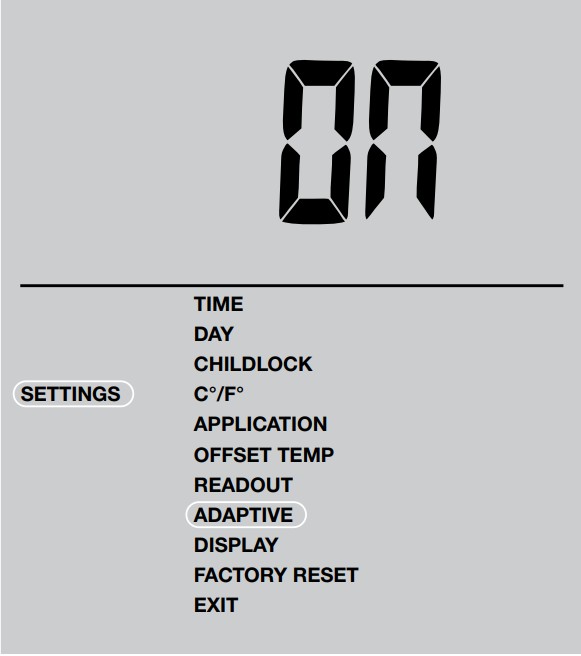
Manual Mode
I want to temporarily cancel the automatic 4-event program and manually select
temperature.
To do so, you must use manual mode:
- With Active Display (backlight on) press OK to activate the menu.
- Press the Up or Down buttons until the MODE option flashes.
- Press the OK button.
- Press the Up or Down buttons until MAN. MODE flashes in the upper part of the display.
- Press the OK button. The temperature will begin to flash.
- Press the Up or Down buttons until the required temperature flashes.
- Press the OK button.
Please note: This feature can be useful for instance if you are going on
holiday and want to maintain a frost protection temperature (e.g. 41°F) while
you are away.
To return to the automatic 4-event program, you must select Auto. Please refer
to page 2 for instructions.
Temporary Override
I want to temporarily set a comfort temperature for a single event, e.g.
because I am not at work one day and want to maintain a higher temperature or
because I am having a party.
To do so, must use override mode:
- With Active Display (backlight on) press OK to activate the menu.
- Press the Up or Down buttons until the MODE option flashes.
- Press the OK button.
- Press the Up or Down buttons until OVERRIDE flashes in the upper part of the display.
- Press the OK button. The temperature will begin to flash.
- Press the Up or Down buttons until the required temperature flashes.
- Press the OK button.
Please note: Override mode is a temporary temperature setting that is
cancelled automatically by the next event in the scheduled 4-event
program.
Child Lock
I want to lock the thermostat menus to prevent the settings from being
changed.
To do so, you must activate the child lock:
-
With Active Display (backlight on) press OK to activate the menu.
-
Press the Up or Down buttons until the SETTINGS option flashes.
-
Press the OK button.
-
Press the Up or Down buttons until the CHILDLOCK option flashes.
A padlock symbol will appear in the menu area. -
Press the OK button. OFF will flash in the upper part of the display.
-
Press the Up or Down buttons until ON flashes.
-
Press the OK button.
-
Follow the Exit Menu procedure to exit the menu.
To unlock the child lock again, proceed as follows:
- With Active Display (backlight on) press OK to activate the menu.
- Then press and hold the Up and Down buttons simultaneously for three seconds.
Factory setting: OFF
Temperature Unit
I want to change the temperature unit (°C/°F) used in the display.
To do so, you must:
-
With Active Display (backlight on) press OK to activate the menu.
-
Press the Up or Down buttons until the SETTINGS option flashes.
-
Press the OK button.
-
Press the Up or Down buttons until °C/°F flashes in the menu area.
The unit currently selected will appear in the upper part of the display. -
Press the OK button.
-
Press the Up or Down buttons until the required unit °C/°F flashes.
-
Press the OK button.
-
Follow the Exit Menu procedure to exit the menu.
Please note : Temperatures are displayed in Celsius with a resolution of
0.5 degree and in Fahrenheit with a resolution of 1 degree.
Factory setting: Celsius
Setting Time
I want to change the time.
To do so, you must:
- With Active Display (backlight on) press OK to activate the menu.
- Press the Up or Down buttons until the SETTINGS option flashes.
- Press the OK button.
- Press the Up or Down buttons until the TIME option flashes.
- Press the OK button.
- Press the Up or Down buttons to select either 12 or 24 hour clock.
- Press the OK button. The hour will begin flashing in the lower part of the display.
- Press the Up or Down buttons to set the hour.
- Press the OK button. Now the minutes will flash.
- Press the Up or Down buttons to set the minutes.
- Press the OK button.
- Follow the Exit Menu procedure to exit the menu.
Factory setting: 24 hour clock
Setting Day
I want to change the day of the week.
To do so, you must:
-
With Active Display (backlight on) press OK to activate the menu.
-
Press the Up or Down buttons until the SETTINGS option flashes.
-
Press the OK button.
-
Press the Up or Down buttons until the DAY option flashes.
The currently selected day of the week will appear in the lower part of the display. -
Press the OK button.
-
Press the Up or Down buttons until the required day of the week flashes.
-
Press the OK button.
-
Follow the Exit Menu procedure to exit the menu.
Please note: Usually, the electrician who installed the thermostat will
have set the correct time and day of the week.
Factory setting: MON Read Out
I want to know the amount of time (in percent) that the heating has been
turned on within a certain period.
To do so, you must:
- With Active Display (backlight on) press OK to activate the menu.
- Press the Up or Down buttons until the SETTINGS option flashes.
- Press the OK button.
- Press the Up or Down buttons until the READOUT option flashes.
- Press the OK button.
- Press the Up or Down buttons to the select the period of interest:
2 DAYS, 30 DAYS or 365 DAYS. The percentage of time that the heating has been turned on will then be indicated in the upper part of the display.
The Readout submenu also contains information about the Software version and
the type of control (Room, Floor, Regulator or Room limit) selected for the
Application. (See Application for more information).
Offset Temperature
I want to adjust the difference in temperature between the thermostat and my room thermometer. To do so, you must:
- With Active Display (backlight on) press OK to activate the menu.
- Press the Up or Down buttons until the SETTINGS option flashes.
- Press the OK button.
- Press the Up or Down buttons until the OFFSET TEMP option flashes.
- Press the OK button.
- Press the Up or Down buttons to set the offset temperature (in steps of 0.1°).
- Press the OK button.
- Follow the Exit Menu procedure to exit the menu.
Offset is used to compensate for any difference between the thermostat and the
actual room temperature. It is possible to adjust the offset by up to +/- 10
°C or +/- 18 °F.
If, for example, the thermostat shows 1° too much, the offset should be set to
1°. The temperature will then be set 1° lower. Application
I want to select the type of temperature control.
To do so, you must:
-
With Active Display (backlight on) press OK to activate the menu.
-
Press the Up or Down buttons until the SETTINGS option flashes.
-
Press the OK button.
-
Press the Up or Down buttons until the APPLICATION option flashes.
-
Press the OK button.
-
Press the Up or Down buttons to select one of the four types of control:
ROOM: The built-in room sensor is used. Only room temperature is controlled.
FLOOR: A floor sensor is used. Only floor temperature is controlled.
REGULATOR: The thermostat functions as a simple regulator and no sensors are used.
ROOM LIMIT: The thermostat controls room temperature while using the external temperature sensor as a limit sensor. If you choose this option, you must set a maximum and minimum temperature for the limit sensor, so that the thermostat will switch the heating off or on if the temperature on the floor reaches the maximum or minimum temperature respectively. This can, for instance, be used to avoid excessively high temperatures on wooden flooring (maximum limit) or excessively cold temperatures on tiled/stone flooring (minimum limit). -
Press the OK button.
-
If FLOOR or ROOM LIMIT is chosen, maximum and minimum floor temperatures can now be set. Press the Up or Down buttons to set the High temperature. Press OK and set the Low temperature. Press the OK button.
-
Follow the Exit Menu procedure to exit the menu.
Please note: Usually, the electrician who installed the thermostat will
have selected the correct type of temperature control for your
application.
Display
I want to choose the information to be shown on the thermostat display.
To do so, you must:
-
With Active Display (backlight on) press OK to activate the menu.
-
Press the Up or Down buttons until the SETTINGS option flashes.
-
Press the OK button.
-
Press the Up or Down buttons until the DISPLAY option flashes.
-
Press the OK button.
-
Press the Up or Down buttons to select whether or you wish to:
– display the Clock or not (On/Off),
– display the Set temperature or not (On/Off).
– You can also decide whether the temperature displayed is the Room temperature, the Floor temperature (if a floor sensor is used) or the Regulator temperature. -
Press the OK button to confirm the settings as you work your way through the various options in the DISPLAY submenu.
-
Follow the Exit Menu procedure to exit the menu.
Factory settings:
TIME: ON; SET TEMP.: ON; TEMP.: FLOOR
Factory Reset
I want to return to the factory settings.
To do so, you must:
- With Active Display (backlight on) press OK to activate the menu.
- Press the Up or Down buttons until the SETTINGS option flashes.
- Press the OK button.
- Press the Up or Down buttons until the FACTORY RESET option flashes.
- Press the OK button. A submenu will appears.
- Press the Up or Down buttons until the RESET option flashes.
- Press the OK button.
- Follow the Exit Menu procedure to exit the menu.
 Error Messages
E0 = Internal failure. Replace thermostat.
E1 = Internal sensor defective or short-circuited. Replace thermostat.
E2 = External sensor defective or short-circuited. Check external sensor.
Factory Settings for Automatic 5:2 Program
Days 1-5 (Monday – Friday)
Event| Time| Temperature
Morning| 6:00 a.m. – 8:00 a.m.| 77 °F / 25 °C
Out| 8:00 a.m. – 4:00 p.m.| 68 °F / 20 °C
Home| 4:00 p.m. – 10:00 p.m.| 77 °F / 25 °C
Night| 10:00 p.m. – 6:00 a.m.| 68 °F / 20 °C
Days 6-7 (Saturday – Sunday)
Event| Time| Temperature
Day| 8:00 a.m. – 11:00 p.m.| 77 °F / 25 °C
Night| 11:00 p.m. – 08:00 a.m.| 68 °F / 20 °C
Drexma Industries inc.
119A Sir-Wilfrid-Laurier
St-Basile-le-Grand Quebec, CANADA J3N 1A1
Tel.: 450 482-1919 • 1 866 994-4664
info@drexma.ca
www.drexma.com
References
Read User Manual Online (PDF format)
Read User Manual Online (PDF format) >>