Pleasant Heartha FA217S Titan Fireplace Screen Instruction Manual
- June 4, 2024
- Pleasant Heartha
Table of Contents
![]()
Pleasant Heartha FA217S Titan Fireplace Screen
Questions, problems, missing parts?
Before returning to your retailer, call our customer service department at
1-877-447-4768, 8:00 a.m. – 4:30 p.m.,
CST, Monday – Friday, or email us at
customerservice@ghpgroupinc.com.
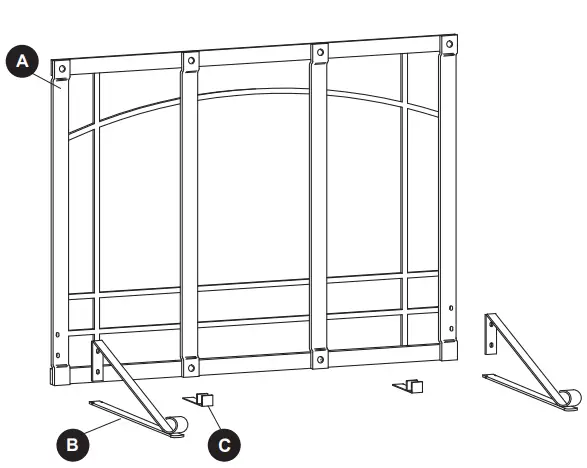
PACKAGE CONTENTS
PART DESCRIPTION QUANTITY
A| Screen| 1
B| Front Foot| 2
C| Back Foot| 2
HARDWARE CONTENTS
SAFETY INFORMATION
Please read and understand this entire manual before attempting to assemble, operate or install the product. If you have any questions regarding the product, please call customer service at 1-877-447-4768, 8:00 a.m. – 4:30 p.m., CST, Monday – Friday.
WARNING
- Do not allow children to play with or around the screen.
- Do not attempt to clean the screen while it is hot.
- When the screen is in use, do not touch with bare hands as hot particles may stick to the surface of the screen.
- Make sure the screen is large enough to completely cover the fireplace opening.
- Use heat-resistant fireplace gloves when moving or adjusting the screen.
PREPARATION
Before beginning assembly of product, make sure all parts are present. Compare
parts with package contents list and hardware contents above. If any part is
missing or damaged, do not attempt to assemble the product. Contact customer
service for replacement parts.
Estimated Assembly Time: 15 minutes
Tools Required for Assembly: Allen Wrench (included)
ASSEMBLY INSTRUCTIONS
-
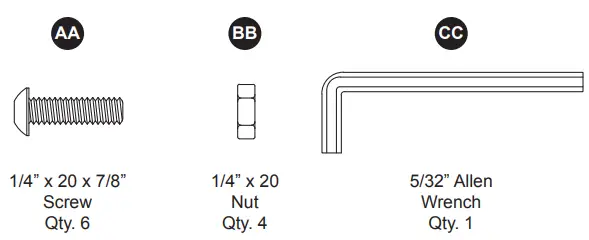
Attach the two feet (B) to the front of the screen (A) by inserting four 1/4” x 20 x 7/8” Screw bolts (AA) through the pre-drilled holes in the feet (B) and through the screen frame (A). Secure with four 1/4” x 20 nuts (BB). Use the allen wrench (DD) to hold the screw (AA) in place while tightening the nut (BB) by hand. Repeat for all 4 screws (AA)/nuts (BB).
Hardware Used- A. 1/4” x 20 x 7/8” Screw
- B. 1/4” x 20 Nut
- C. Allen Wrench
-
Attach the back feet (C) to the back side of the screen (A) by inserting one #8 x 32 x 3/4” (CC) into the hole in each foot (C) as illustrated in figure 2. Adjust feet (C) to desired width. Tighten against the screen (A) using the allen wrench (DD).
NOTE: The back feet are designed to adjust to the inside width of your fireplace opening so that, if desired, the screen can be placed flush against the fireplace.
Hardware Used- C. #8 x 32 x 3/4” Screw
- D. Allen Wrench
CARE AND MAINTENANCE
- Do not attempt to clean the screen while it is hot.
- Use a soft cloth to wipe the screen.
- Store in a cool, clean, dry place.
1-YEAR LIMITED FRAME WARRANTY
If with in one year from the date of original purchase, this item fails due to a defect in material or workmanship, we will replace or repair at our option, free of charge. To order parts or to obtain warranty service, call 1-877-447-4768, Monday – Friday, 8:00 a.m. – 4:30 p.m. CST. This warranty does not cover defects resulting from improper or abnormal use, misuse, accident, or alteration. Failure to follow all instructions in the owner’s manual will also void this warranty. The manufacturer will not be liable for incidental or consequential damages, or common erosion of out-door products. Some states do not allow the exclusion or limitation of incidental or consequential damages, so the above limitation may not apply to you. This warranty gives you specific legal rights, and you may also have other rights which vary from state to state.
REPLACEMENT PARTS LIST
For replacement parts, call our customer service department at 1-877-447-4768, 8:00 a.m.-4:30 p.m., CST, Monday – Friday.
PART DESCRIPTION PART #
A| Screen| 40-01-005
B| Front Foot| 40-01-002
C| Back Foot| 40-01-003
AA-DD| Hardware Pack| 40-09-002
N/A| Instruction Manual| 40-10-510
ABOUT COMPANY
- GHP Group Inc. 6440 W. Howard St. Niles, IL 60714-3302
- 877-447-4768
Read User Manual Online (PDF format)
Read User Manual Online (PDF format) >>